


We're done with the clothes for now. Let's try something more ambitious!
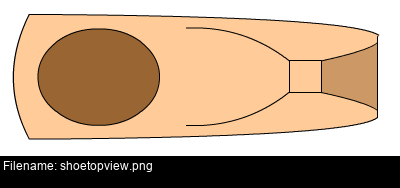
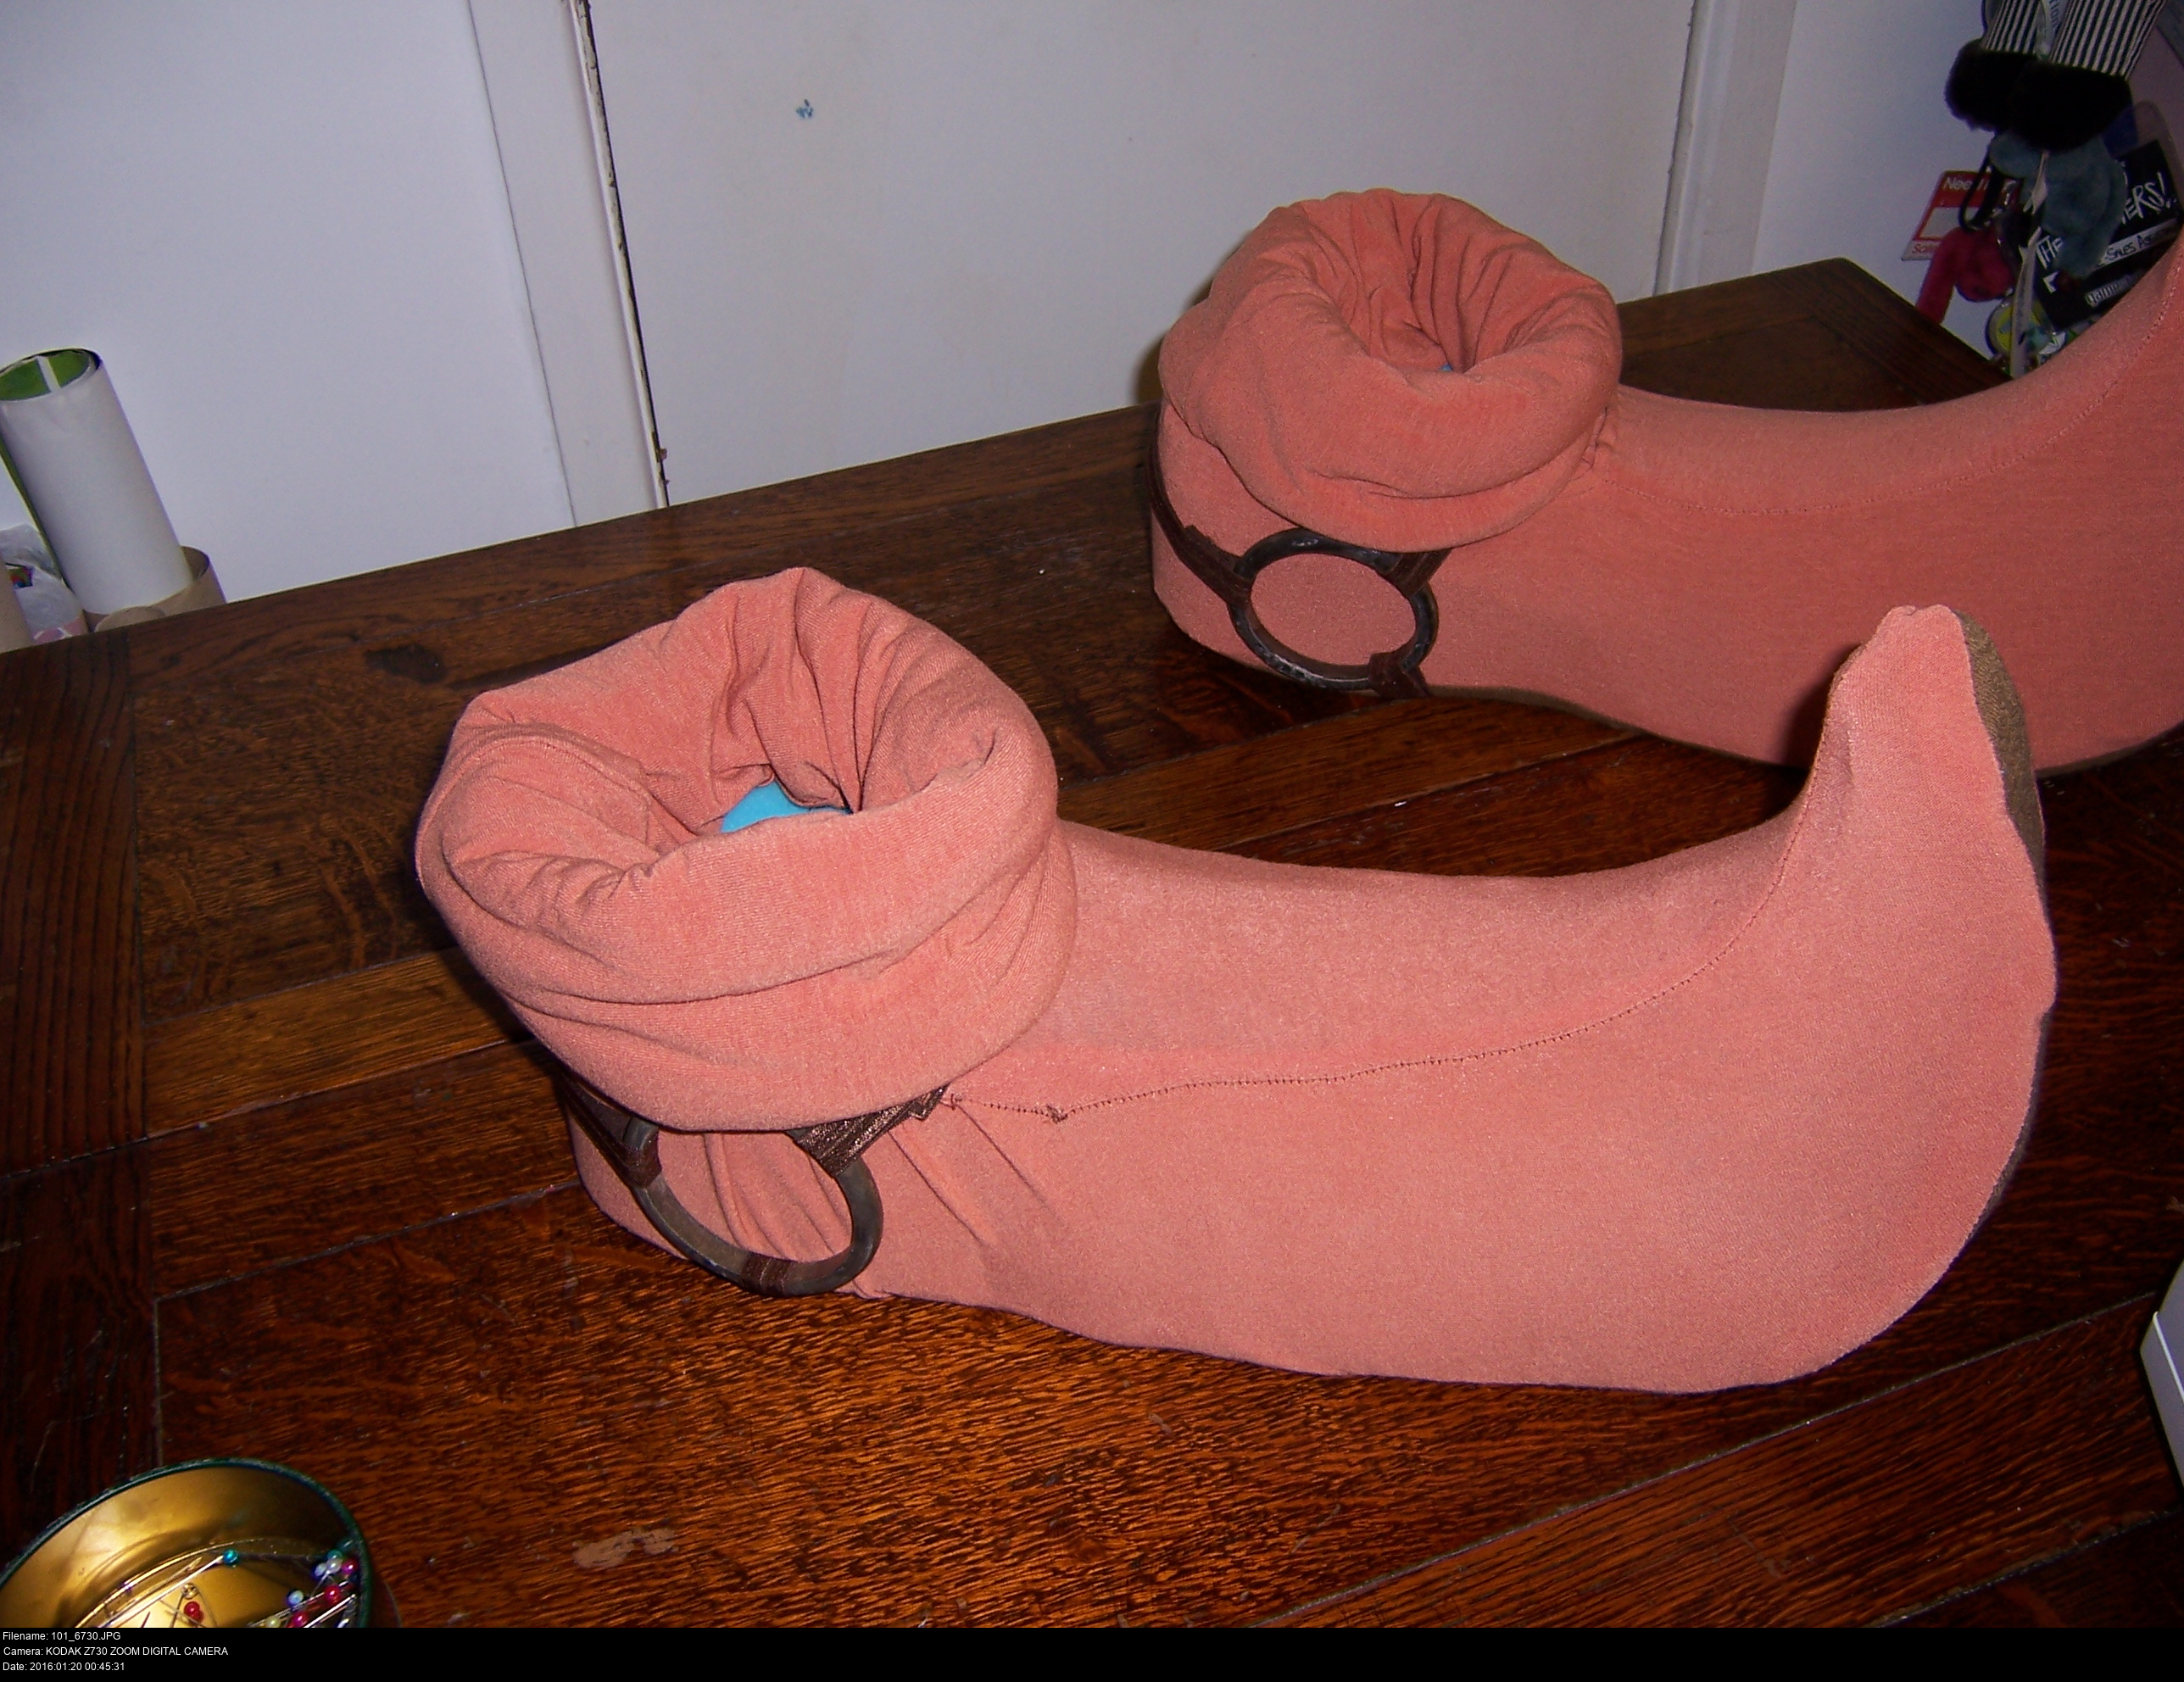
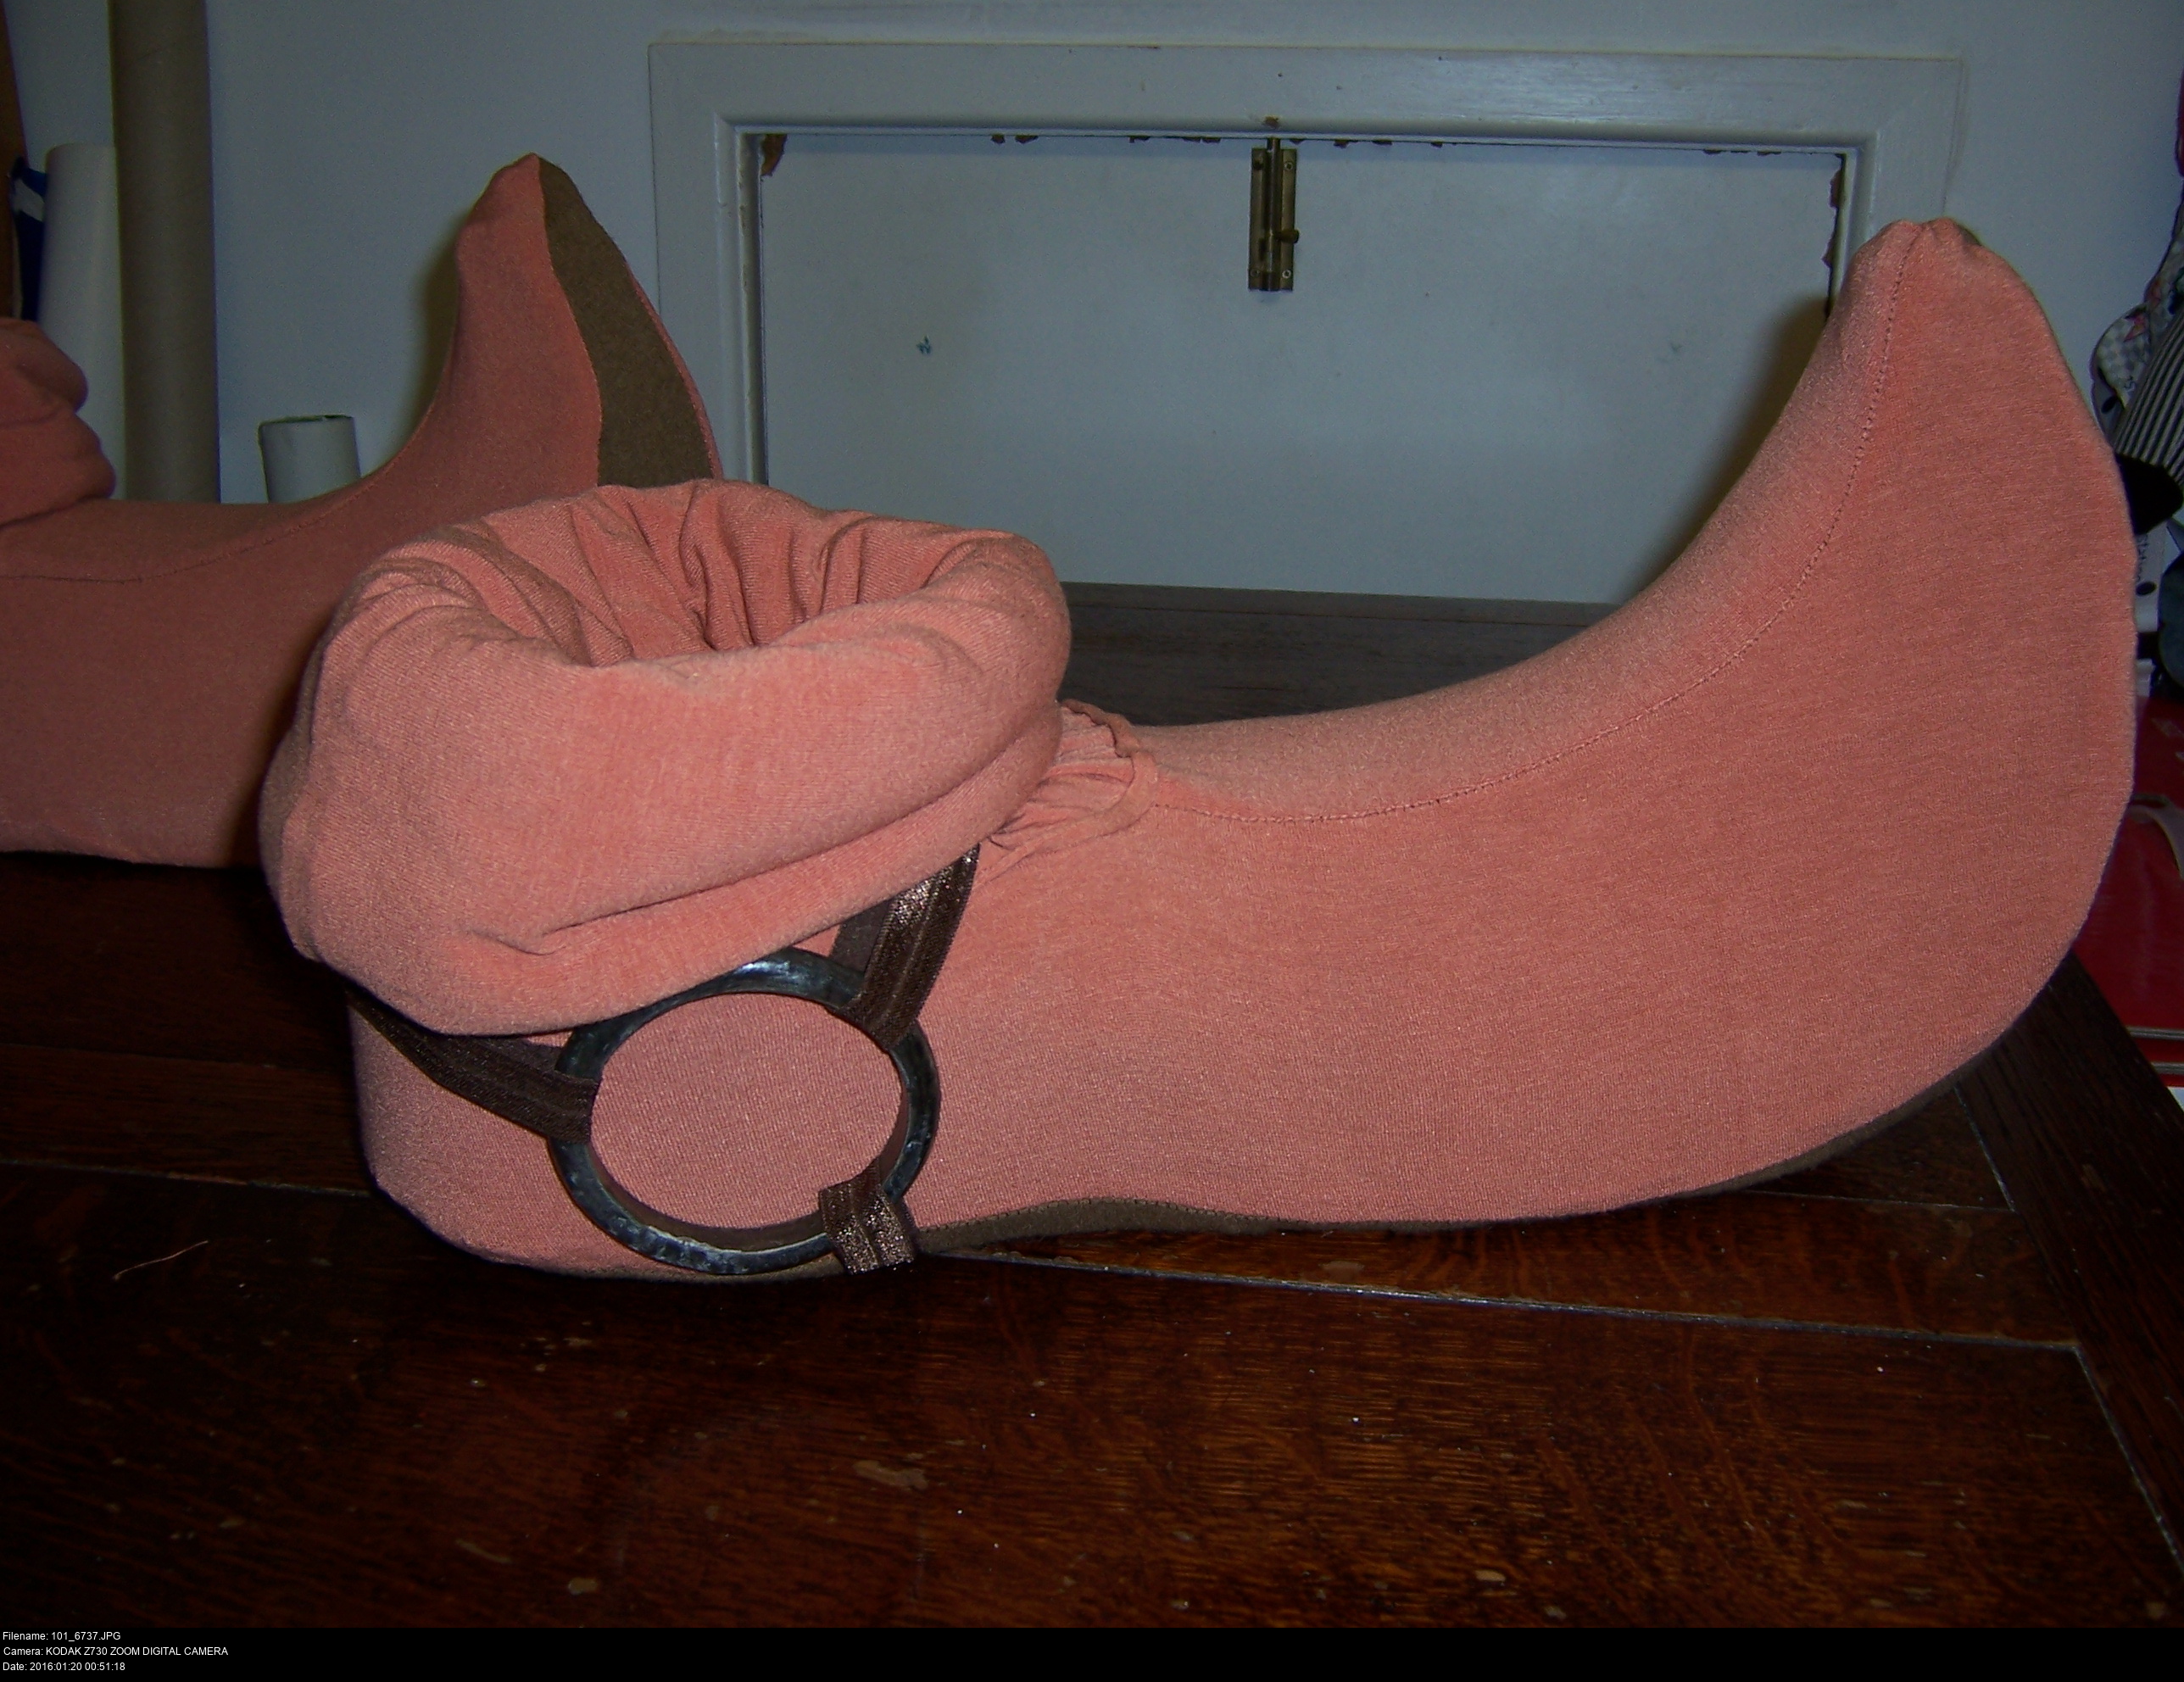
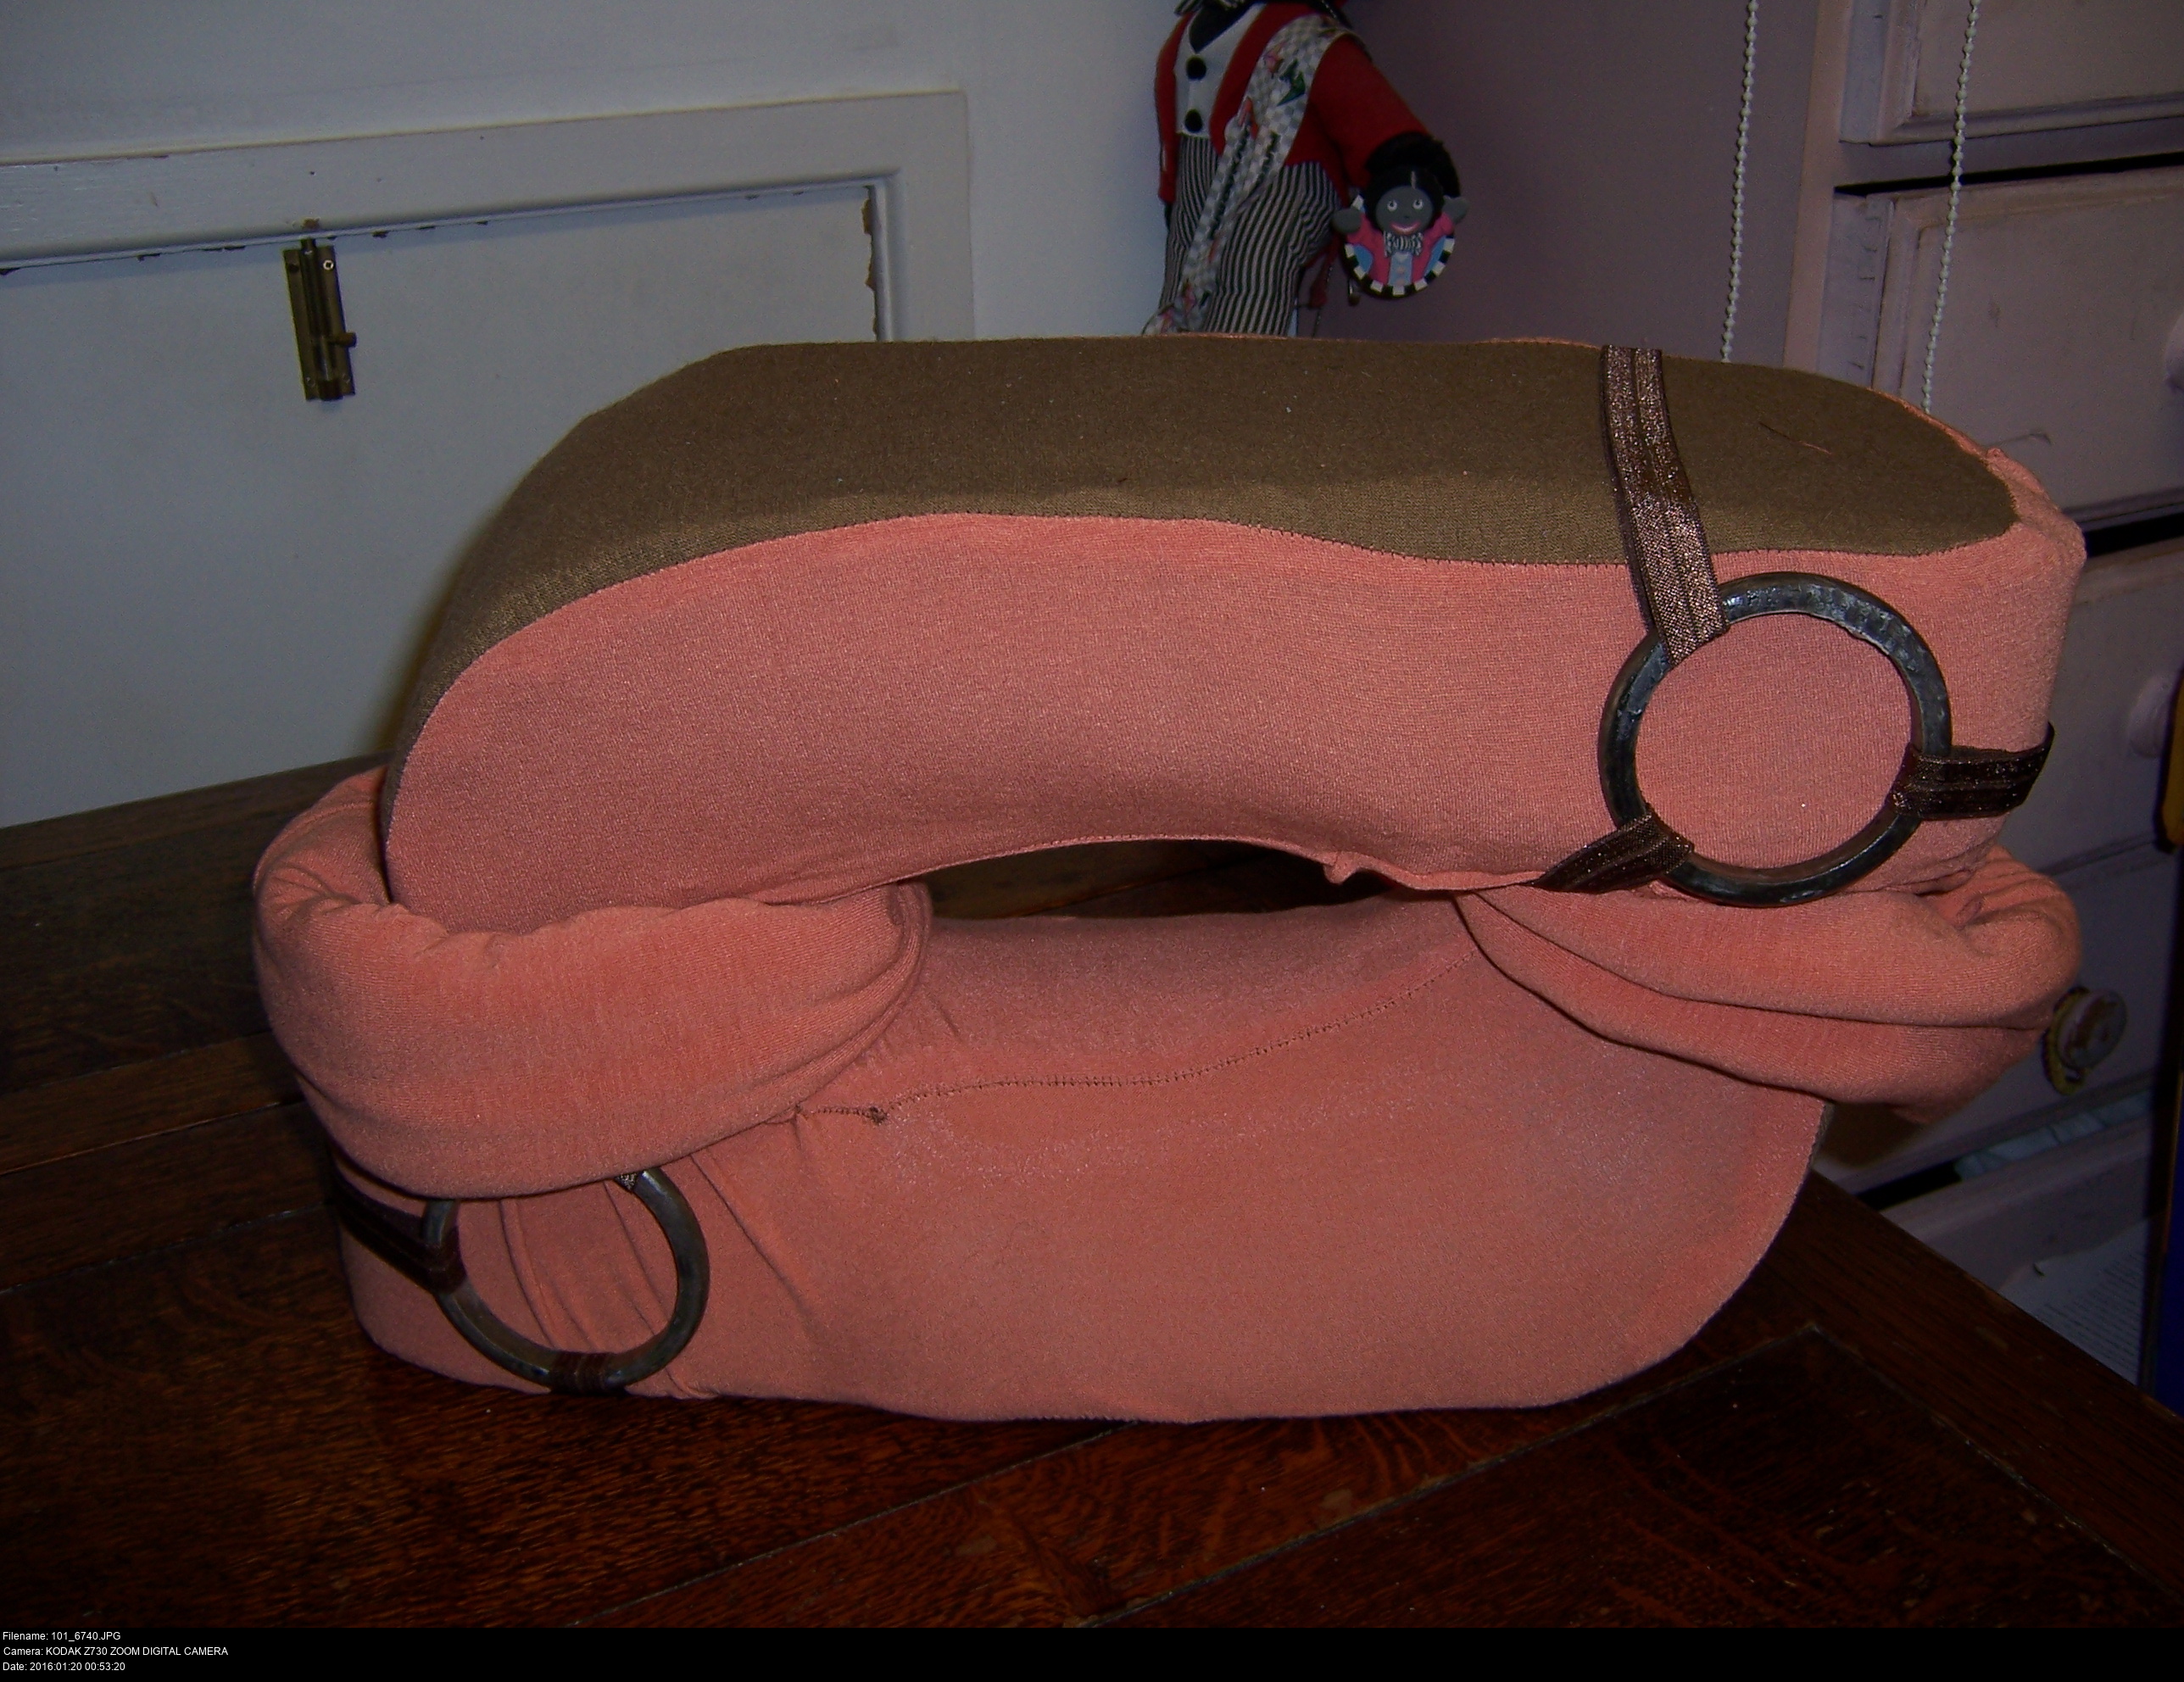
Skulld Kid's shoes are more like boots. They're the same flat colour as his tunic and his hat: orange, brown or terracotta. They're a little worn, but not ragged. They've got wide soles and long, pointed tips.
There's no visible laces or seams anywhere on the shoe other than possibly connecting the sole to the upper. On either side of the shoe, above the ankle, there's a ring similar to those on Skull Kid's hat and belt. The rings are visible fastened to the shoe and one another by three bands: one running around the front of the calf, one running around the back of the shoe, and one running underneath the arch of the foot tugging the sole of the shoe up a little. The upper bands tug the entrance to the boot slightly tight, and the boots have a large, chunky, solid cuffs spreading out a few inches conically upwards from the bands.
In the images I found, the sole looked noticeably darker than the rest of the foot. I don't know if that's supposed to be the case: it's almost certainly due to the way it was lit in the illustration. It could also have been just general wear/muck from being the sole of the shoe.
In his later appearance in Smash Bros for Wii U, his shoes have changed a little:

Before doing Skull Kid, the only cosplay item I'd made had been a pair of Naruto-style ninja shoes for my Shikamaru cosplay. And they were... alright! They weren't great. I had no luck with hot-glue and ended up using huge upholstery tacks to hold them together in the end.
What you might not know is that the pair of Skull Kid shoes I'm wearing in all my convention pictures aren't my first try.
Either way, the crux is to do as little work as possible. Specifically: you're not going to make boots from scratch. It's time consuming, costly and error prone! You can sit around trying to construct a sole that won't implode if you like, but I'm a 6'1" guy who goes through walking shoes like they were made of paper. I need a reasonably hard-wearing shoe base, anything I make myself will explode on contact with my foot like it was antimatter.
For my first attempt, I had no instructions to work off. I decided to try to come up with my own pattern for them.
If you look up 'make elf boots' on Google, you get a whole collection of monstrosities.

A lot of these instructions are for decorations I assume, since they're just a simple pair of pillow-sewn shapes with no sole whatsoever. Most of them construct the boot from two identical halves which are then sewn together and inverted. That'll get you a boot-like sack for sure, but then you're walking on the seam... I don't get how that would ever work. And it's completely unsuitable for Skull Kid. A couple of them let you attach the elf covering to a regular shoe, but that would look pretty bad.
What I really want is a pattern that has a left side, a right side, a large pointed sole, and a cuff. Let's try to draw one from scratch!


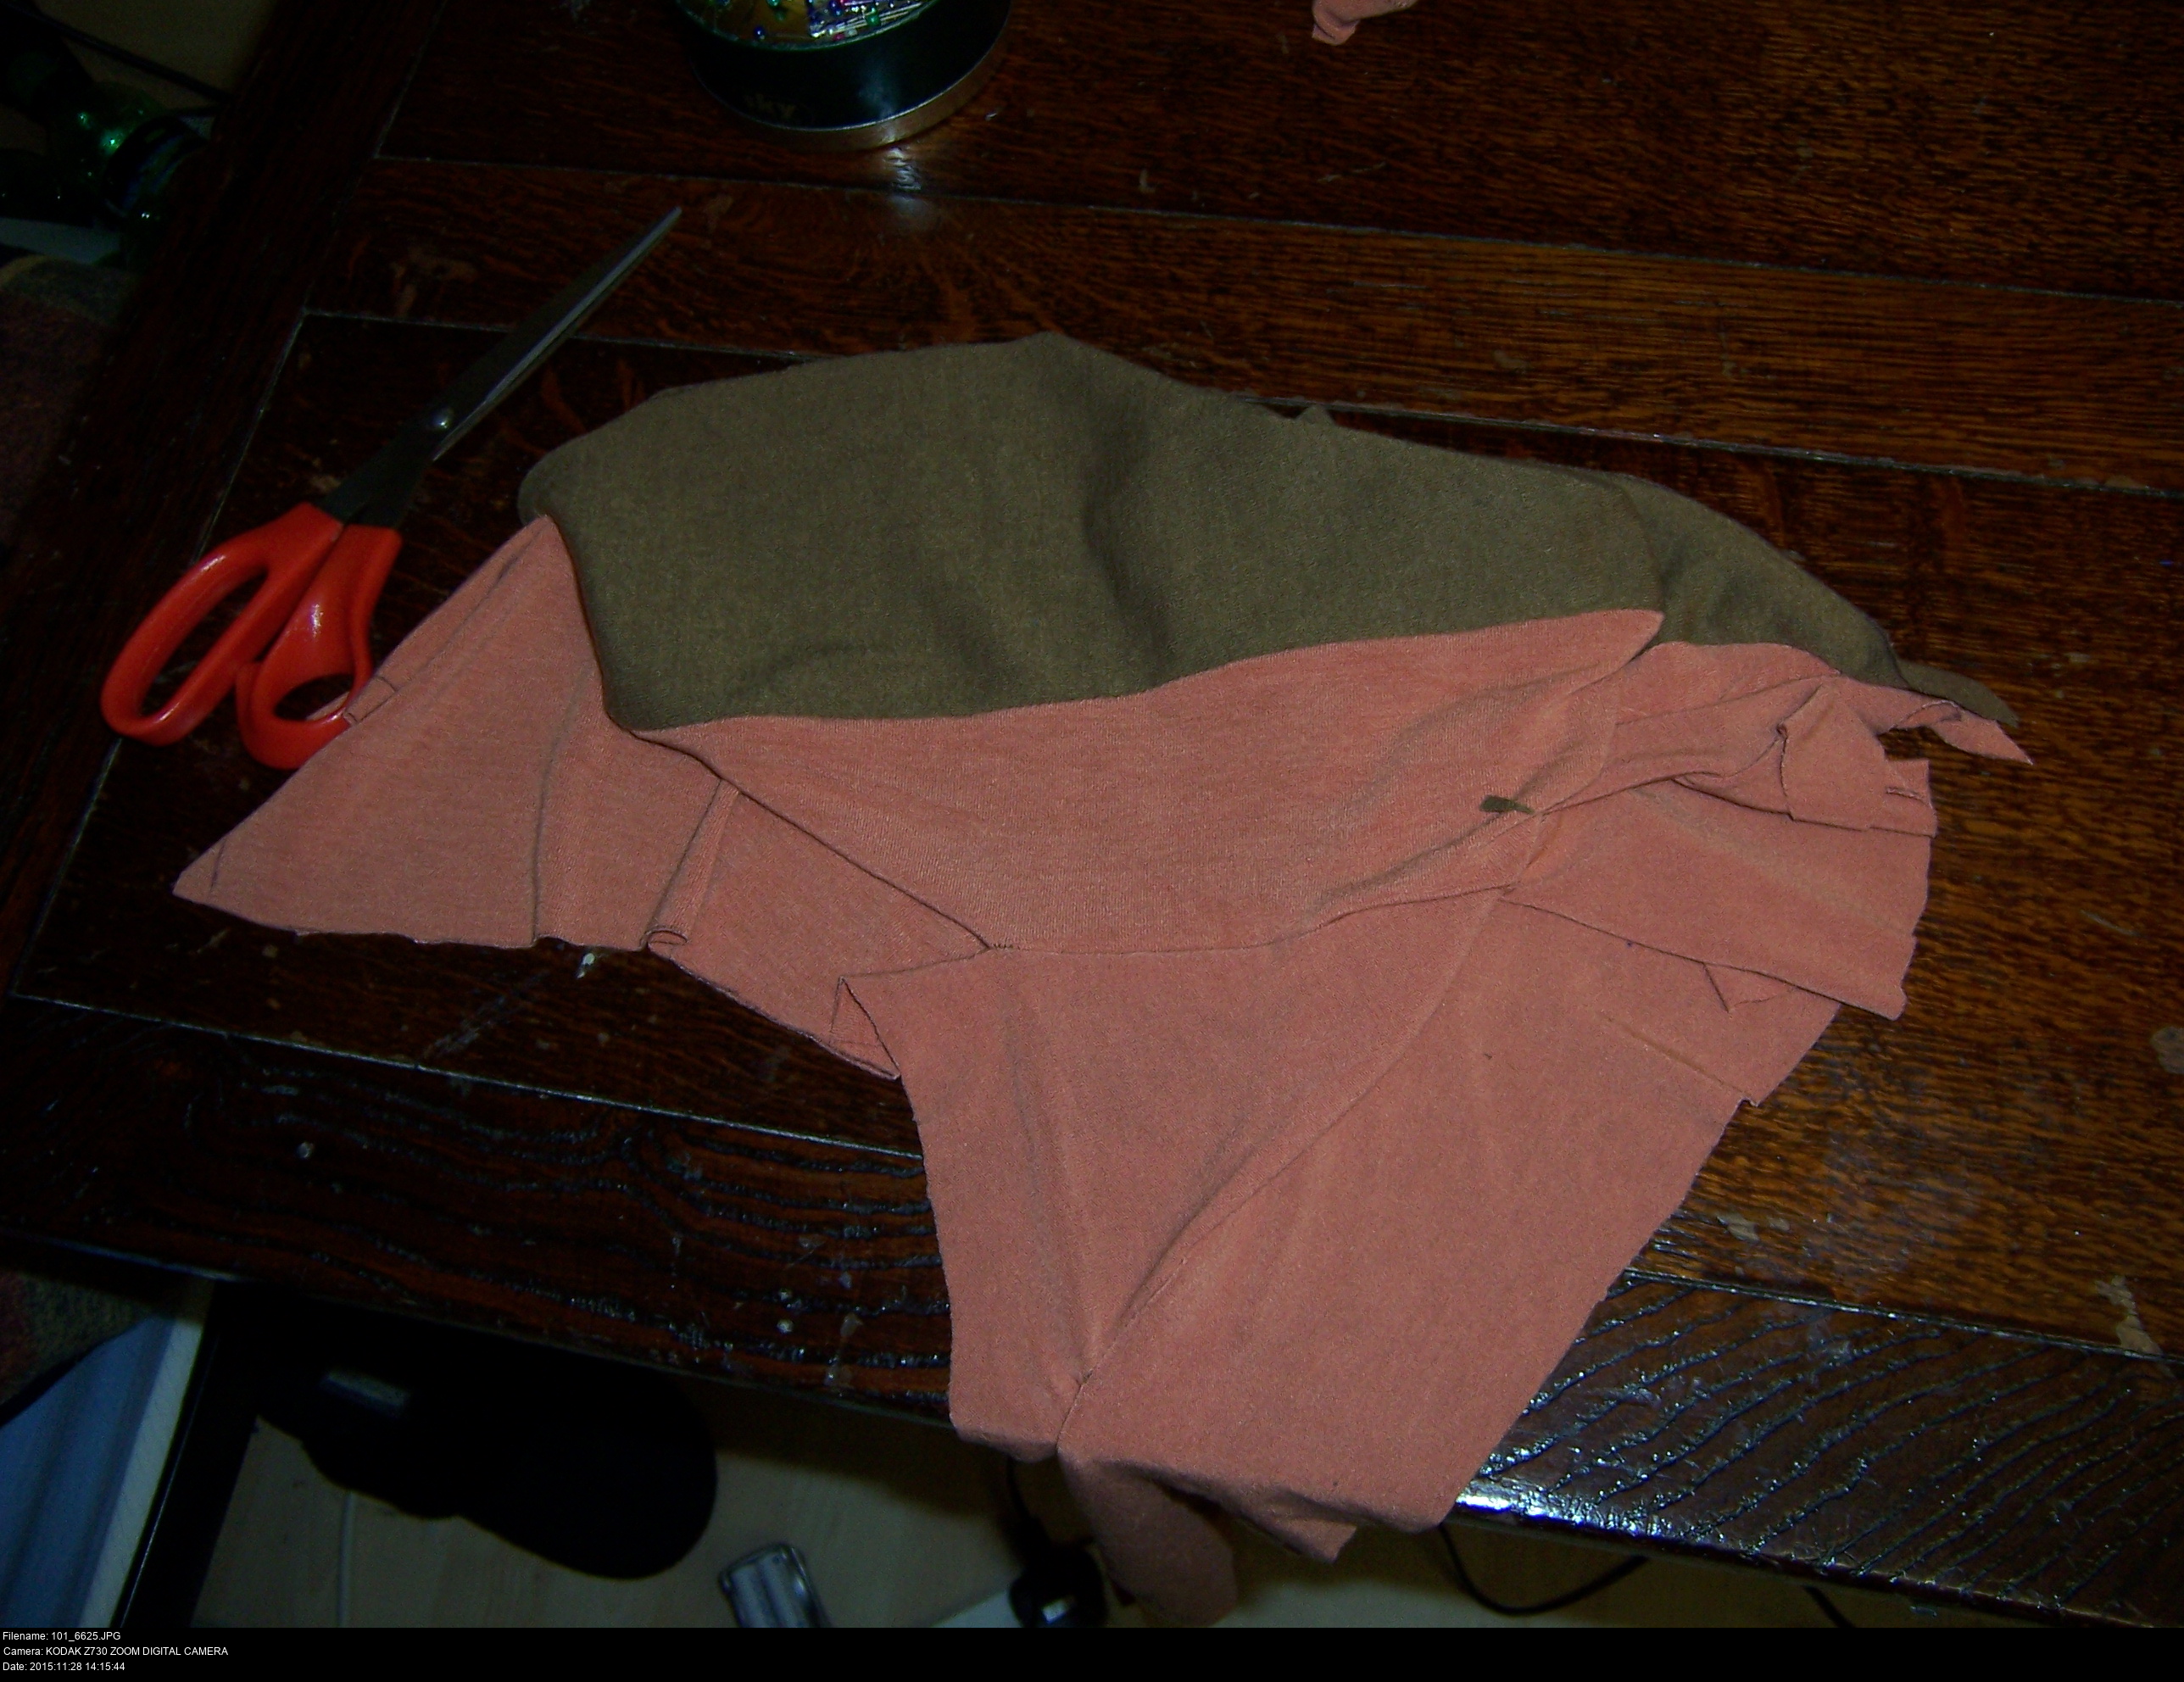
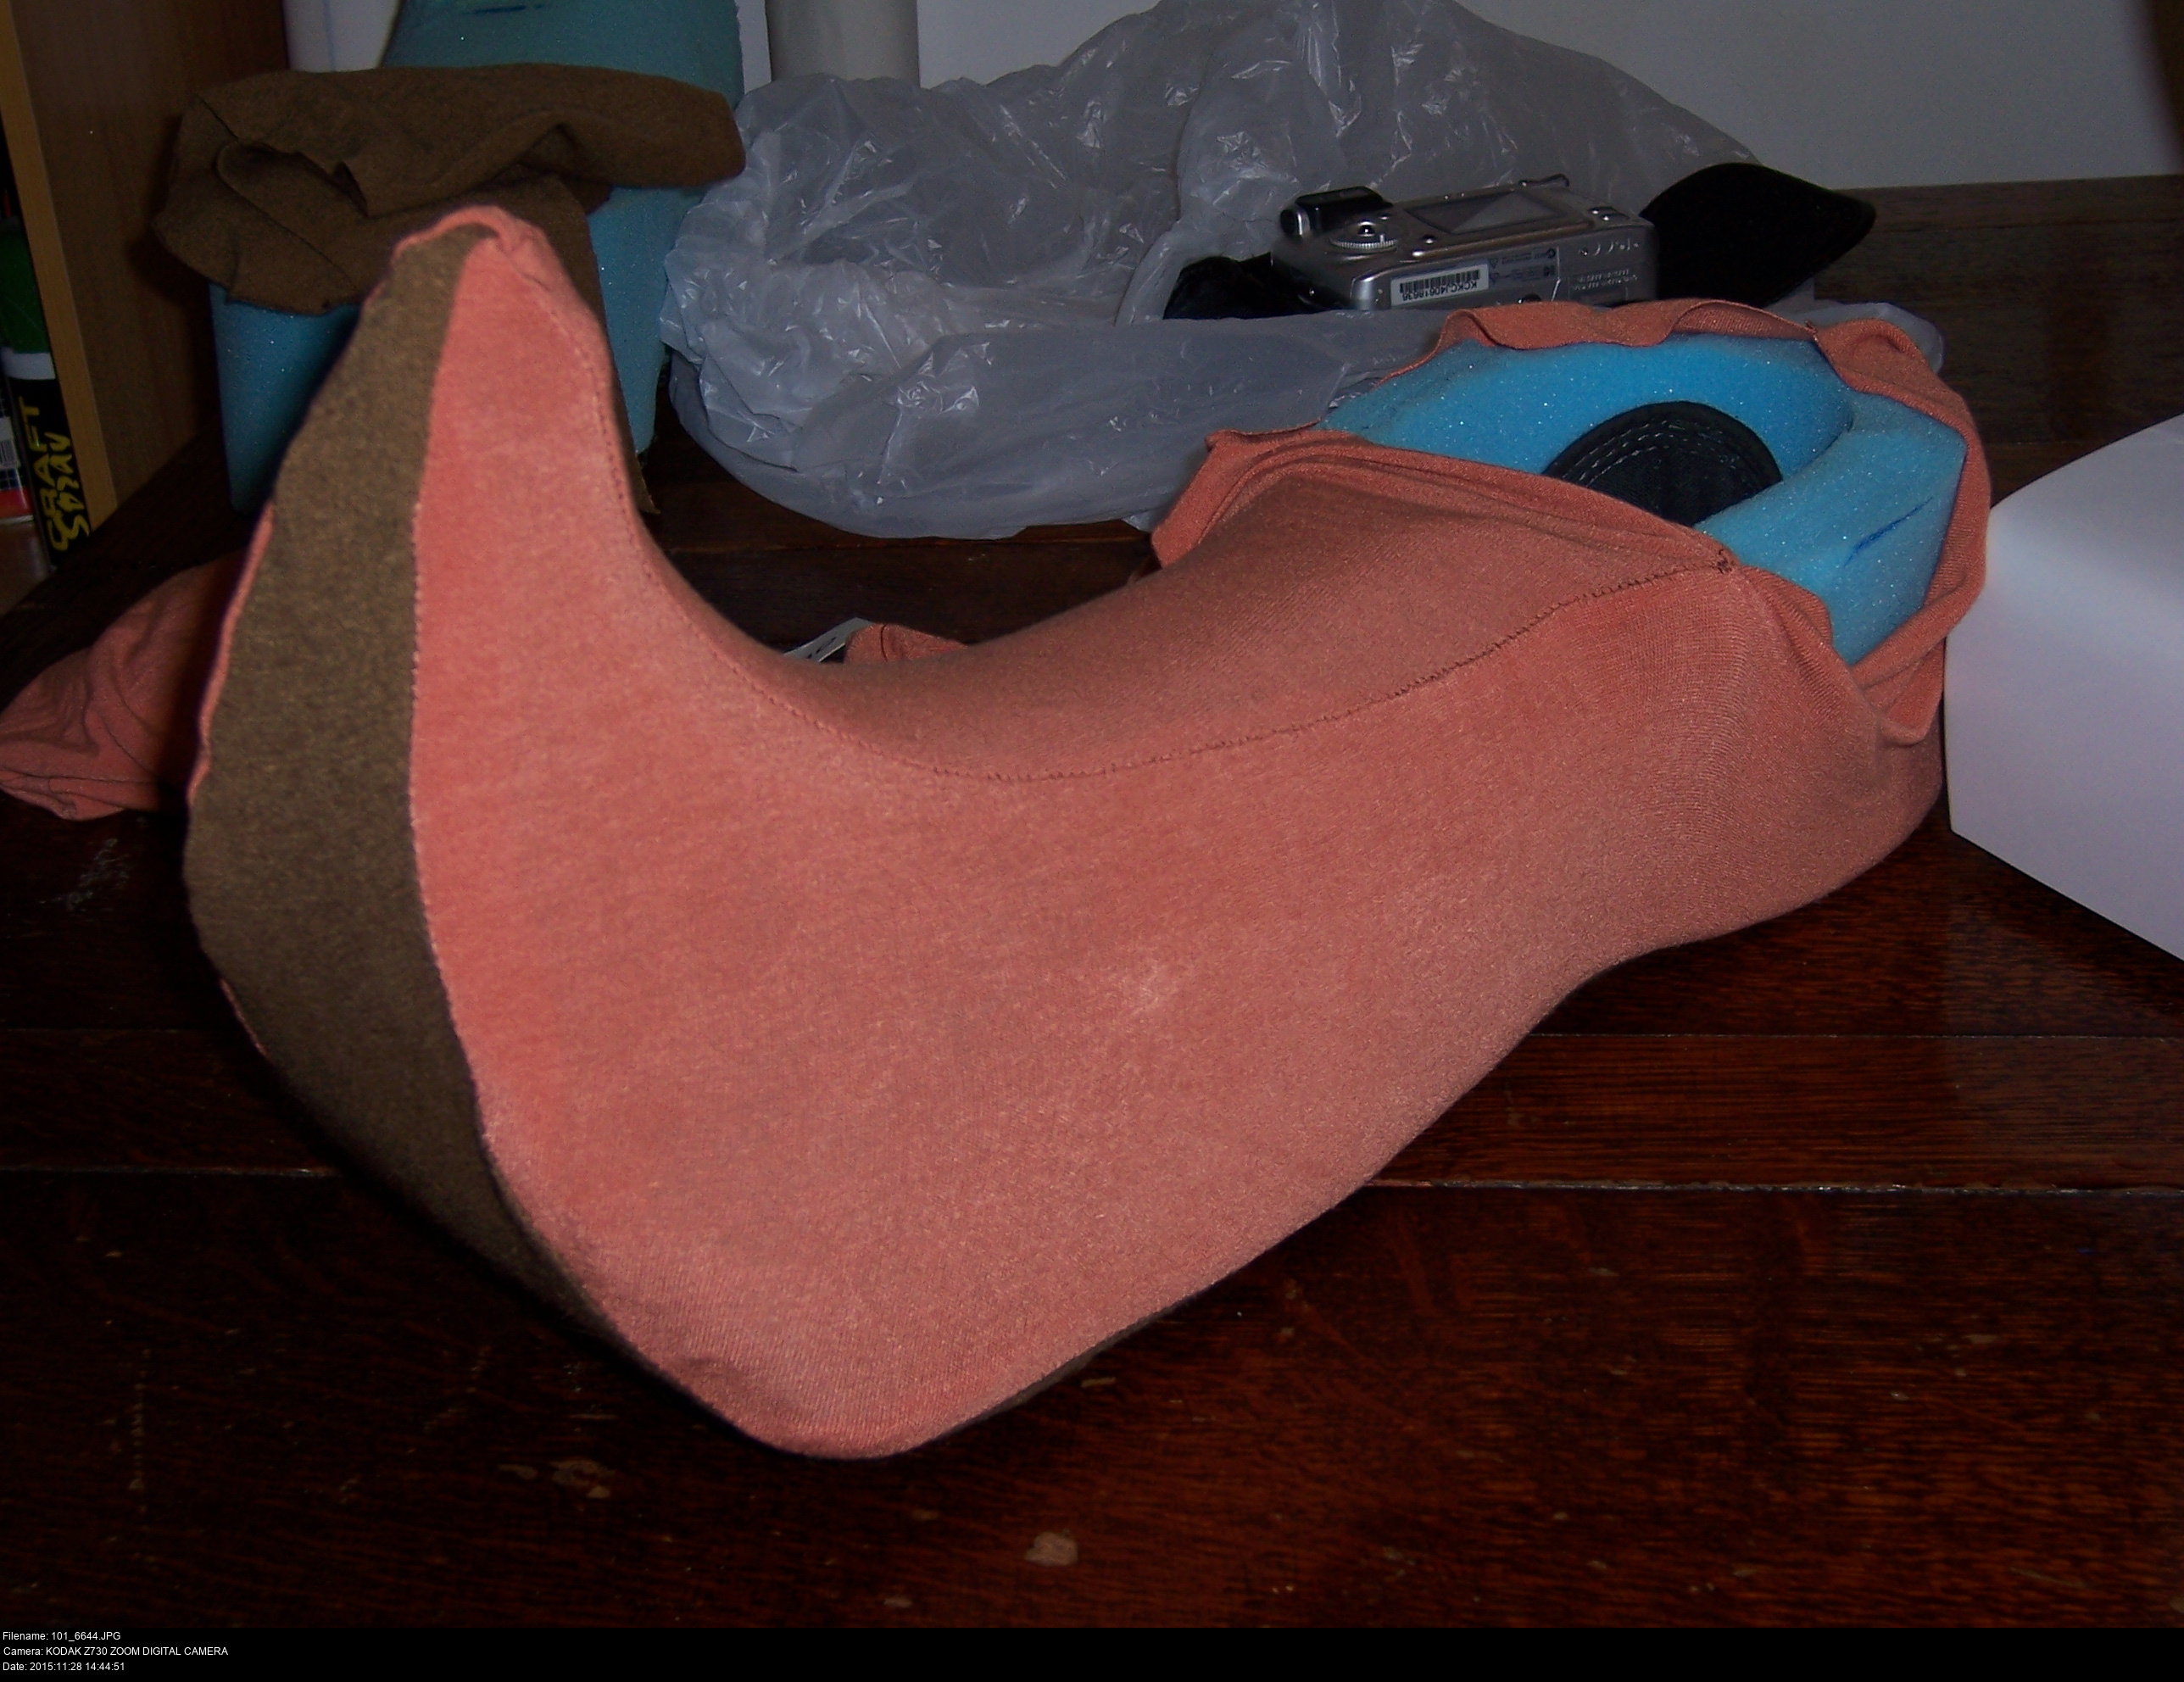
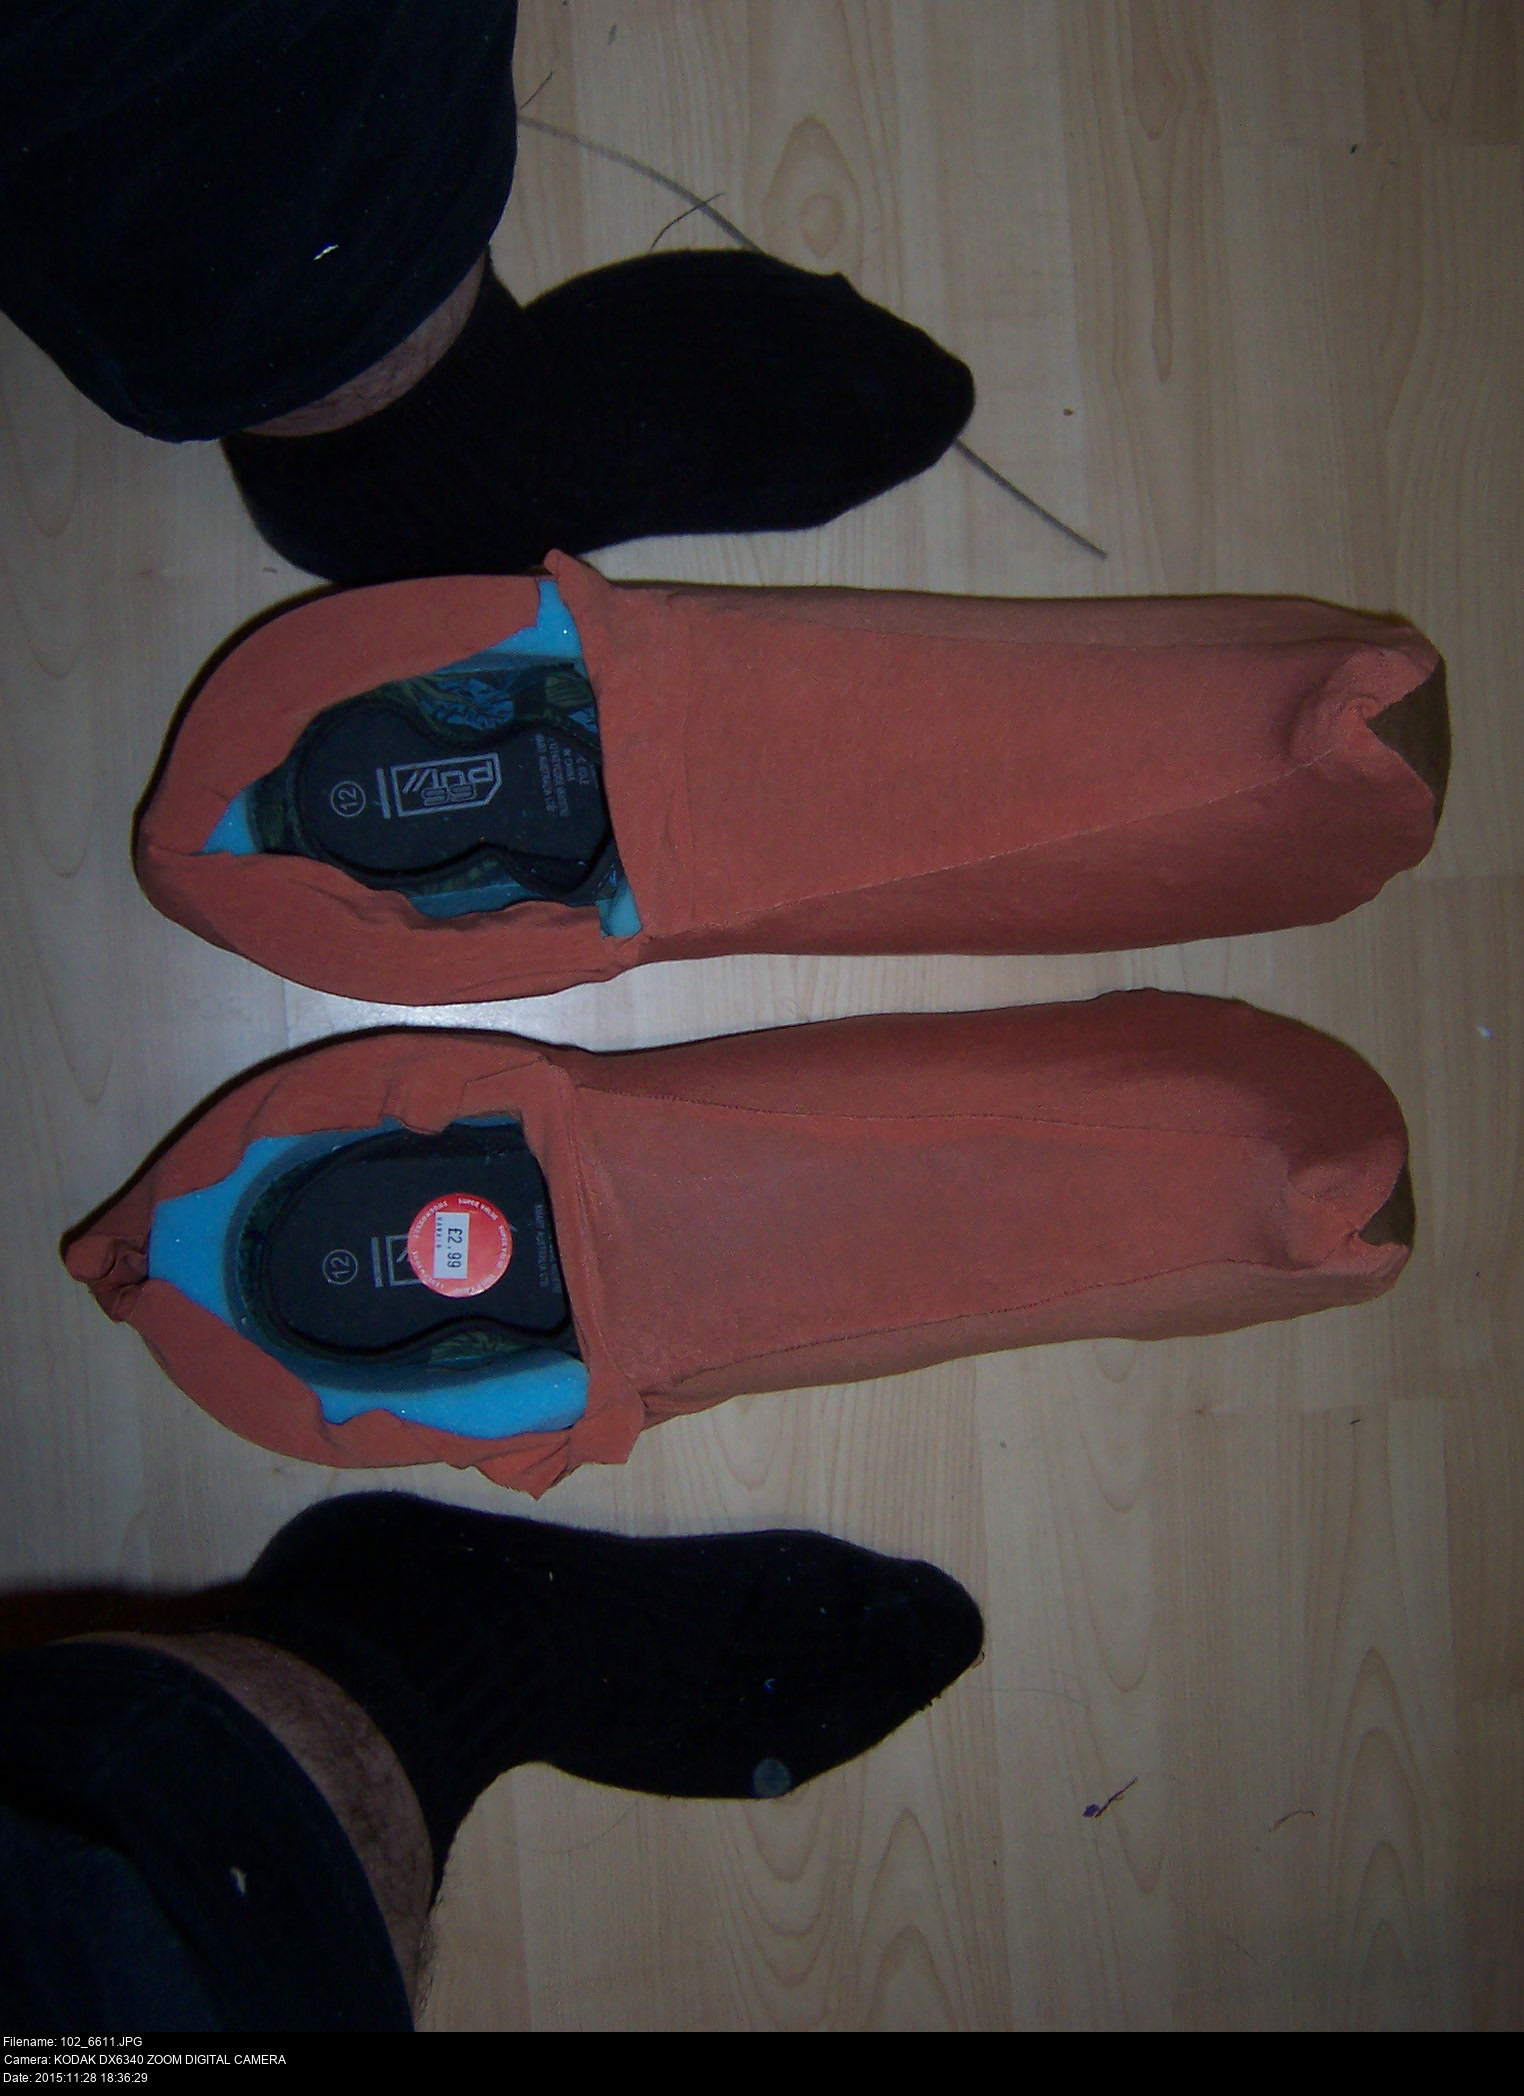
The idea is that I wear a pair of lightweight black pumps and put the boots on over them. The point of the boot is filled with padding to keep its shape and keep the boot tight while I wear it. It works a little bit like this: You hold up your shoe against the paper and draw around it. Maybe. And then measure around your foot in different places and spread those lengths out onto the pattern. Make a test one out of cheap, loose fabric and pin it around your foot painfully. When you've wasted enough time doing that, transfer your pattern to the pleather, making sure to arbitrarily add an inch or two make sure that the unforgiving material allows your foot inside.
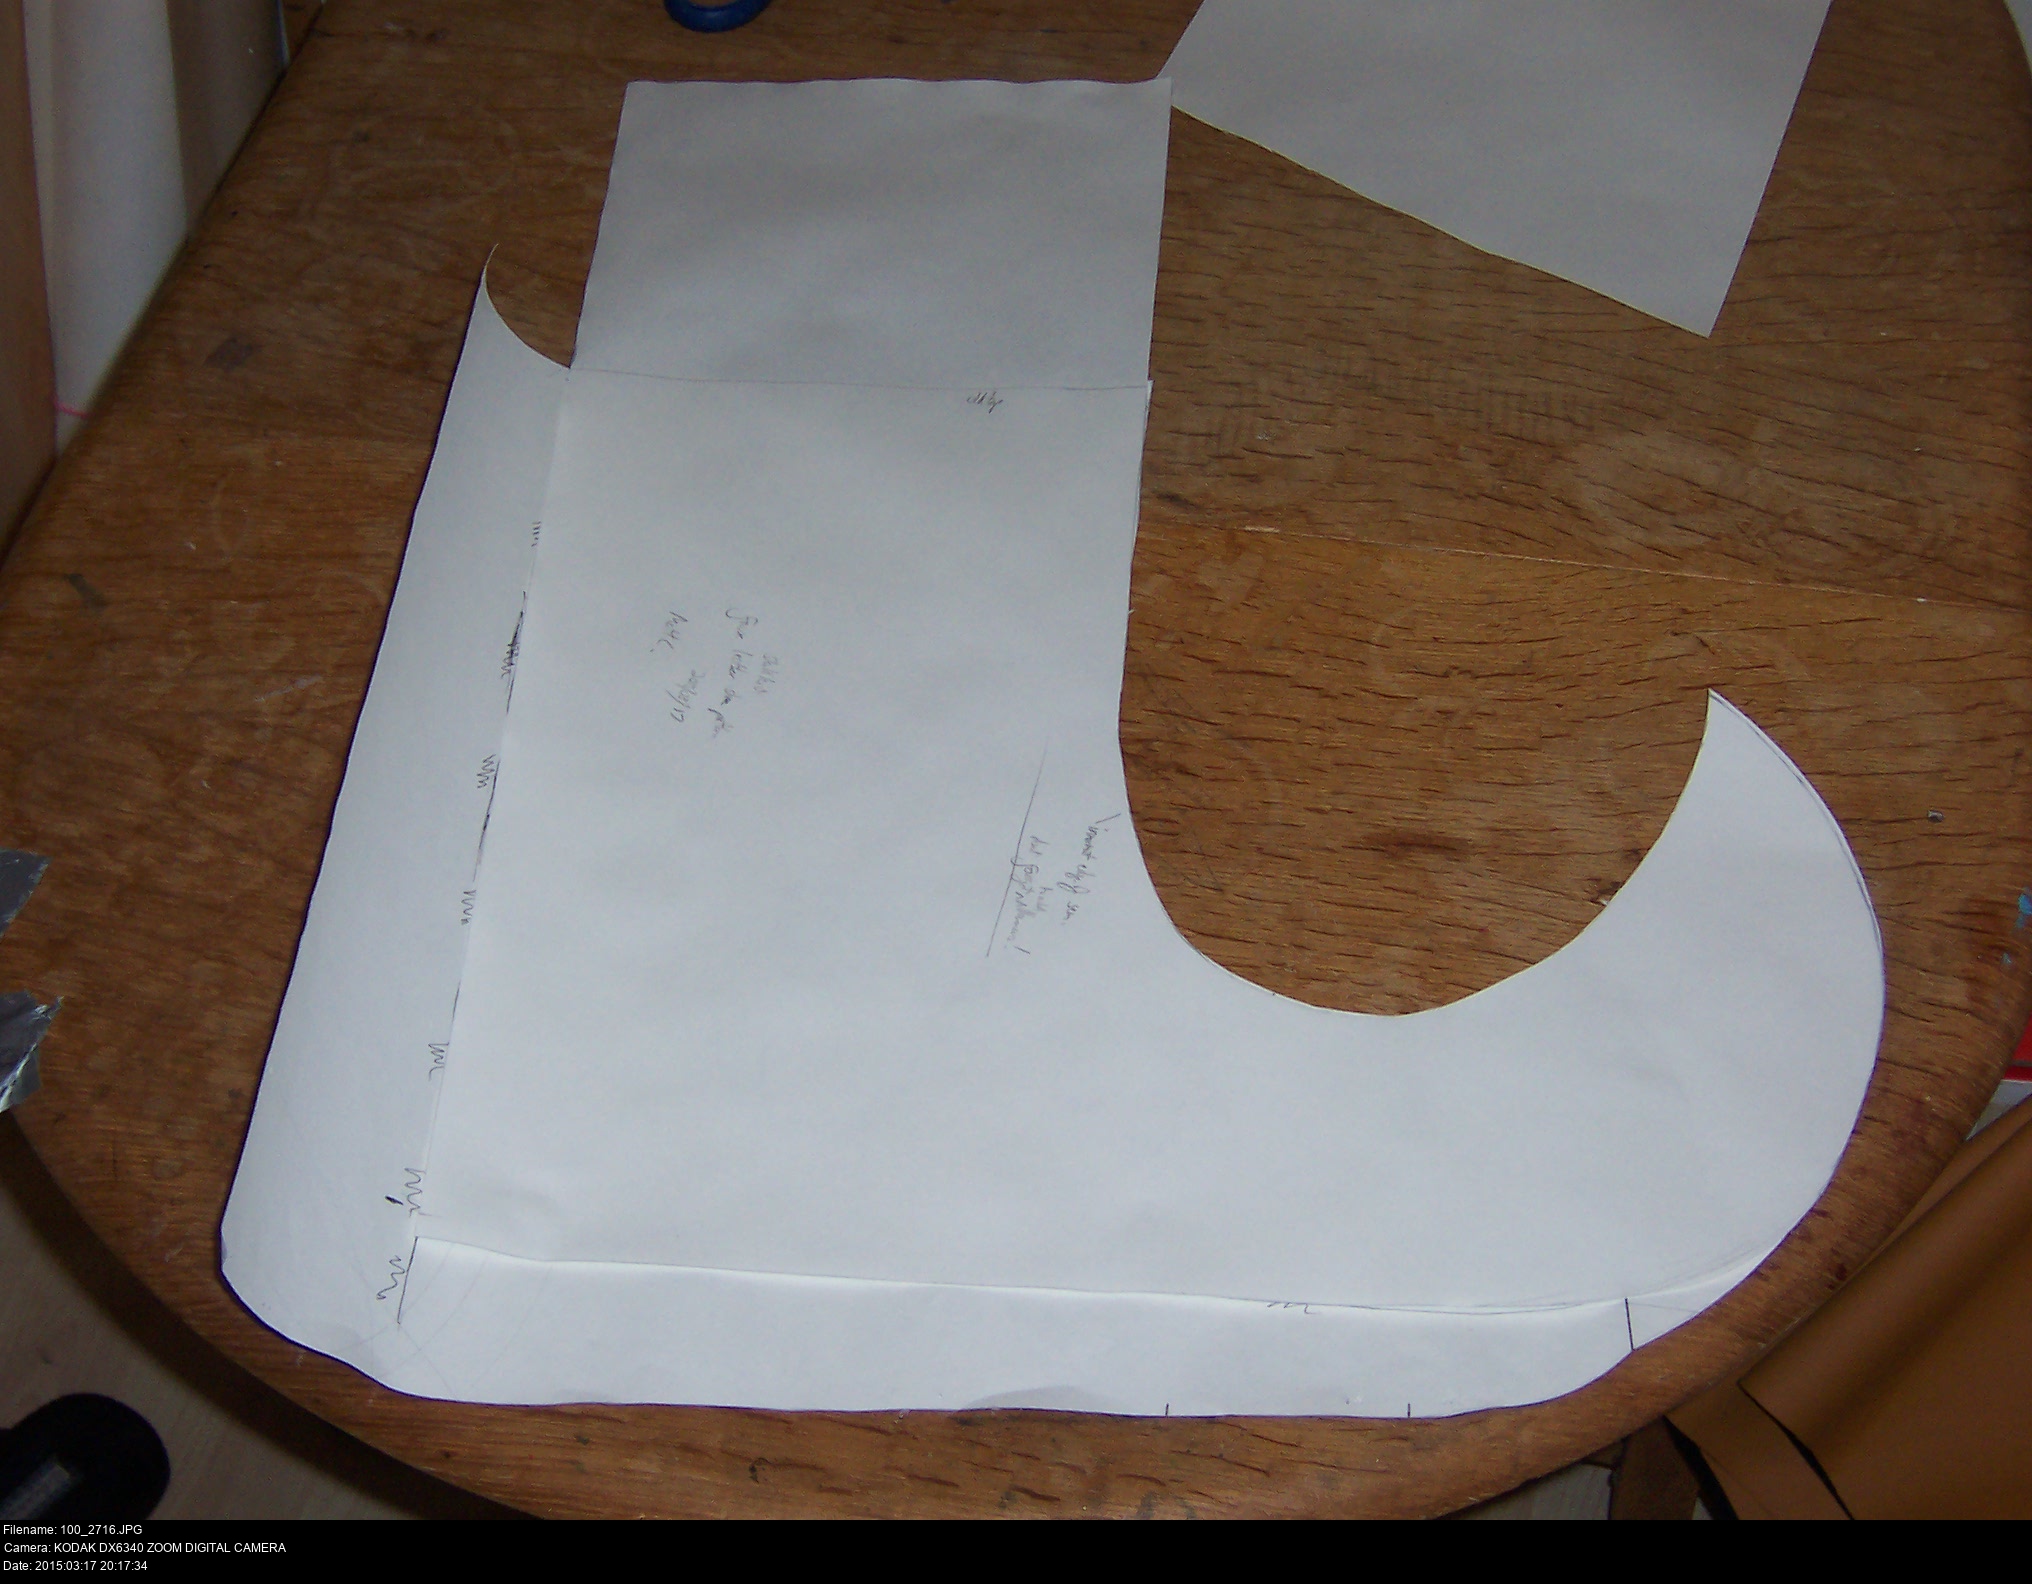
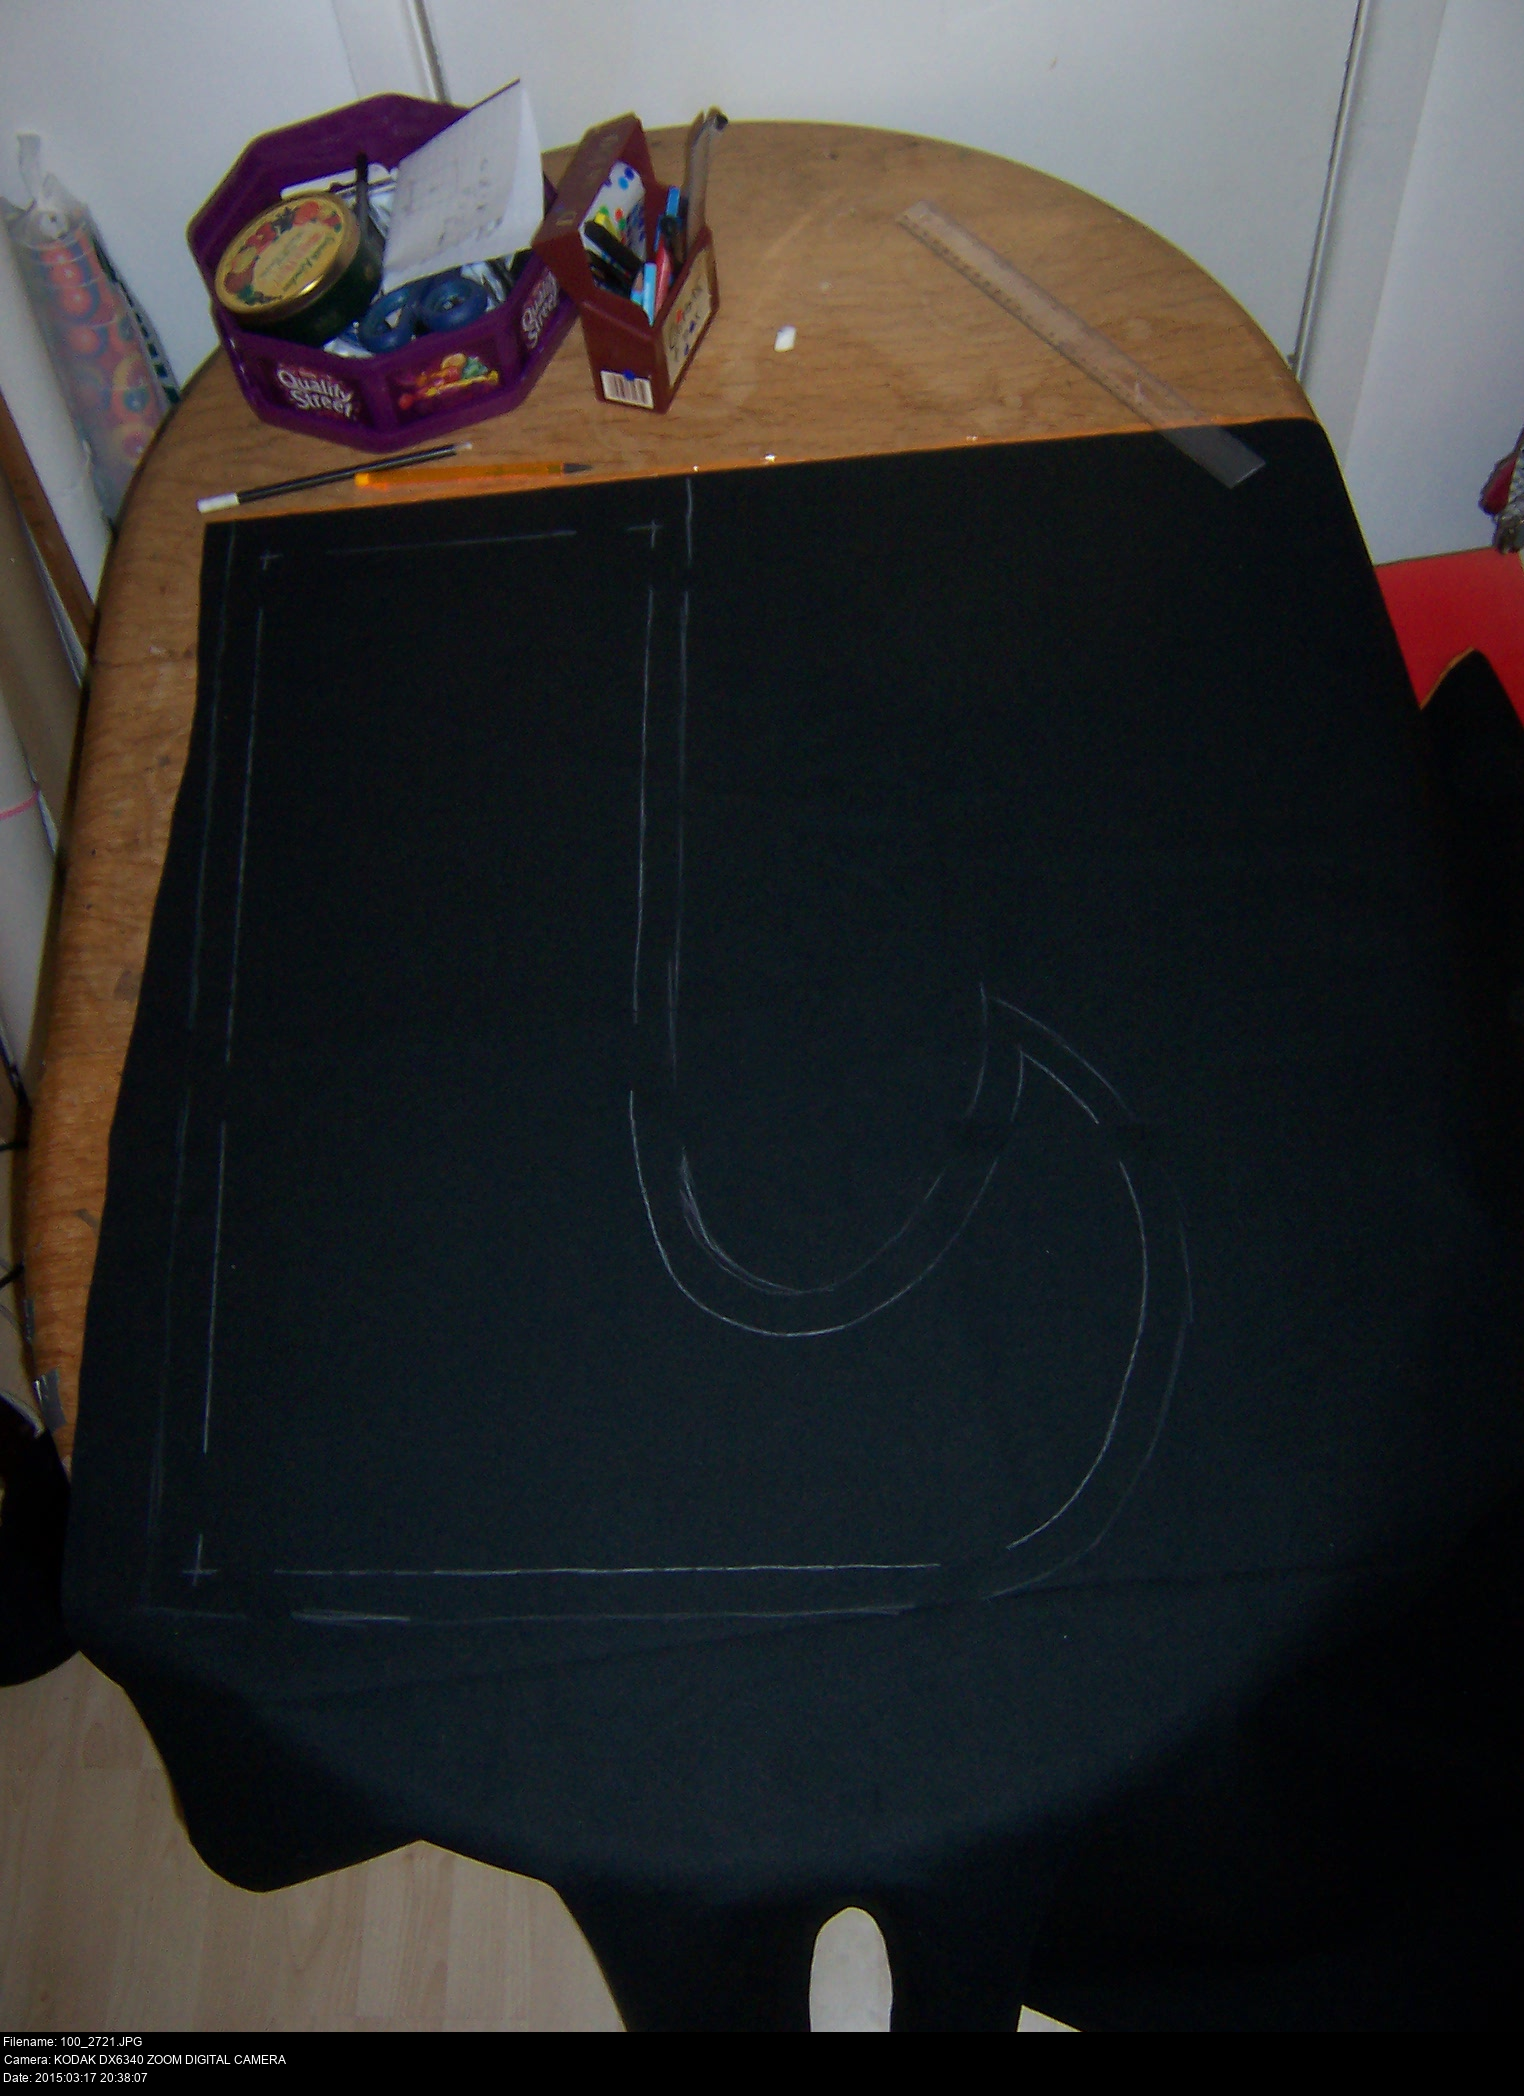
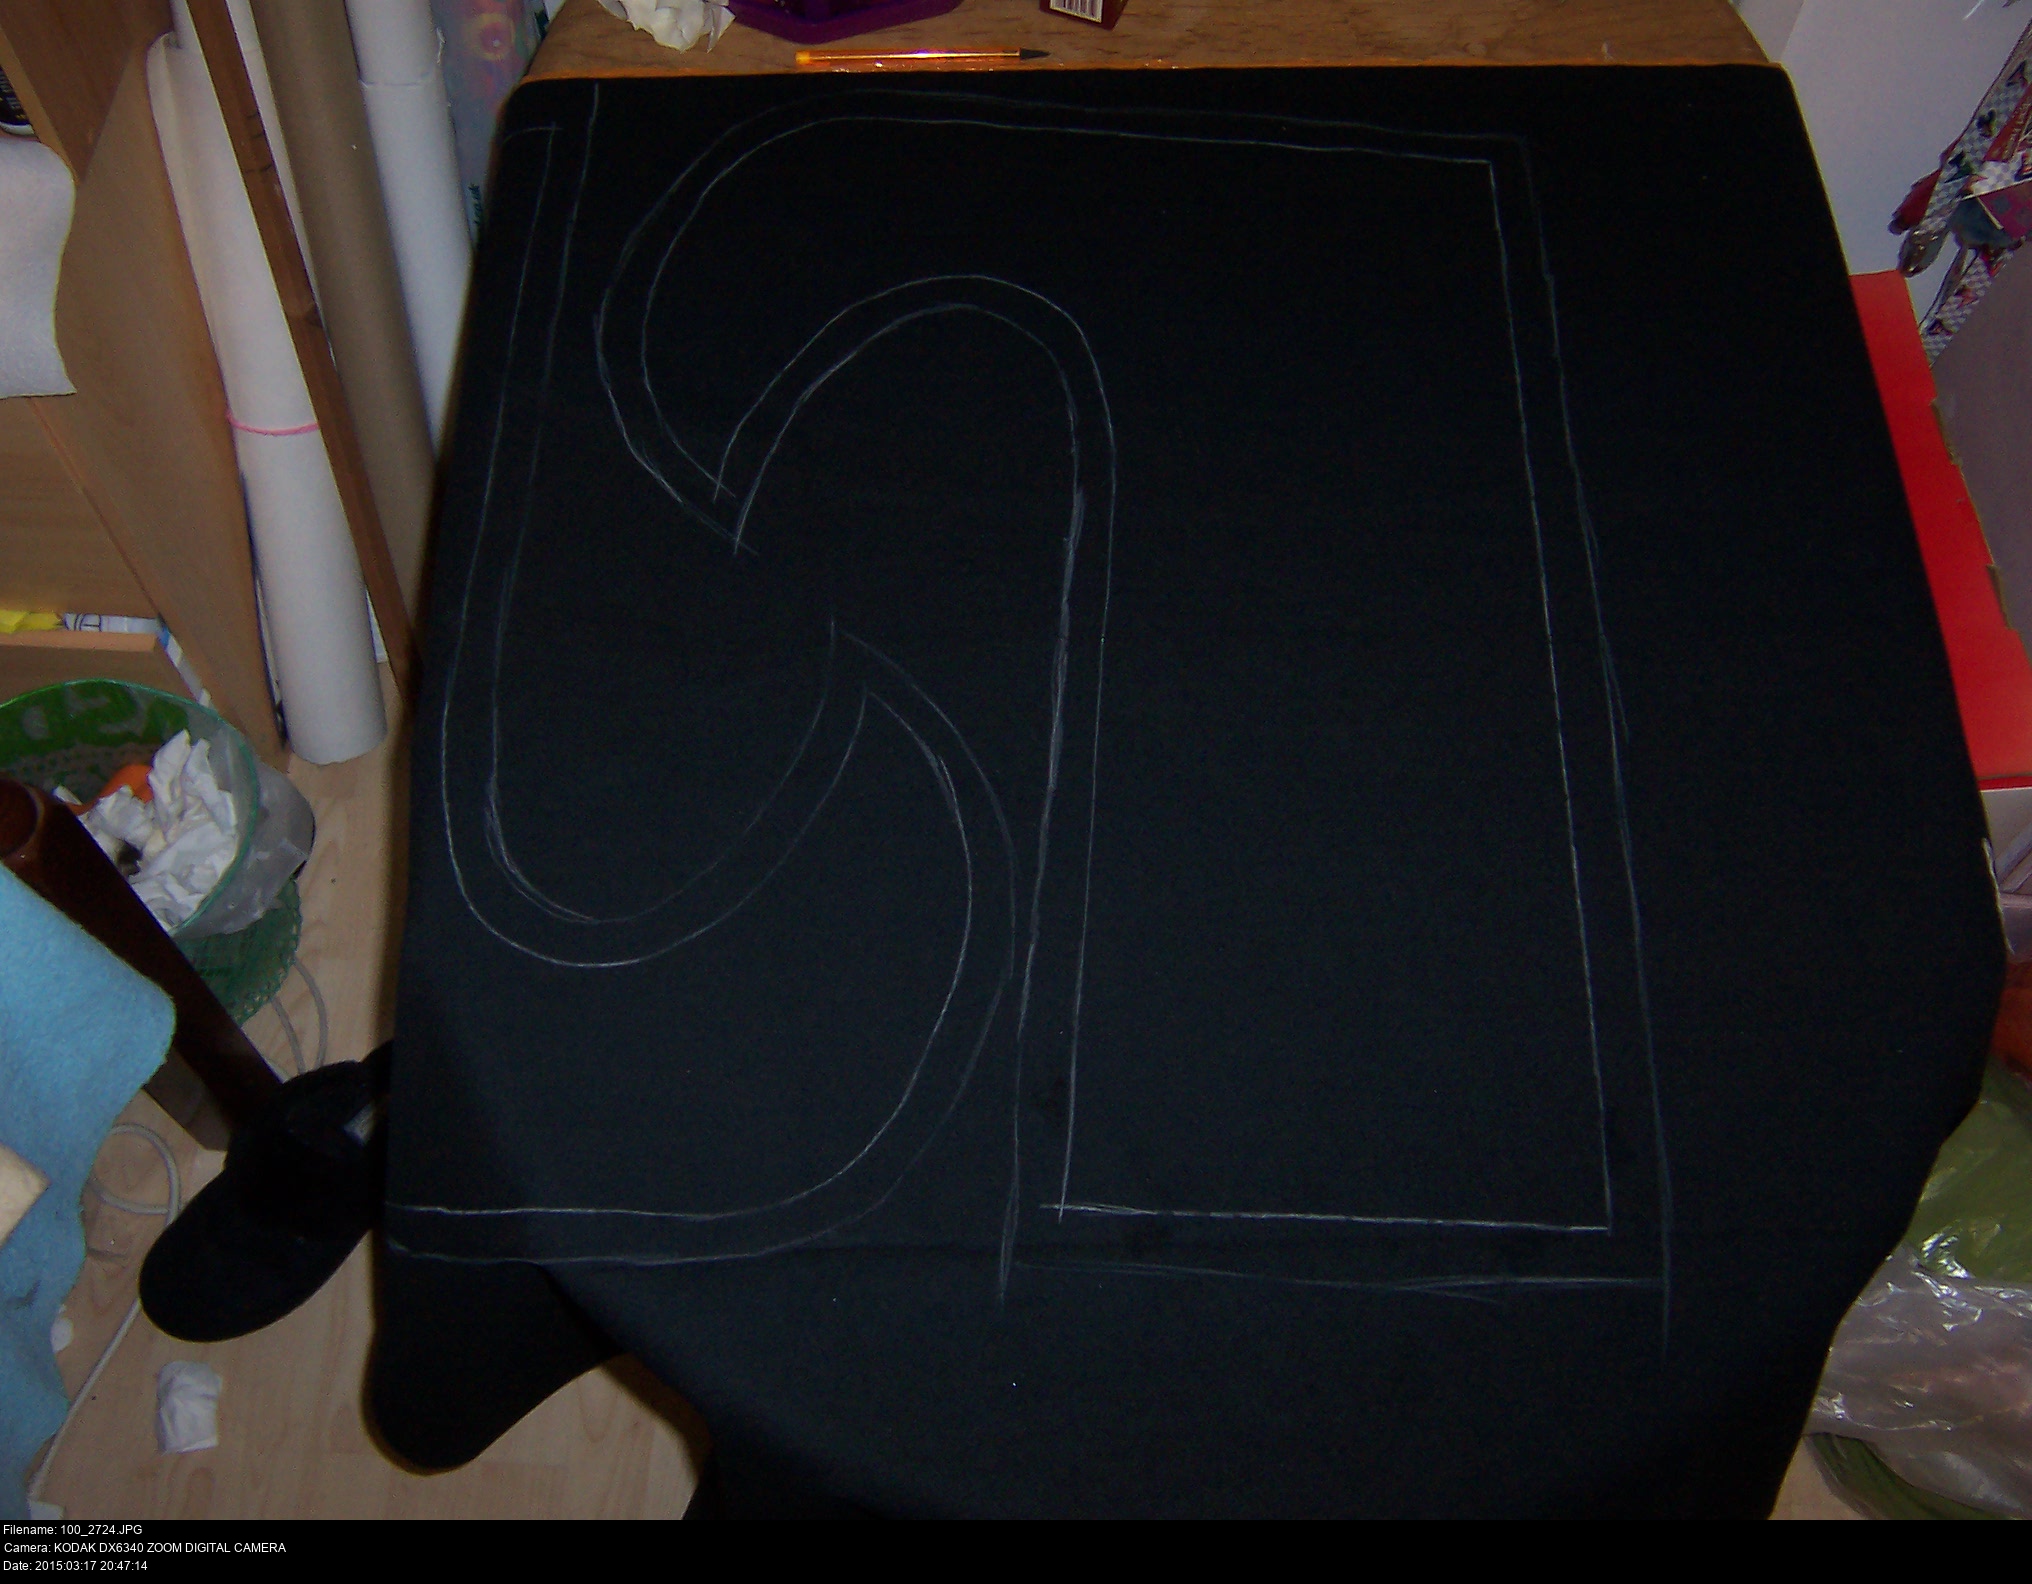
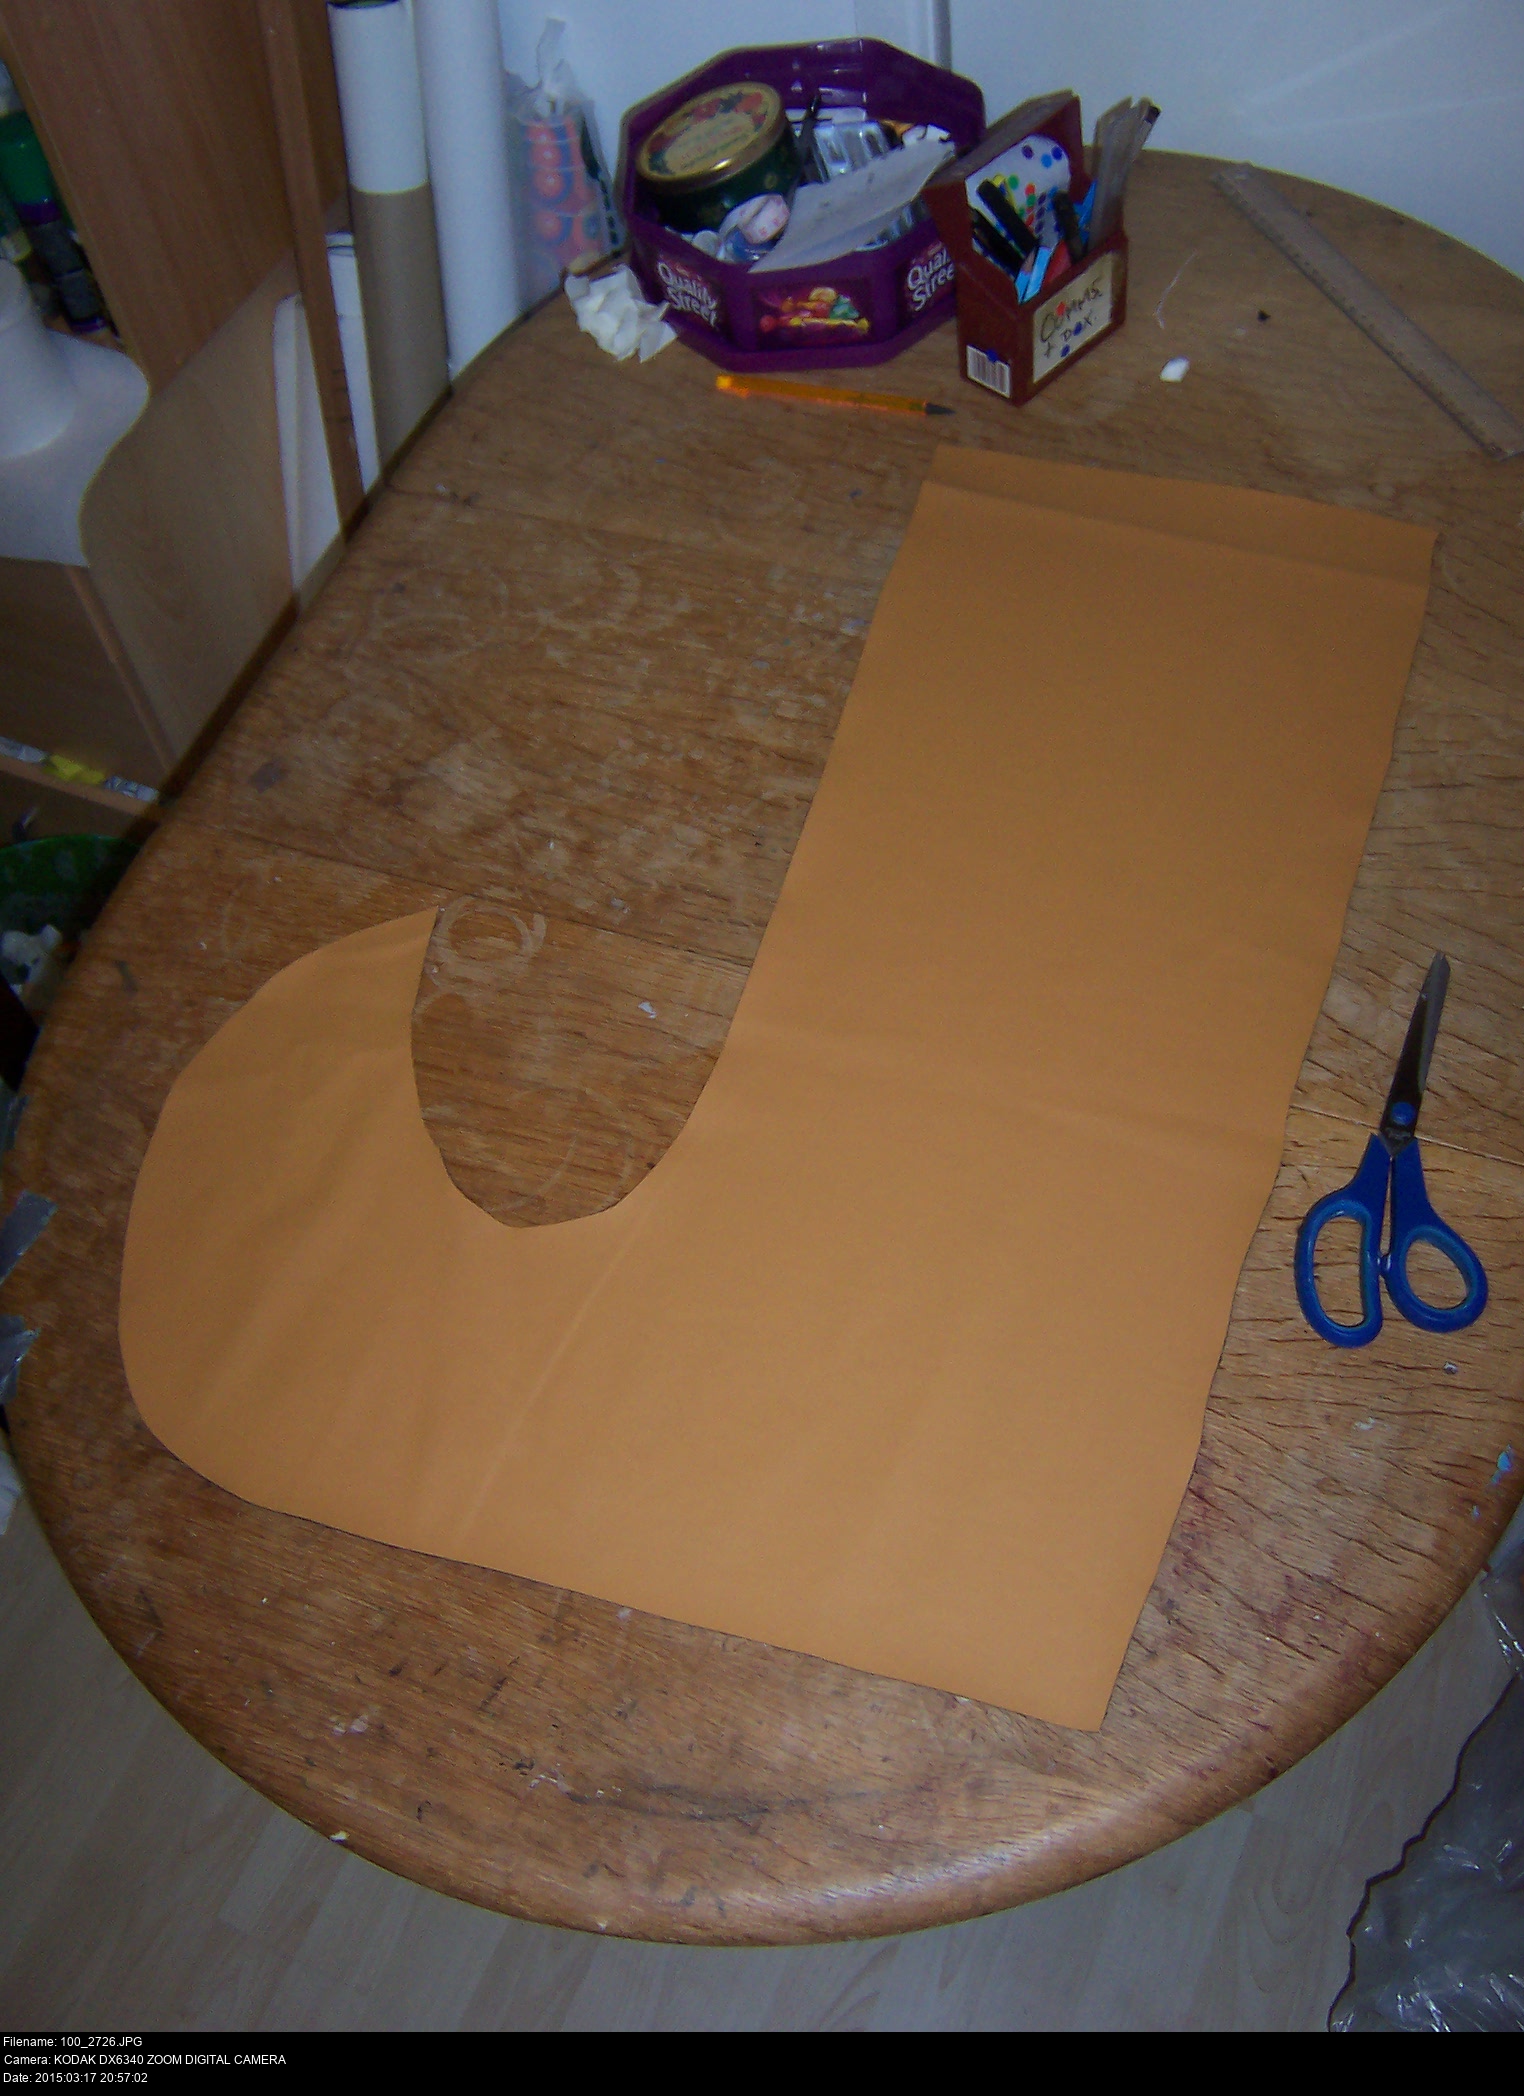

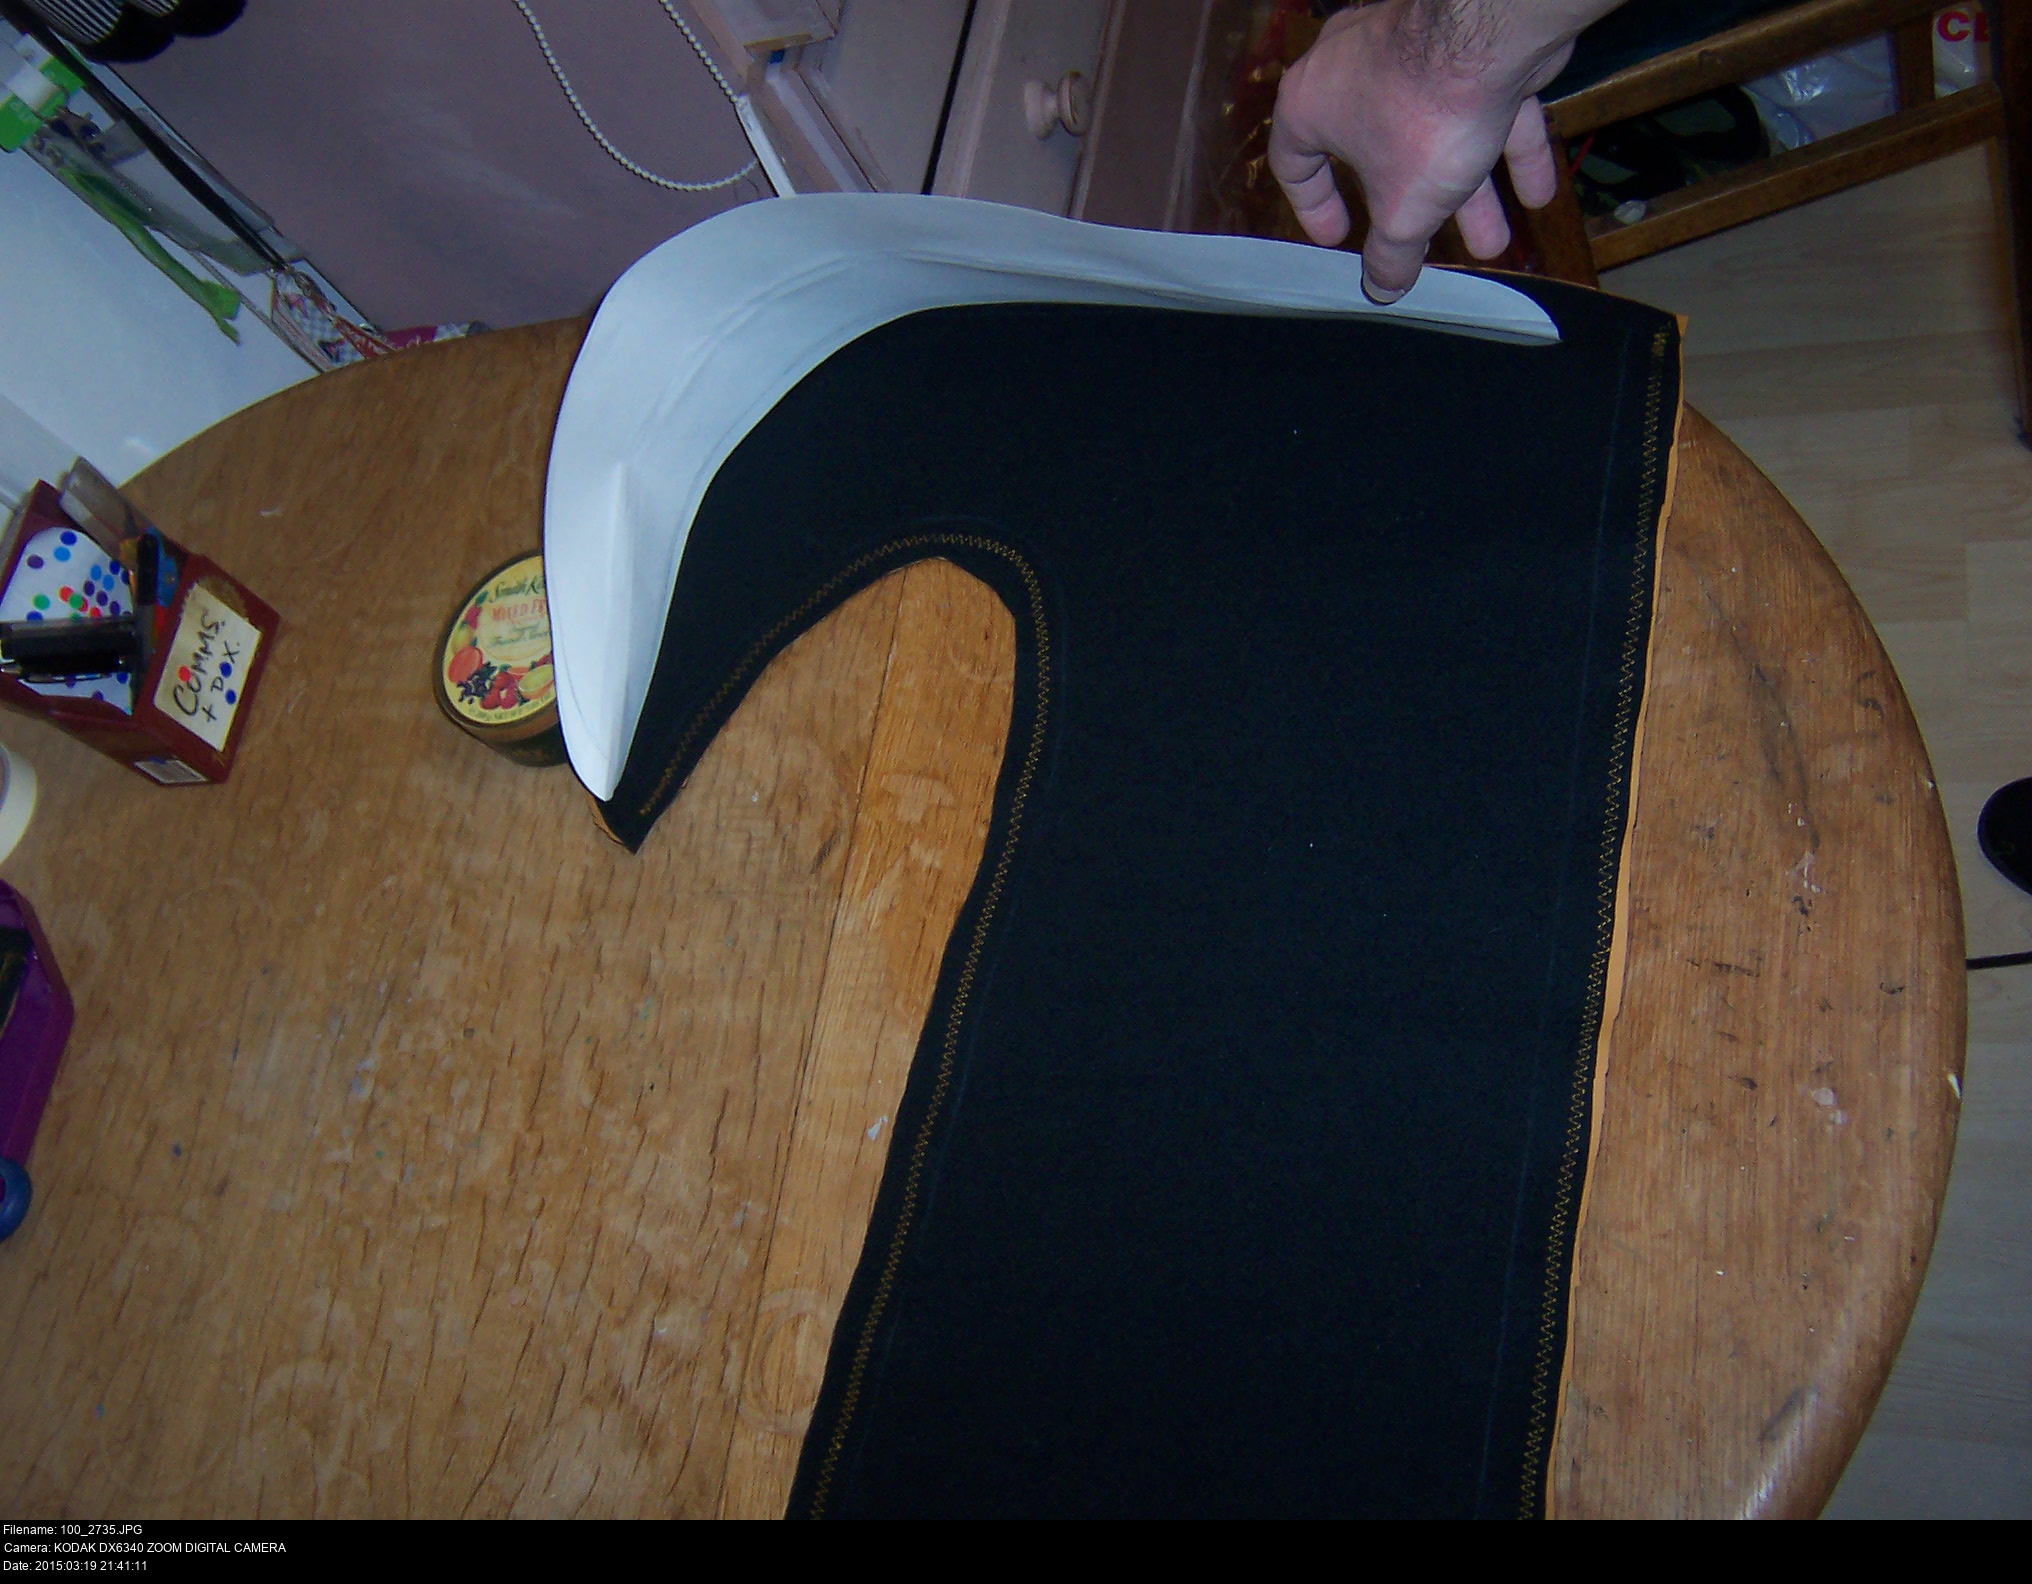


Estimate the full length of the boot from the back of the heel to the point of the toe, and plan out the shape and curve of the sole piece. Mark and cut it out, and sew it together. Don't forget that if you want to hem the cuff of the boot, you'll be sewing with the rubberised side of the pleather facing the presser foot so you'll need a non-stick teflon foot. (My material has a fabric backing so it sews nicely normally when sewing with the right sides together.)
This particular vinyl is cotton backed, so it's easy to sew. (I imagine the way it's made is that a polymer is sprayed onto a thin cotton fabric base to produce a two-layered material as it sets.) You don't need a non-stick teflon foot to sew through it as long as the metal foot is always against the fabric side.
That said, the machine I used to sew these shoes died a little time after making these. It could have been because of the hat, or it could have been from the effort of poking lots of tiny holes through two layers of this stuff. My Singer Tradition 2250 was just that bad.
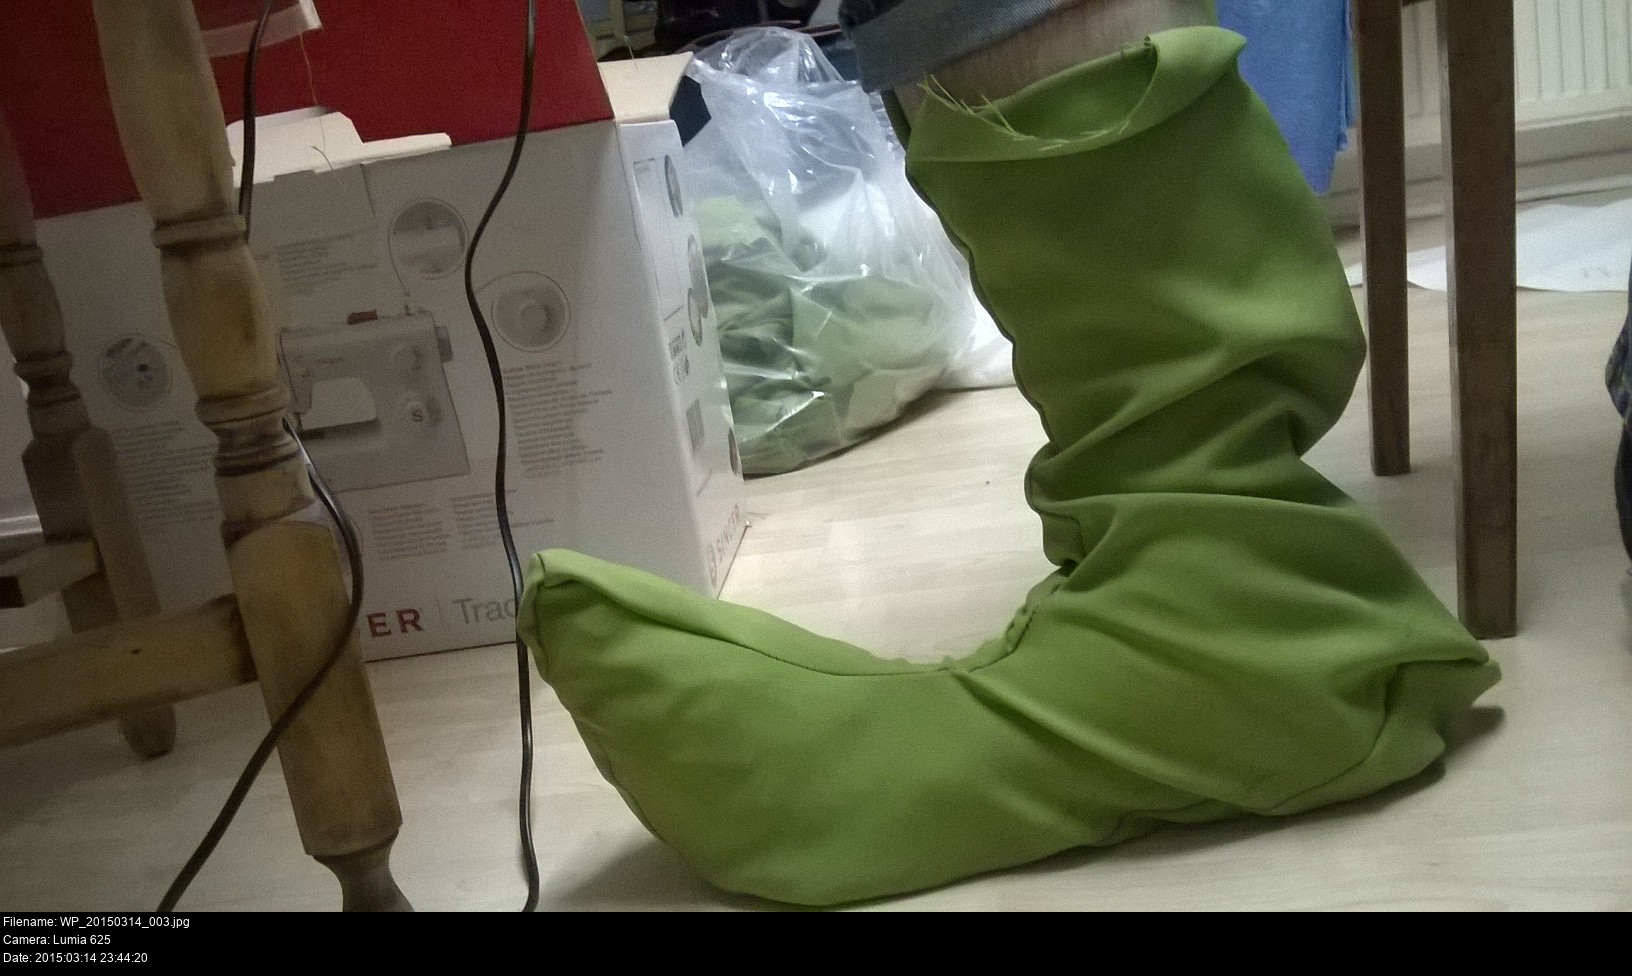
And 'easy to sew' is an exaggeration. Regular fabric can be a rascal: being floppy and thin when you need it to hold steady for a moment, or suddenly becoming sturdy and chunky when you want it to flow nicely. This vinyl is like the chunky kind of misbehaving fabric taken to the extreme.


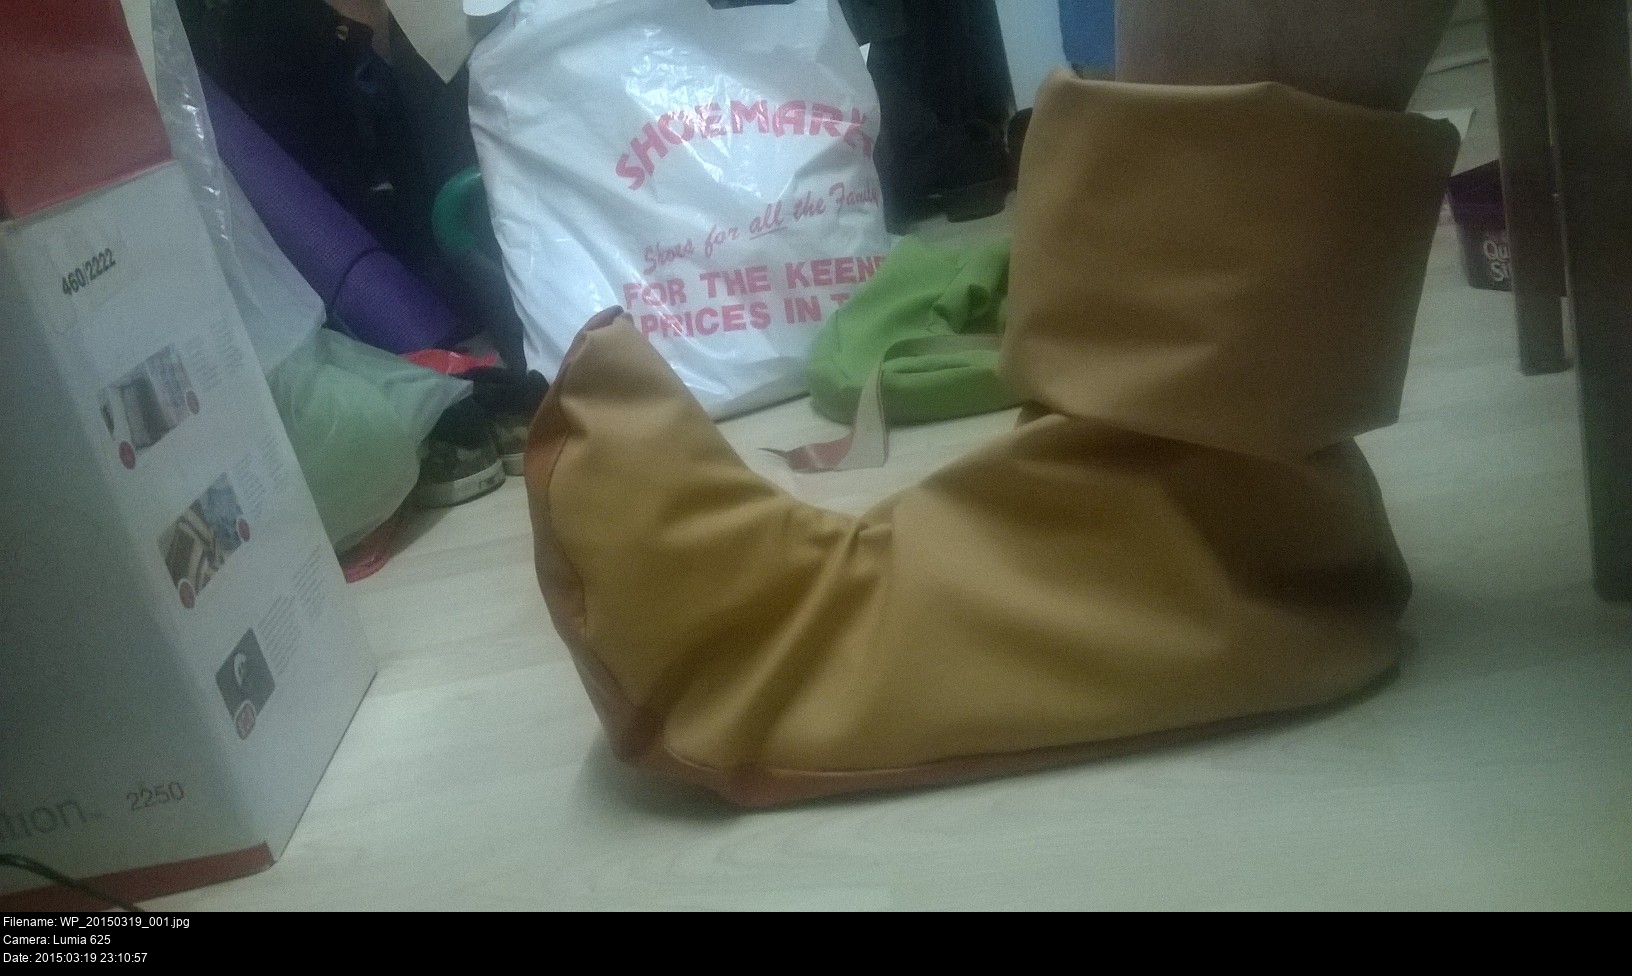


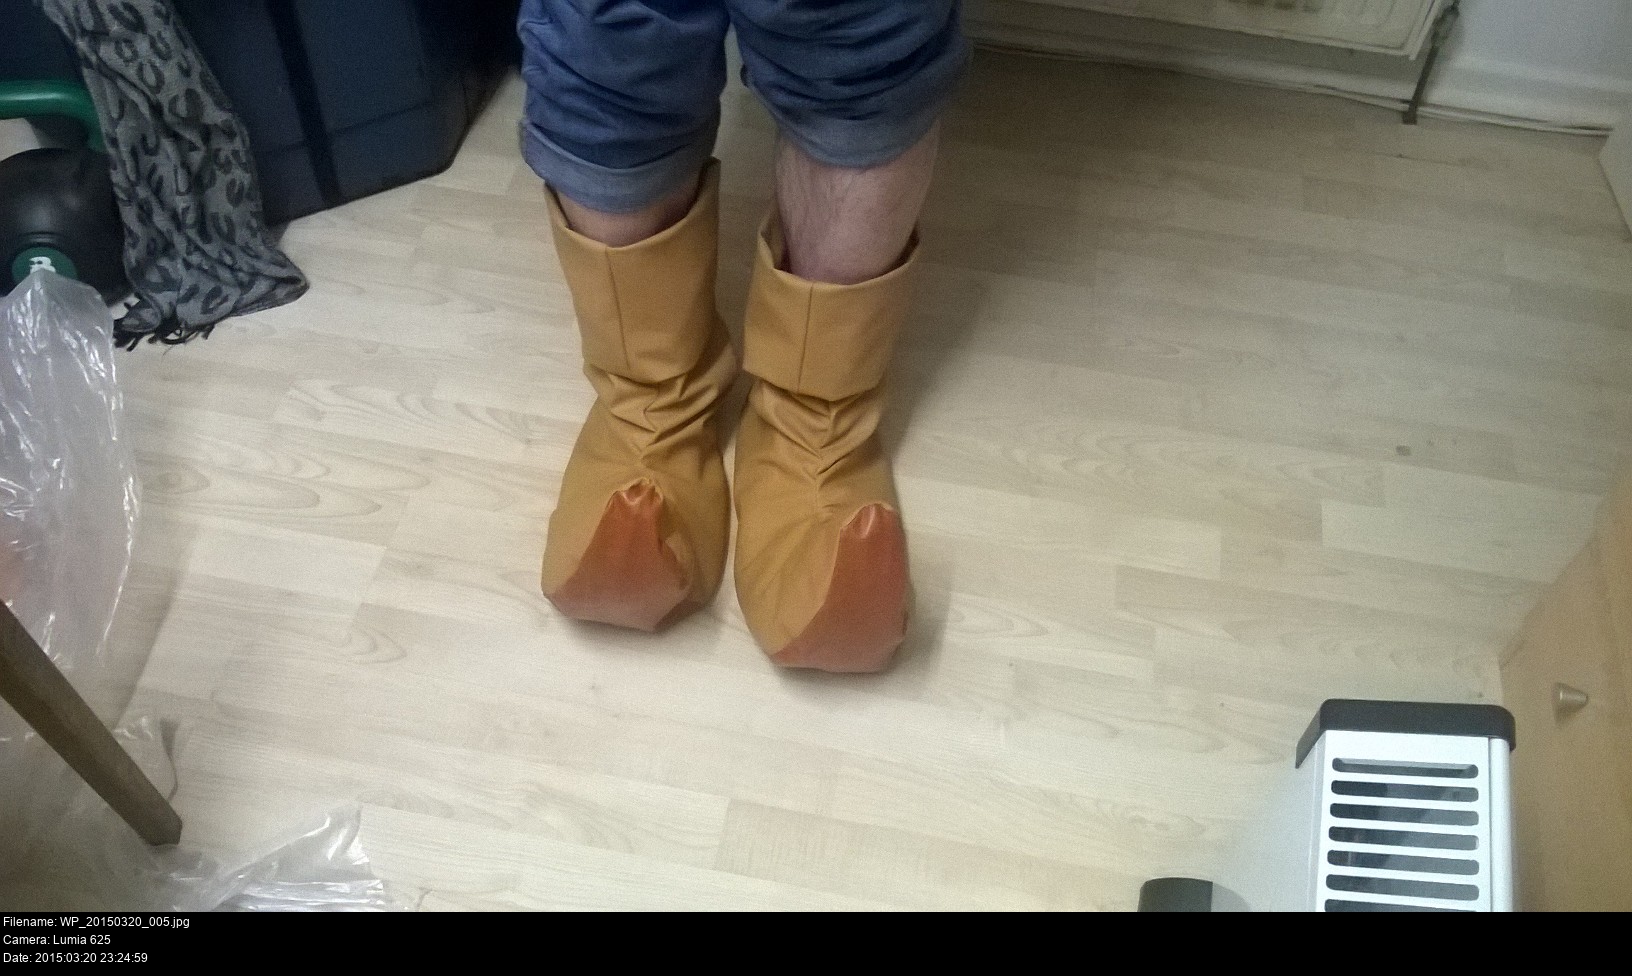
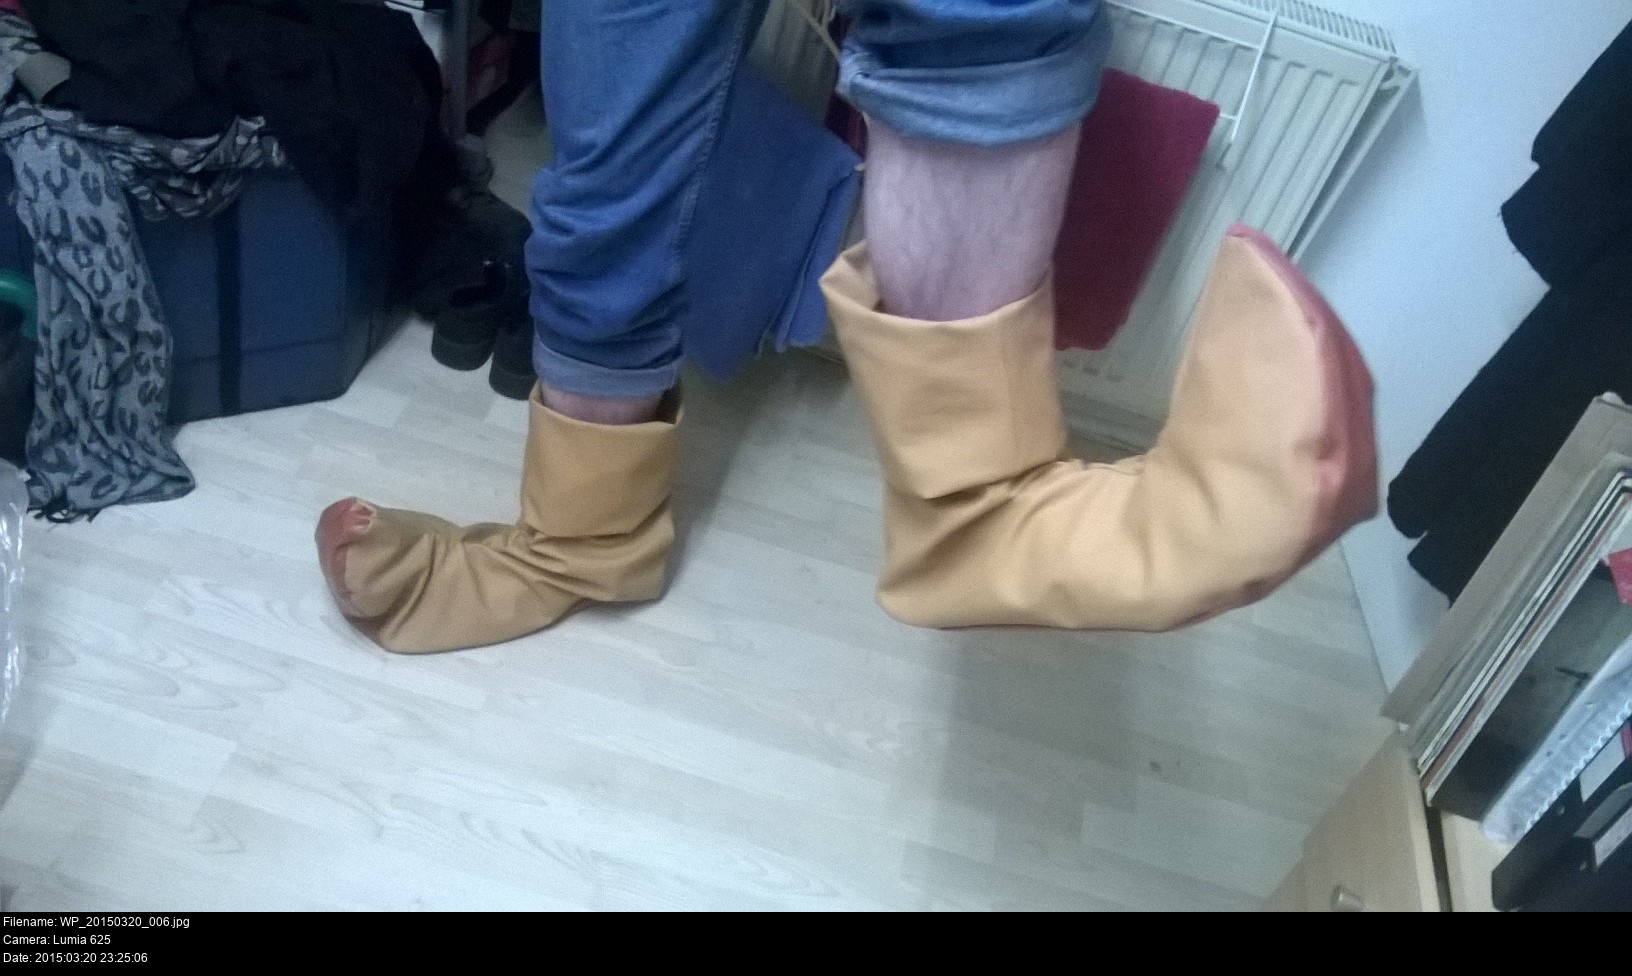
I really didn't think this through. There was nothing to stop the material twisting or flapping around while I wore it.
It was a big old horrible mess and an embarassment and no way could I wear these anywhere or do anything in them.
One advantage of using vinyl over fabric is that the shoe ought to be more hardwearing. But probably a disaster area when used on smooth floors. Maybe it's for the best I never found out?
There's a number of emotions you'll feel when you get to this stage; the series is a cliché. Most important thing to do is realise what you did wrong, what you need to improve and come up with a new plan. And my new plan was fantastic. Wonderful, even.
Try to find somebody who'd done Skull Kid shoes before and ask them what they did!
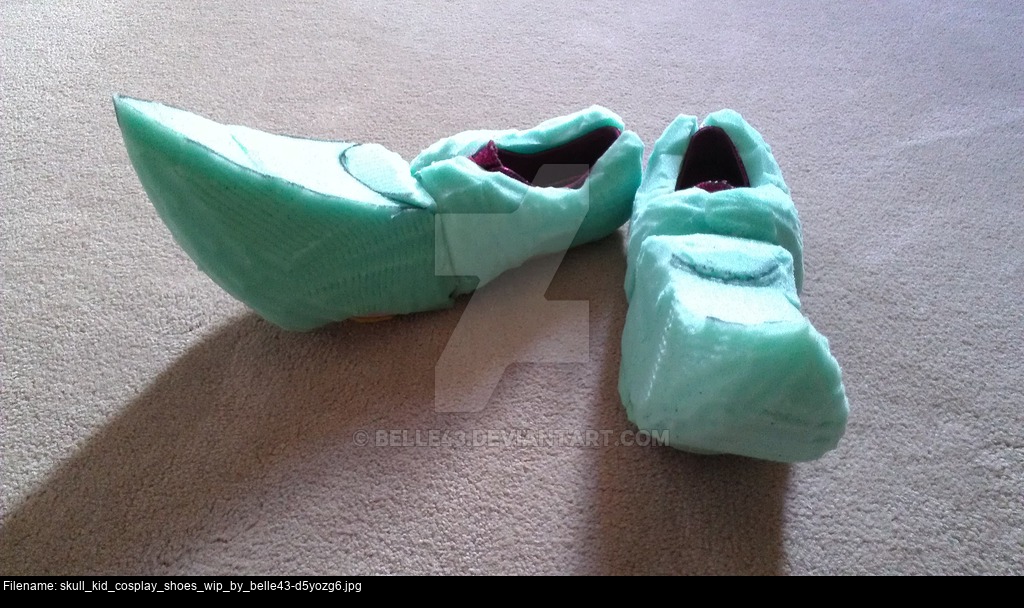
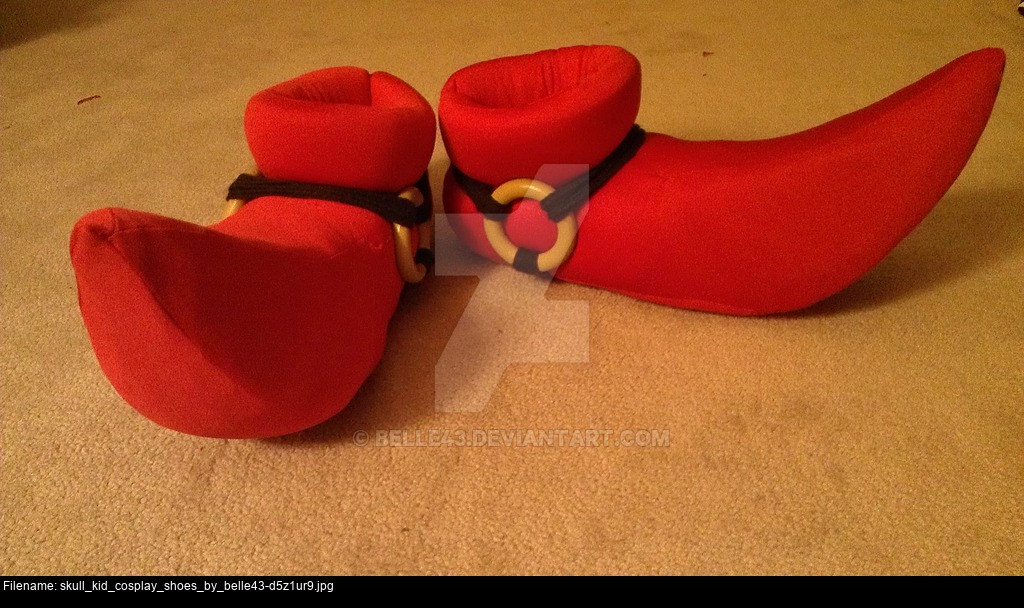
Look at these wonders! These are by belle43 on DeviantArt.
You take a cheap comfortable lightweight donor shoe, and glue foam onto it. They've mentioned they use 'high density foam' and hot glue for these.
I asked them for a little more info and they confirmed my suspicious that the fabric is like a sock around the completed shoe form.
Which is also how you make a fursuit head, or any number of squishy costume pieces by the way!
I've had a bad history with hot glue so far, never sure how to long to leave it or how to use it. The last time I used it was for my Shikamaru cosplay ninja shoes, fastening the fabric to the sole and it didn't stick one bit.


It begins!
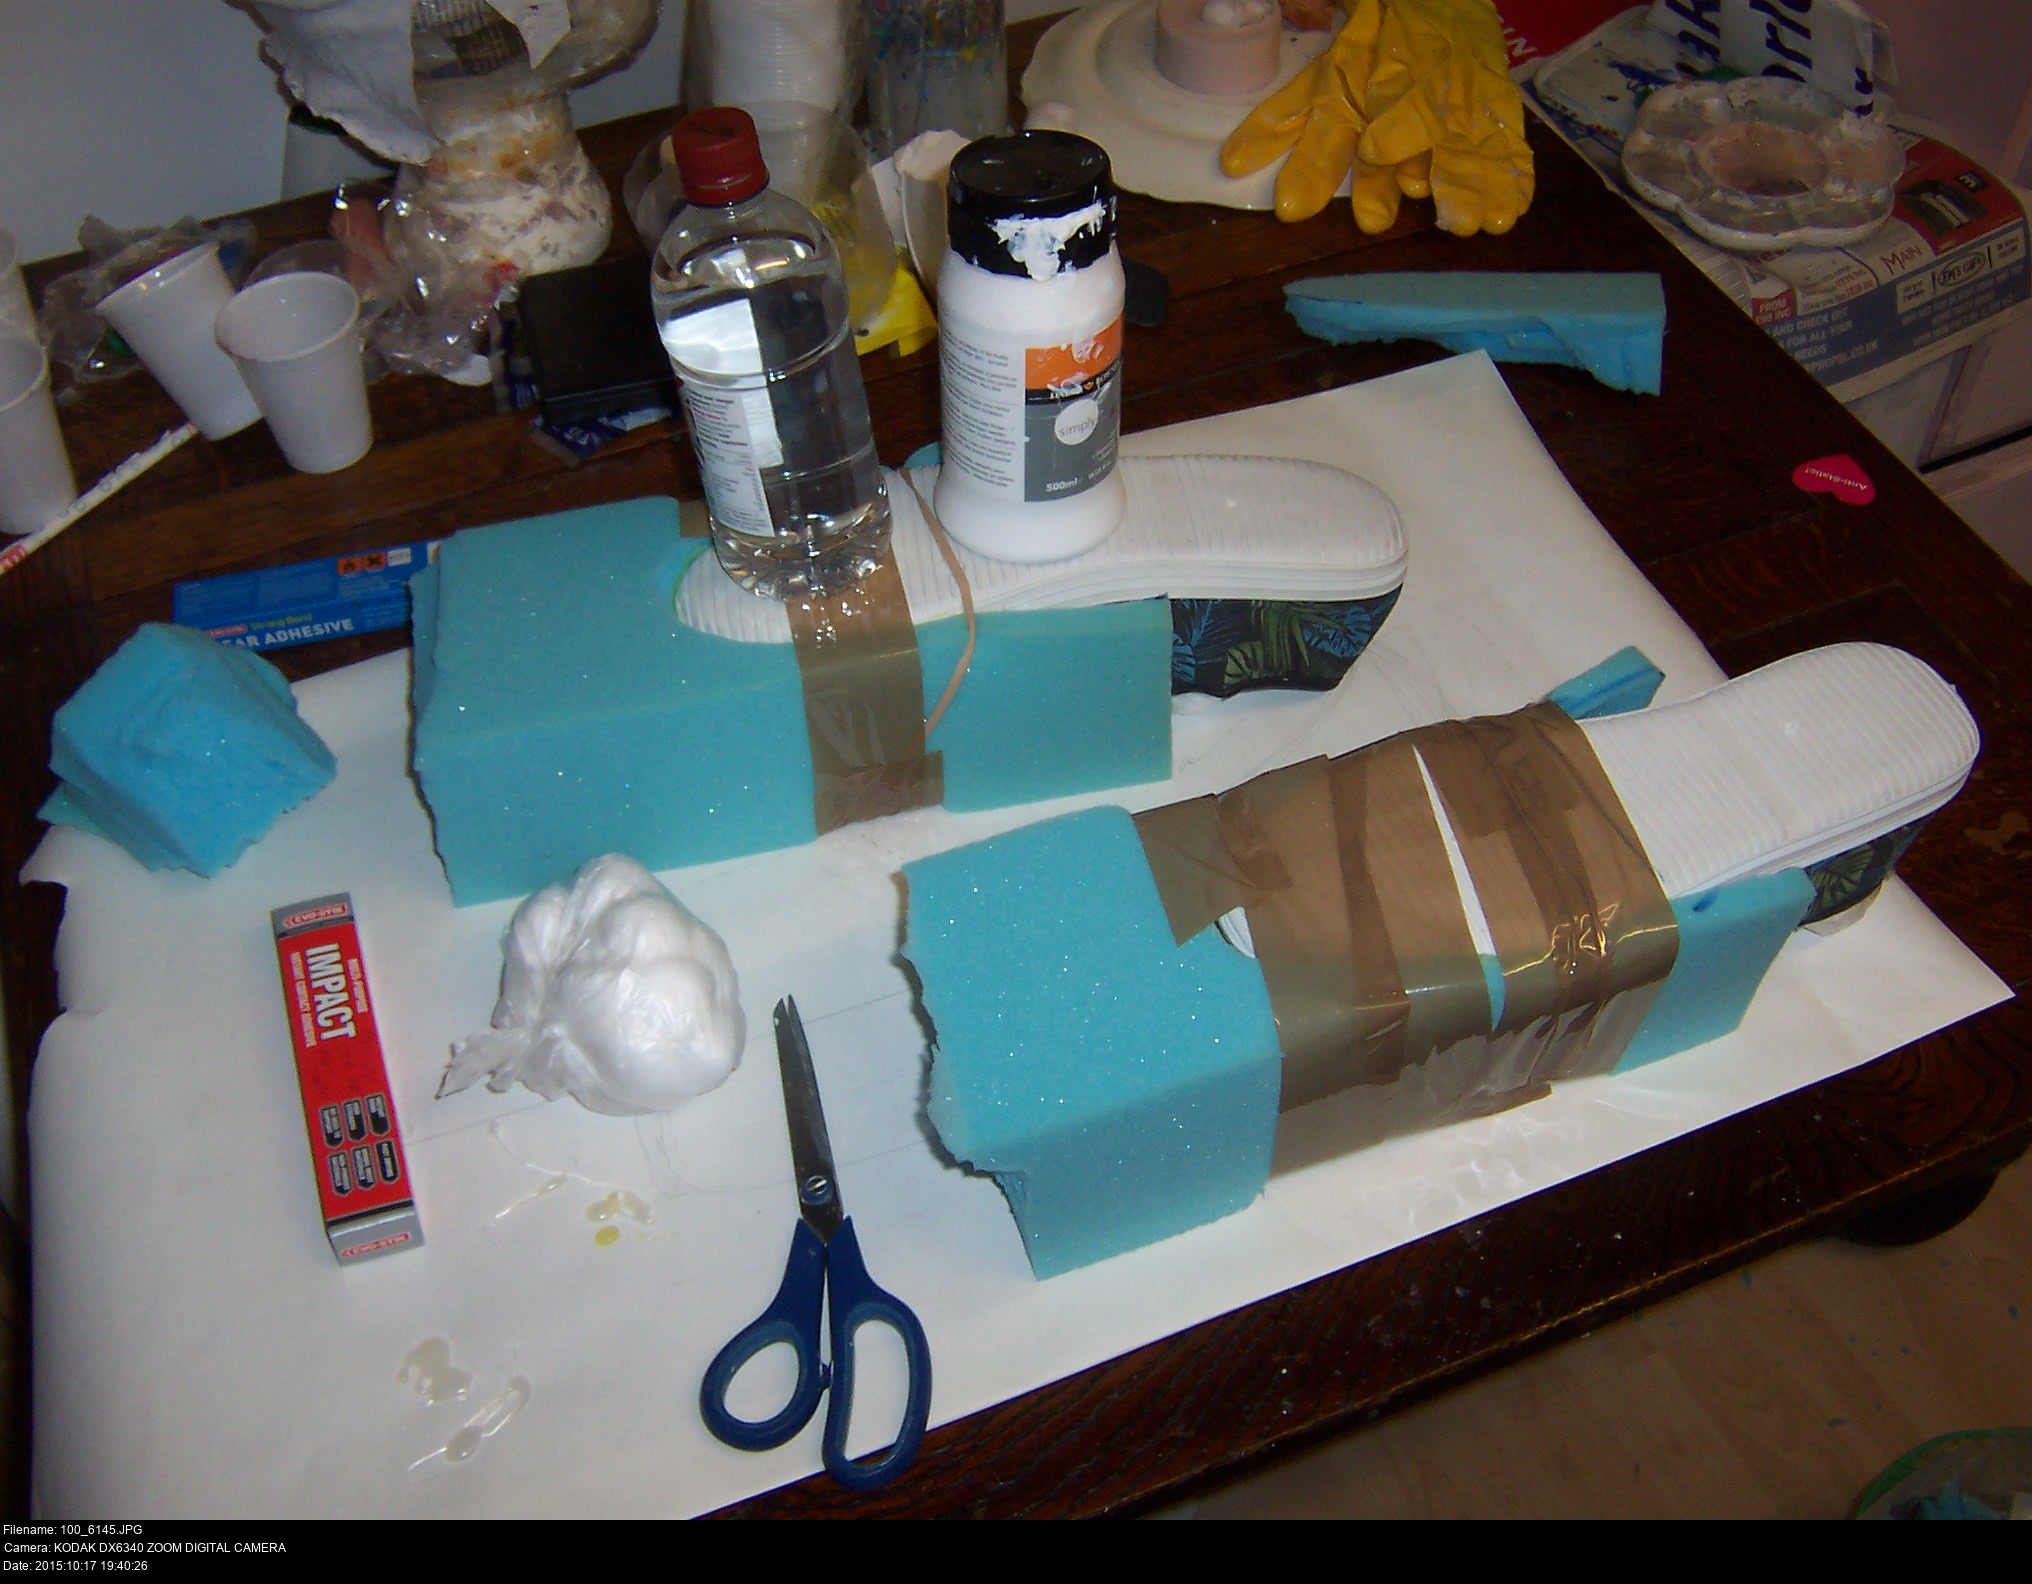
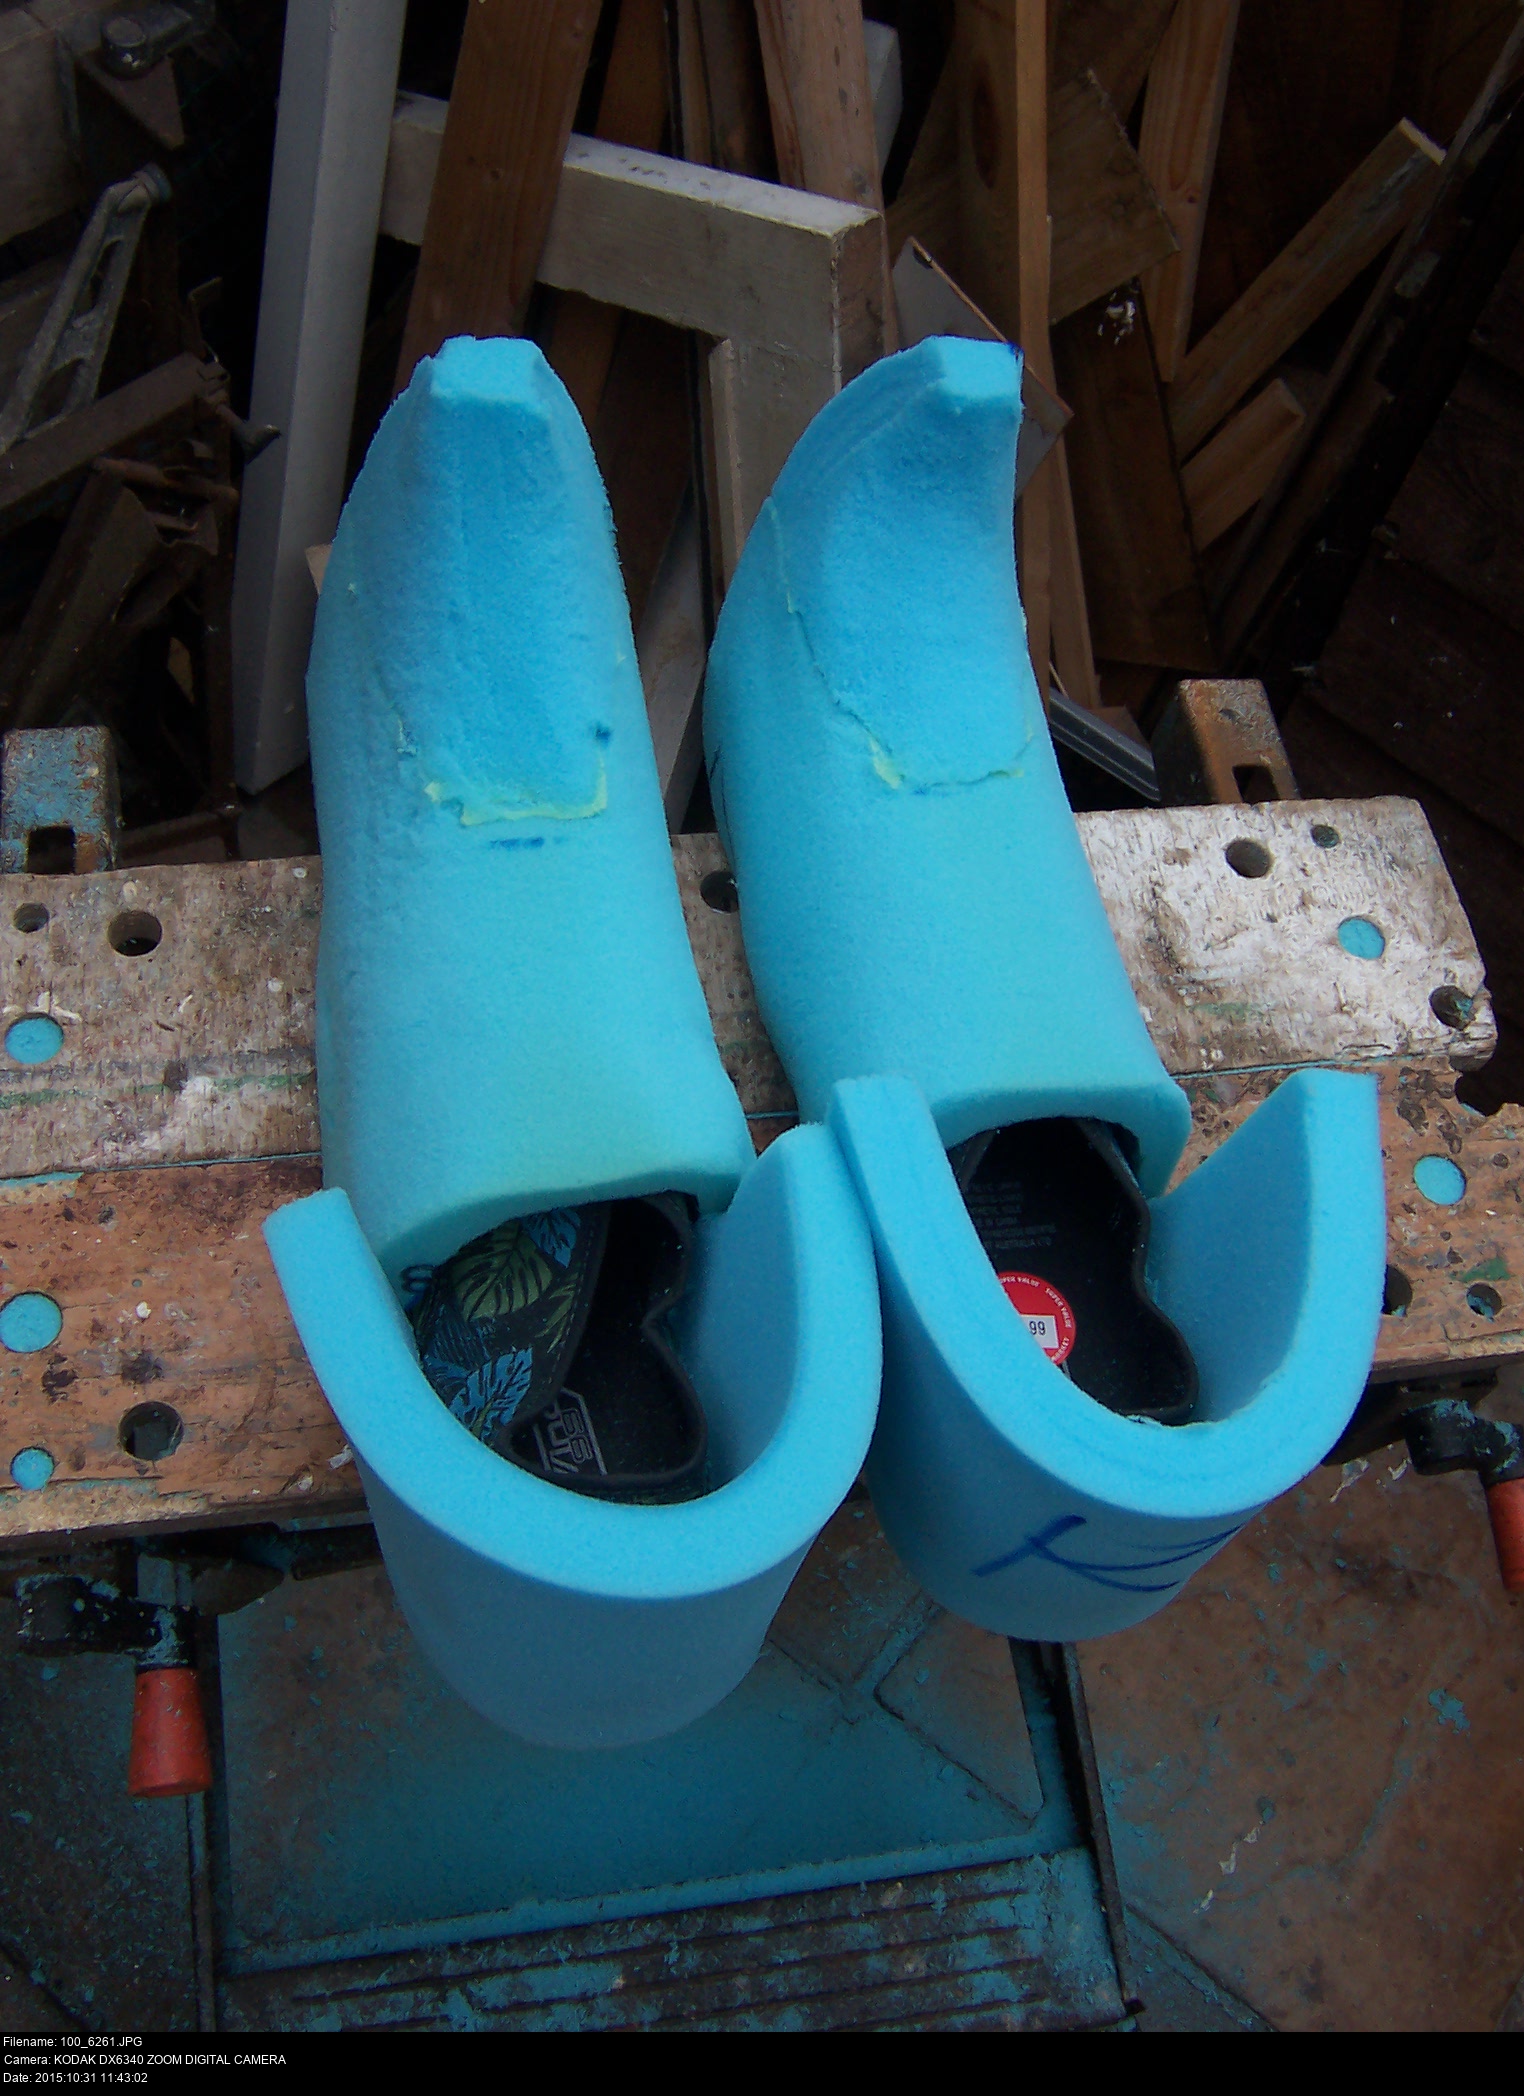
Here's a pair of £5 pumps from my local Shoemarket. Size 11 since I have monstrous feet, plus I expected that gluing foam all over them might collapse their shape a little. Before gluing I filled them with little bags filled with cotton wool balls (the very same that I used to fill up the points of the pleather version of the shoes). I cut out the tongues of the shoes to make them easier to slip into and removed the laces. There's no way I could possibly tie up laces once these are covered in foam.
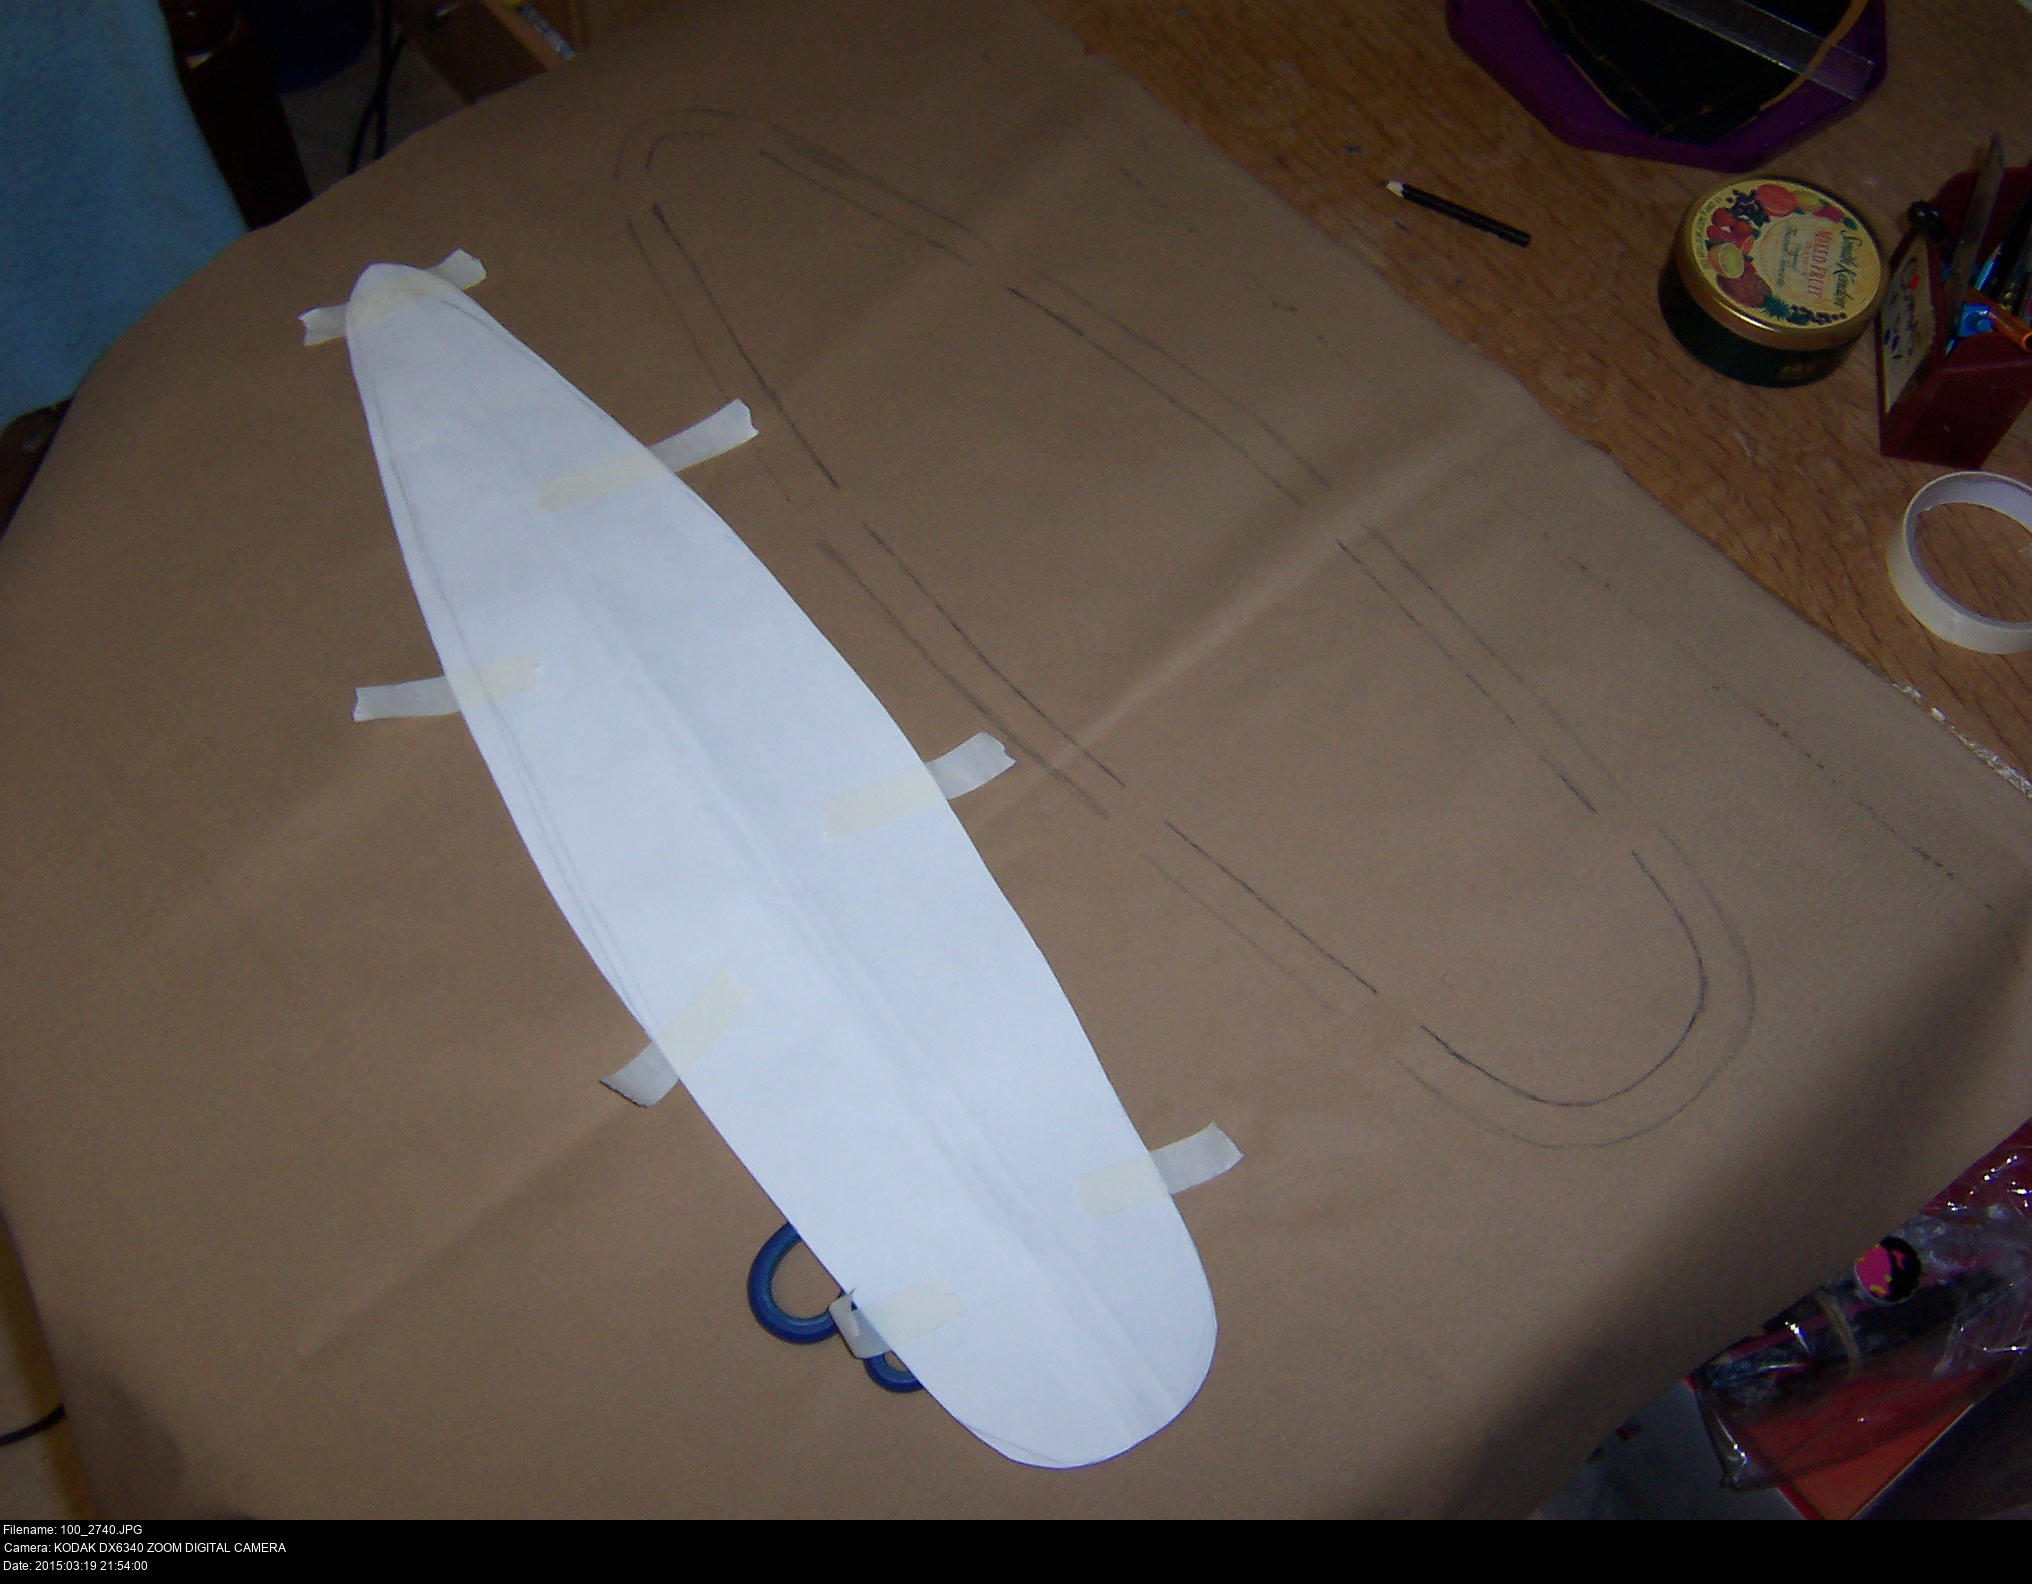
Before you do any buying or cutting, you need to be able to solidly visualise what the shoes are going to look like once you're done. I've got the pleather boots prototypes as a pretty good appoximation of the shape. This blue foam is sturdy upholstery foam from a shop in Birkenhead Market. It's the same stuff that I used to make the base form for my Majora's Mask. It's sturdy but squishable. Also, nigh on indestructible. Perfect for this kind of work.
First, I'll cut a perfect cavity into these blocks, deep enough for the sole to be flush with the foam, and glue them onto the front of the shoes, starting at where the calf would lie.
The glue I'm using is Evostik Impact Adhesive ('shoe glue'). It requires pressure and at least 24 hours drying time, but it holds like nothing else. Make sure to test it on scrap foam first - certain glues will melt the foam instead of gluing it!
I taped my foam to the shoe and weighed it down with some jars of water and paint. I used a LOT of glue doing this, and the smell was really something else. Don't do this inside if you can help it, and definitely don't do it in your sister's bedroom. (Sorry ;-;)


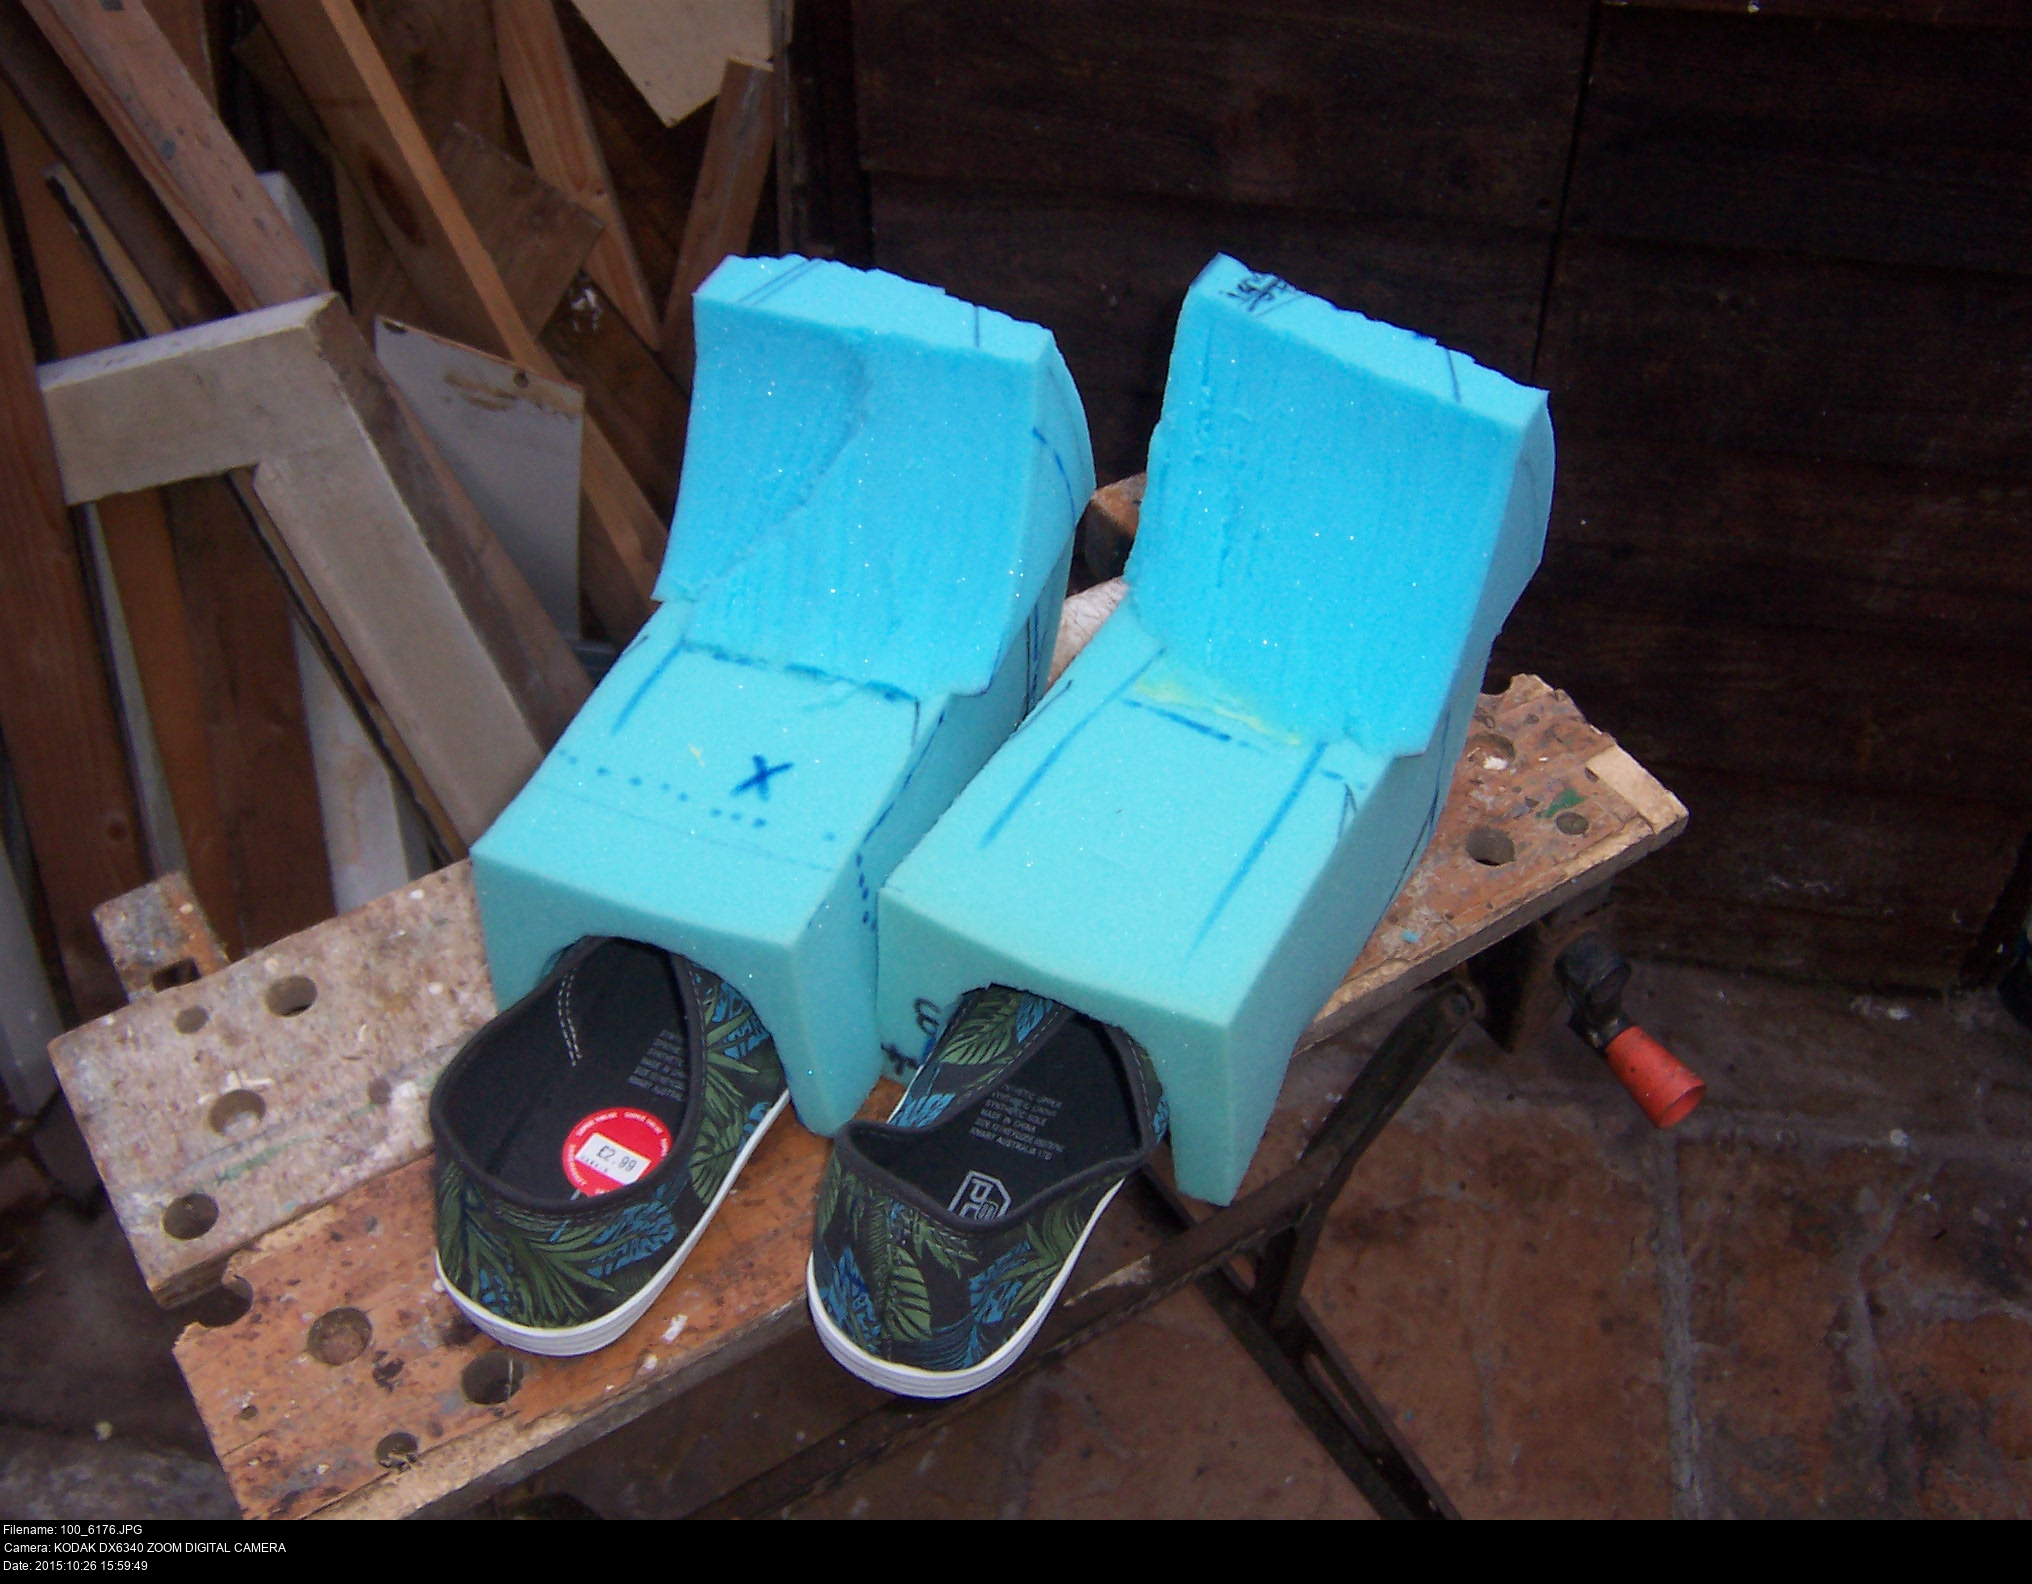
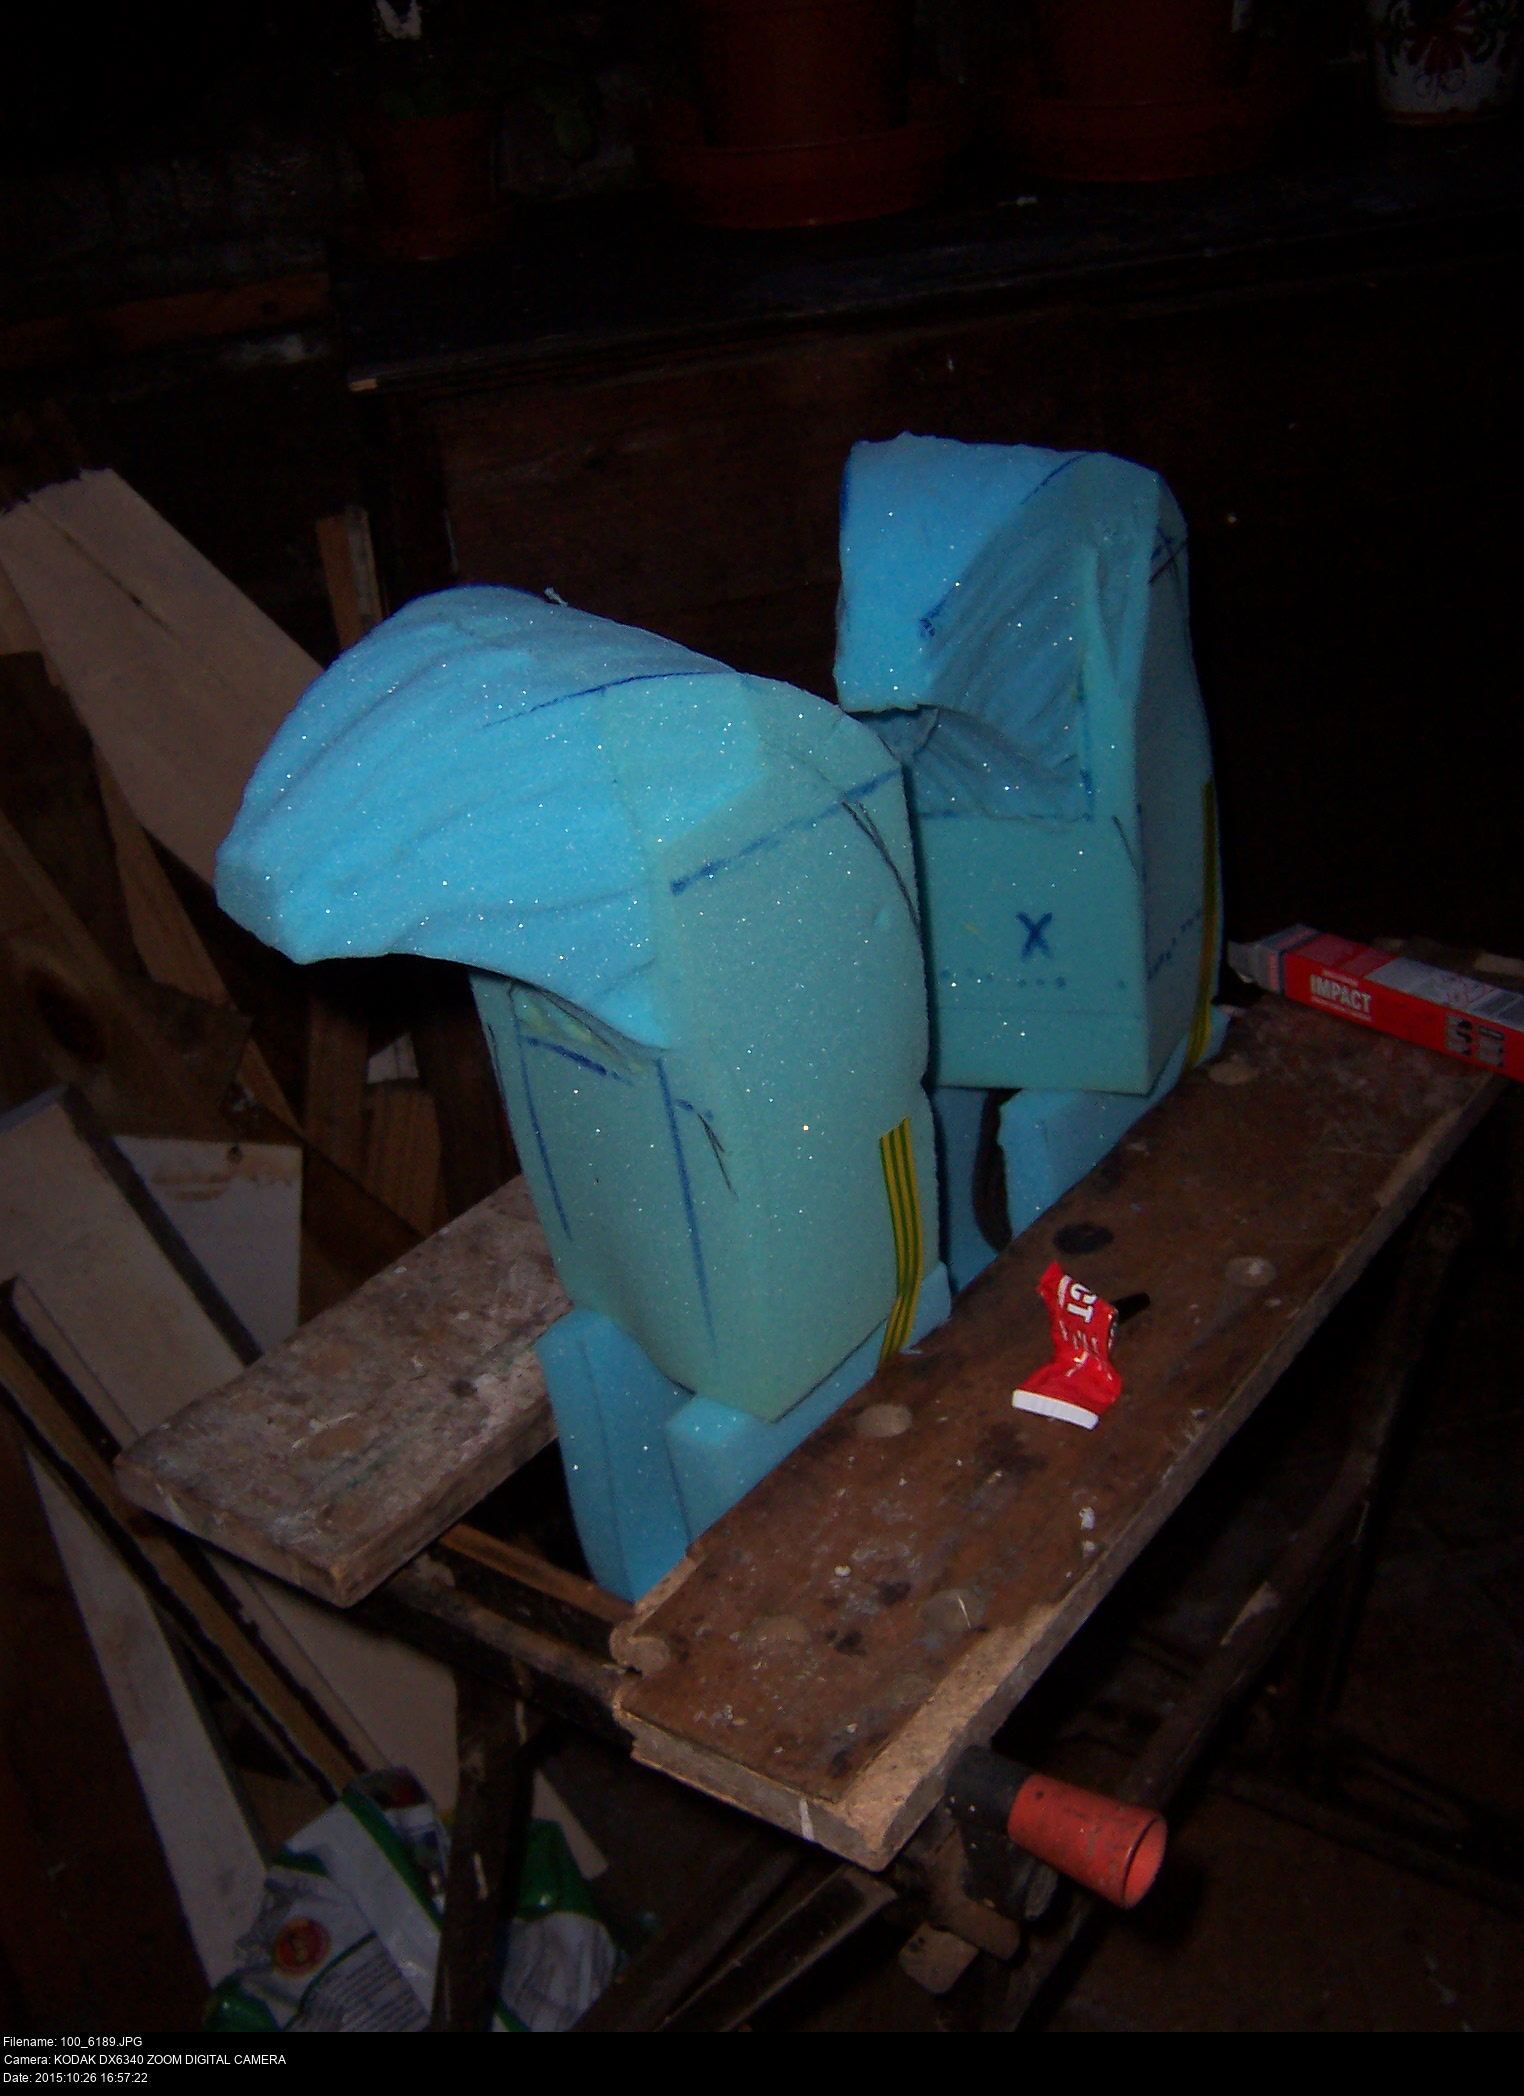
After very patiently waiting for the first stage of gluing to finish, I could add the second block of foam above the first. You need to be able to visualise what the final carved shape is going to be. If you can look at my photographs and see the final pointed shape of the shoe, you're on the right track.
At this point I very wisely (though not particularly happily) moved all my stuff down to the shed.


I think back then I was still using my tiny hobby knife for all the cutting, like a damned fool. I'm going to skip forward and give you some advice from my future fursuit-head-making self some twelve months hence: if you're going to be doing any amount of work with foam, get yourself a set of disposable snap-off retractable knives. Extend them to their full length and you've got a long, super sharp (and DANGEROUS) cutting edge to cut or whittle foam with. I was hacking at this lump with a tiny precision scalpel if I'm not mistaken.
In these images, you can see I made a mistake in marking out the cutting shape on my foam. In the photo where the boots are sitting on the table beside the mask, I've marked out a sailboat type shape at the tip of the boots. This is wrong! If I cut out that shape, the boots would taper off towards their tip. The correct shape is that the boot remains more or less the same horizontal width all the way down to the toe. The flat edge of the shoe, where it curls upwards, would appear to be a vertical line at the tip of the shoe.
Cut conservatively and constantly check your references. Look at it from every angle and take tons of pictures. It's possible to glue on a new block of foam if you make a mistake, but it'll be 24 hours before you can make any more progress on your shoe.


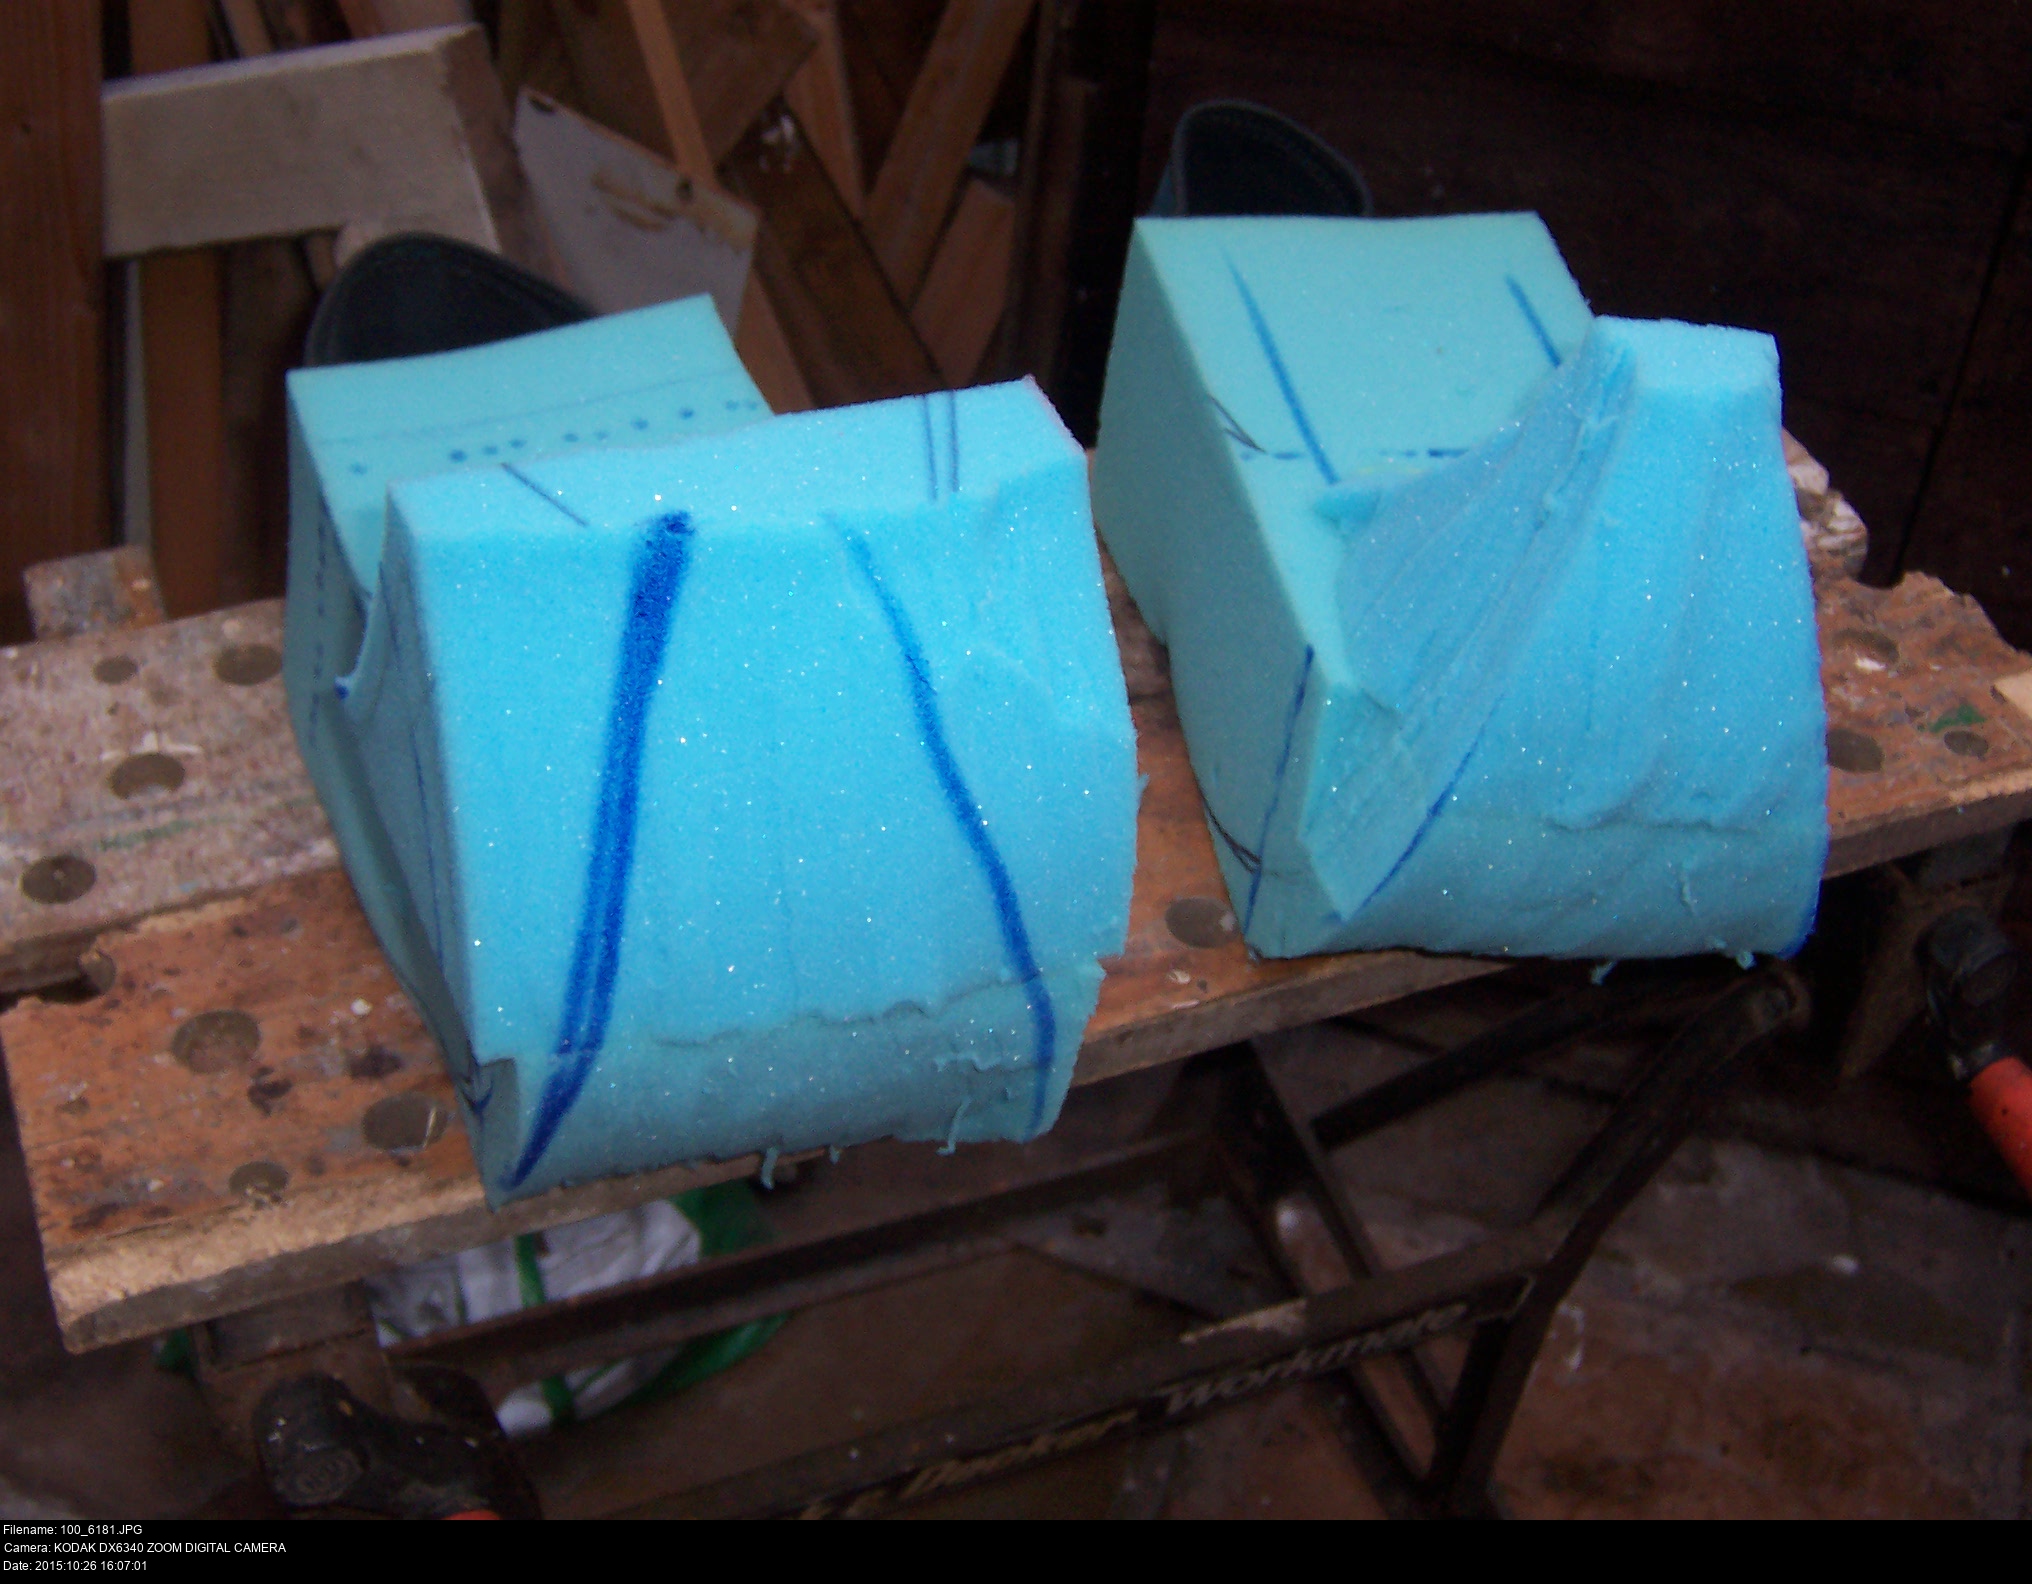
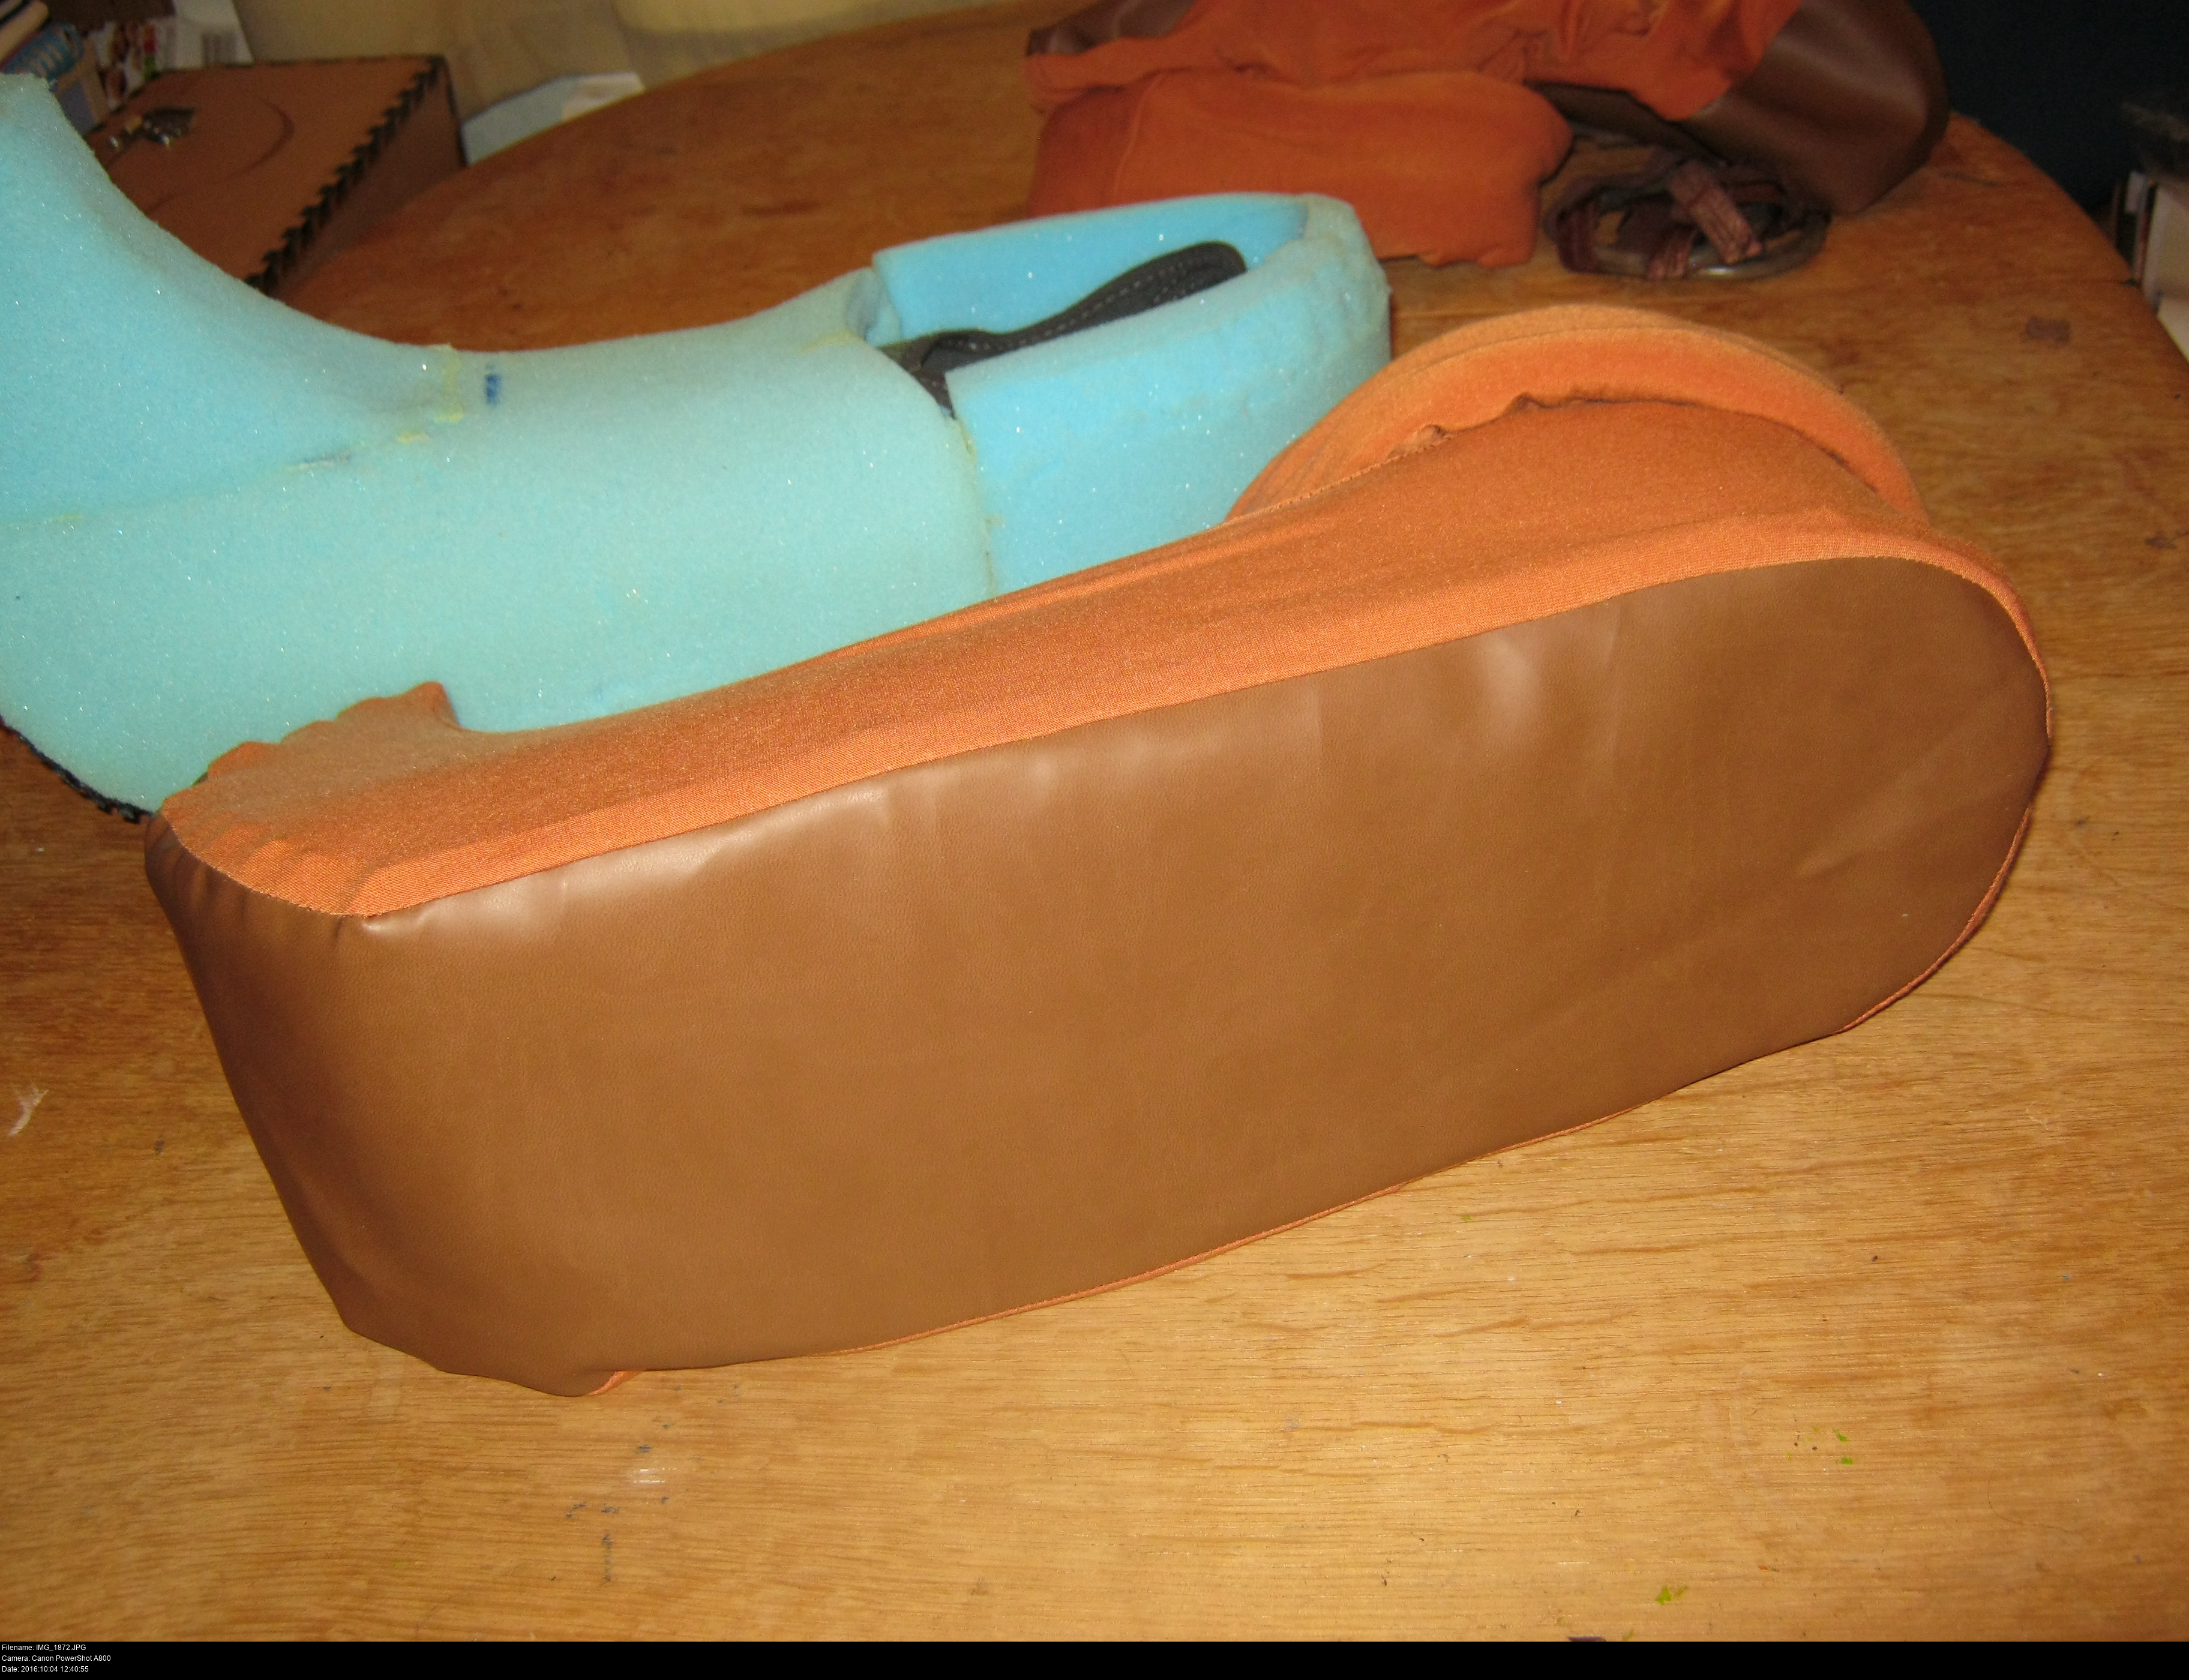
There's an extra piece of foam that needs to be added to give the shoe the correct shape - to make the full outer edge of the shoe a uniform thickness I need to glue on a thin layer of foam around the back of the opening. The alternative to this would have been to keep the original shoe's width, but then the foam point would've only been glued to the top canvas of the pump and it would've been very flimsy. Gluing the foam all over the canvas and a little over the sides of the shoe makes it stronger and results in a more cartoony poofy foot shape. The uniformity also helps with planning out the fabric covering later.
Remember to leave it 24 hours to dry and give it some pressure. The Workmate helps! (That's the name of this adjustable work table I'm using. It has two shelf-like surfaces that you can open and close like a vice to clamp materials in place.)


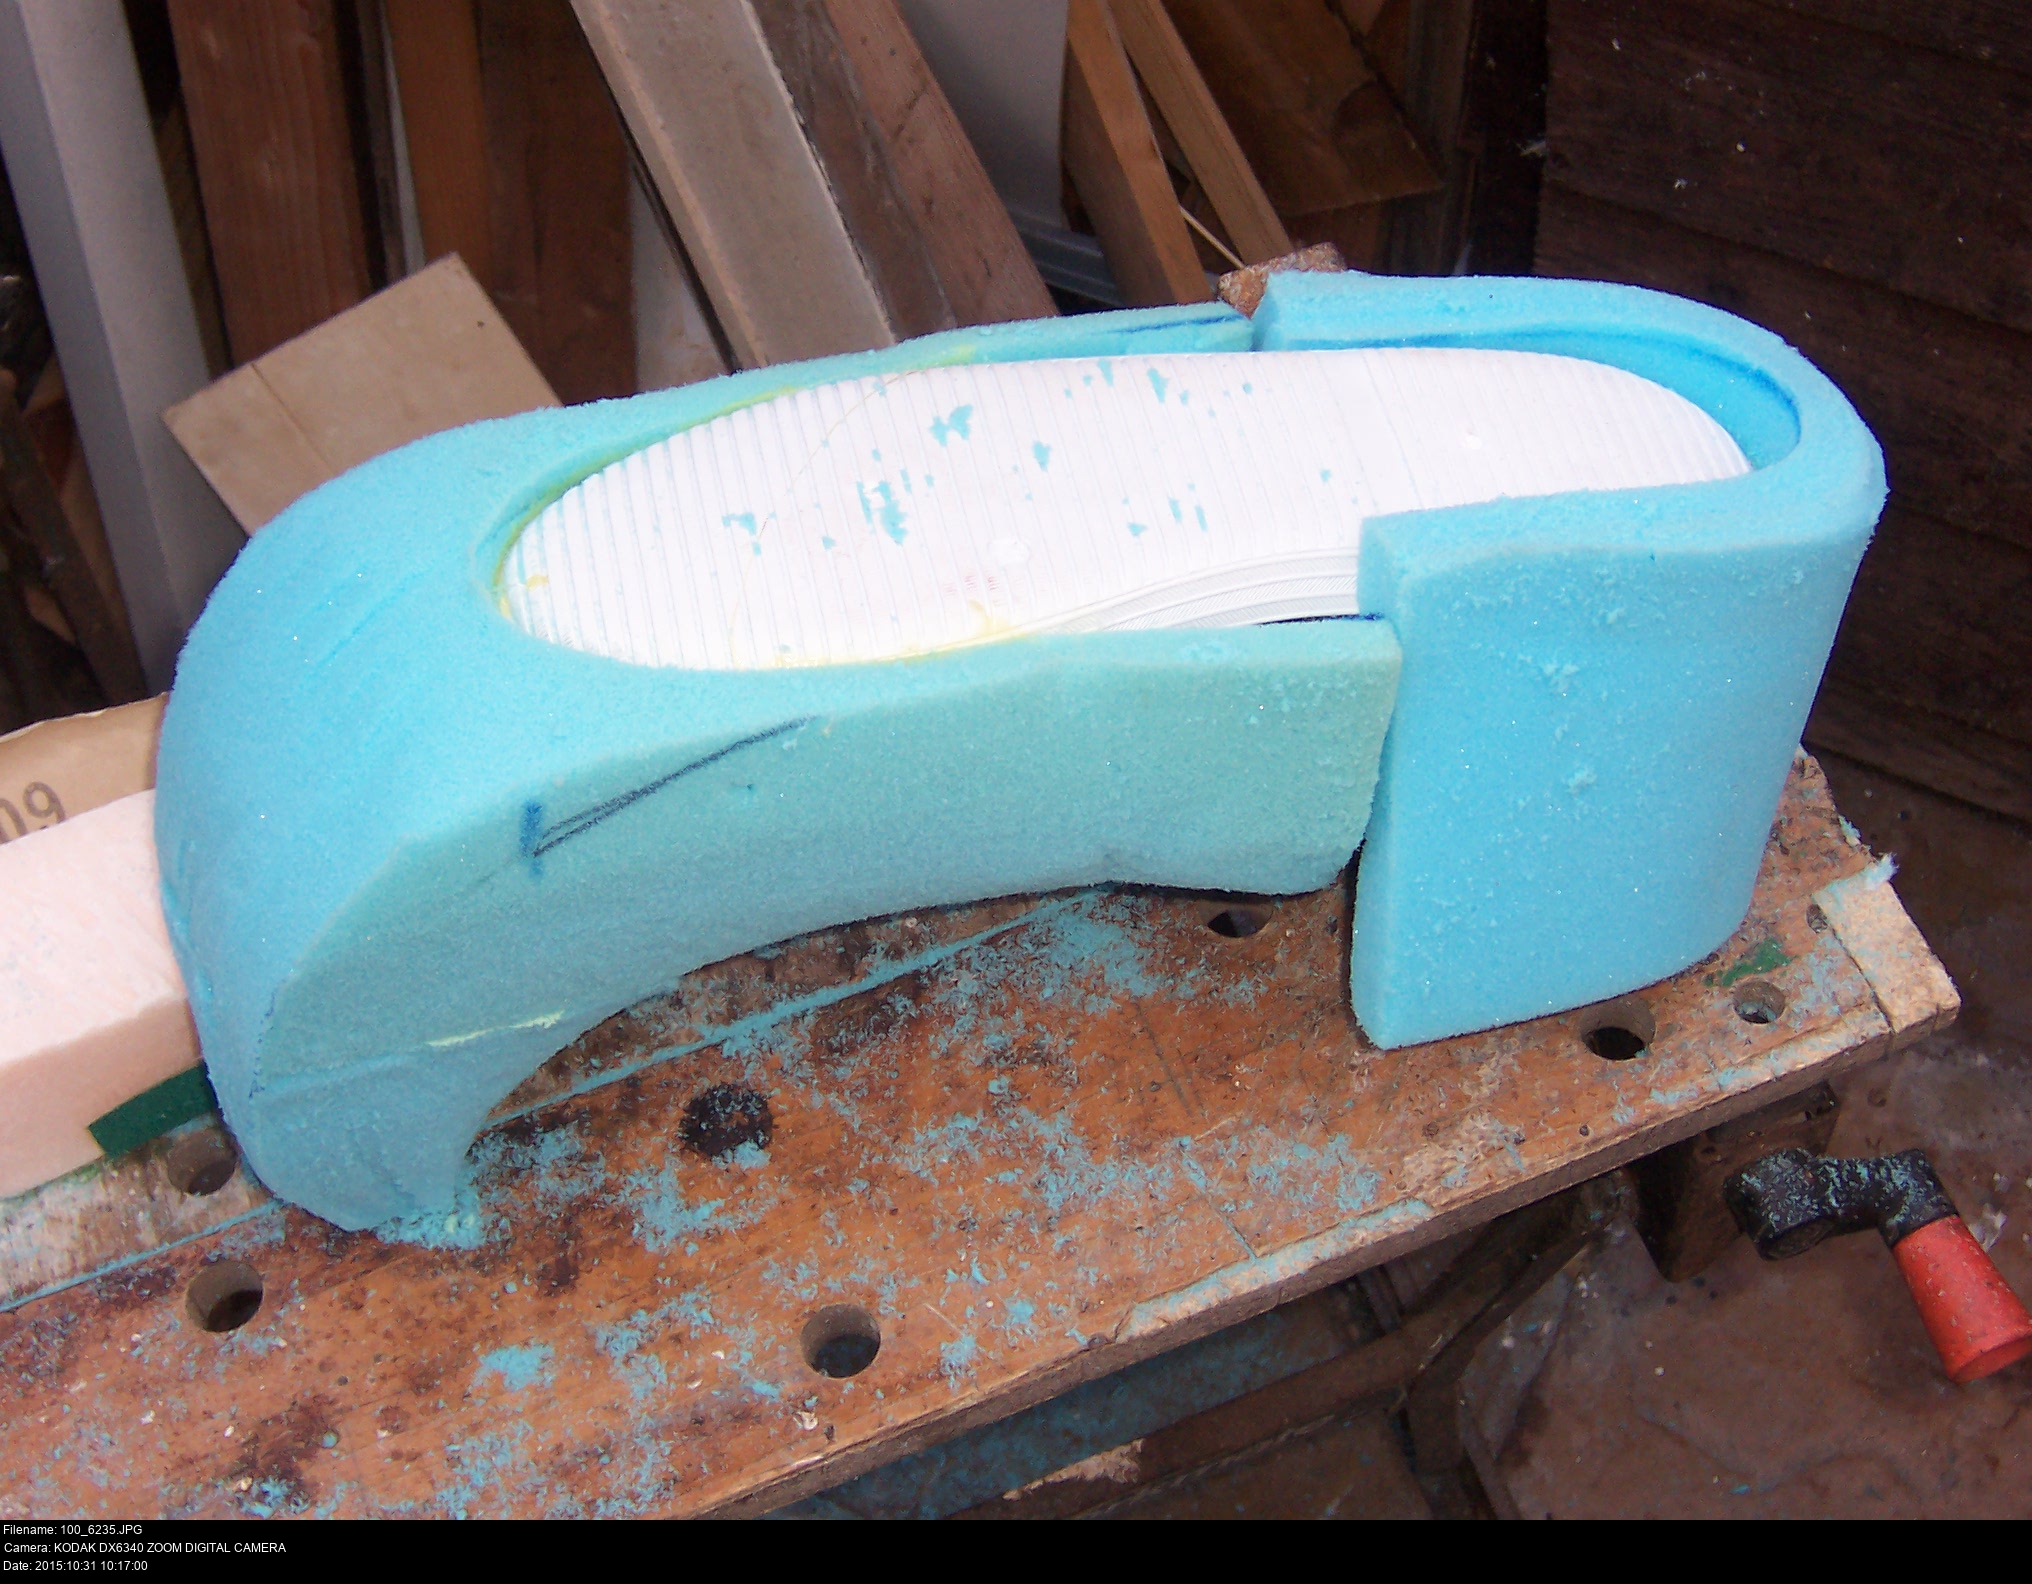


When the back piece is in place, it's time to create the final shape of the boot. How do you get such a lovely smooth-looking finish, you ask?
Sandpaper. From that chunky cut-up mess above, I sat down with a block of XPS and a pack of sandpaper and gently scraped away the upholstery foam until it revealed the contours I wanted. It took a long time and produced a hell of a lot of dust. But if I'm covering this in stretchy cotton fabric later on, I can't have any lumps since they'd show through. So it was from one shoe to the other, making sure they were as even as I could make them. Certain parts of the foam started to peel from all the attention, so I had to apply more glue and leave it a few times.
Once it's dry (never work on it while it's drying!), I cut the back piece so it was flush with the sole and the top of the opening.


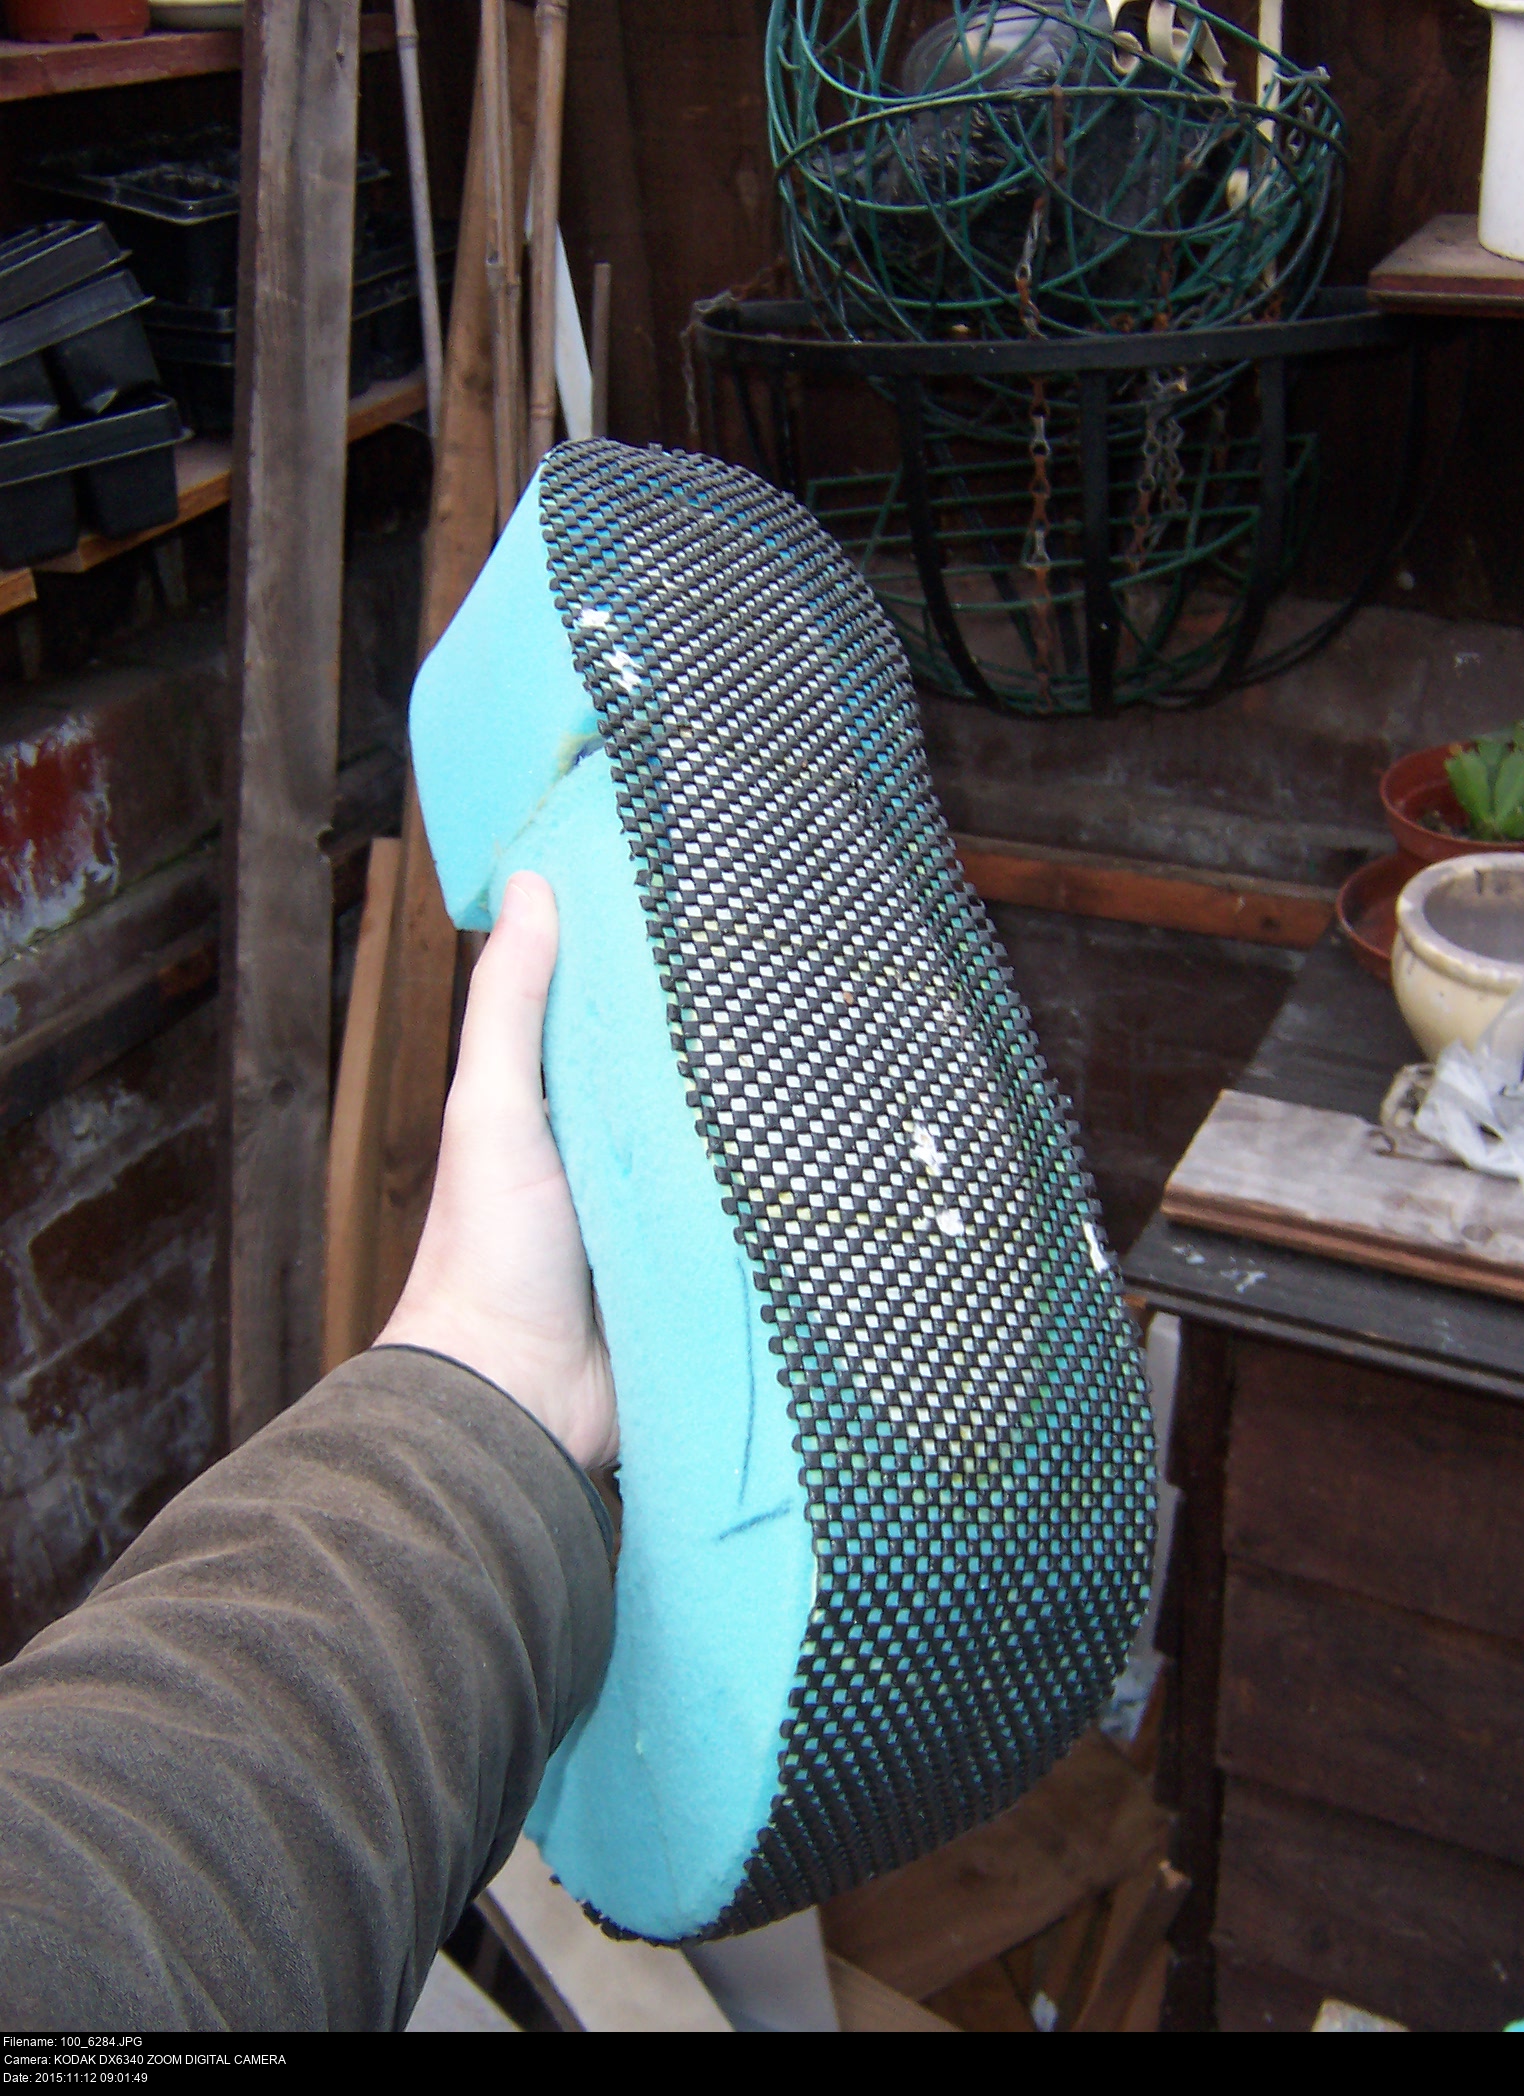


I've got a funny way of walking, apparently. I have no idea what causes it, but every shoe I've ever owned has been ground to a thin paste under my heel. Or, more correctly, the ball of my foot. If I tried to wear these pumps normally, as my normal walking shoes, they wouldn't last six months. For want of a better idea, I decided to glue some non-slip rubber mats to the soles to give them more strength, or at least another layer to wear through. It also provides a uniform surface over the foam and the curve of the manufactured sole. It's glued on with more Evostik, taped as best I could and left for a day. This took a few attempts before I had it all gluing to the shoe and not dangling all over the place.
At each stage in this, it's really important to try the shoe on! If you do something to it that prevents you from wearing it, you're going to start making unfixable mistakes. Keep trying things on!


This was the first time I'd made a pattern to fit an existing object. There's a bunch of ways to do this, but what I did was:
Visualise where I wanted all the seams to lie on the shoe.
Stretch a piece of scrap fabric with similar properties over each area in turn, pinning it in place.
Draw the outline of the pattern piece onto the fabric.
Cut them all out.
Another way (which is what I've done since for fursuit heads and soft toys) is to cover the object in non-sticky duct tape, mark out the seams on the taped object, and finally cut the tape off along the seams to reveal a collection of pieces with the correct shape. This is almost certainly what belle43 did to make theirs!
After using either method, you'll need to remember to add the seam allowance where necessary, and any extra extrusions where you want to sew on things later.
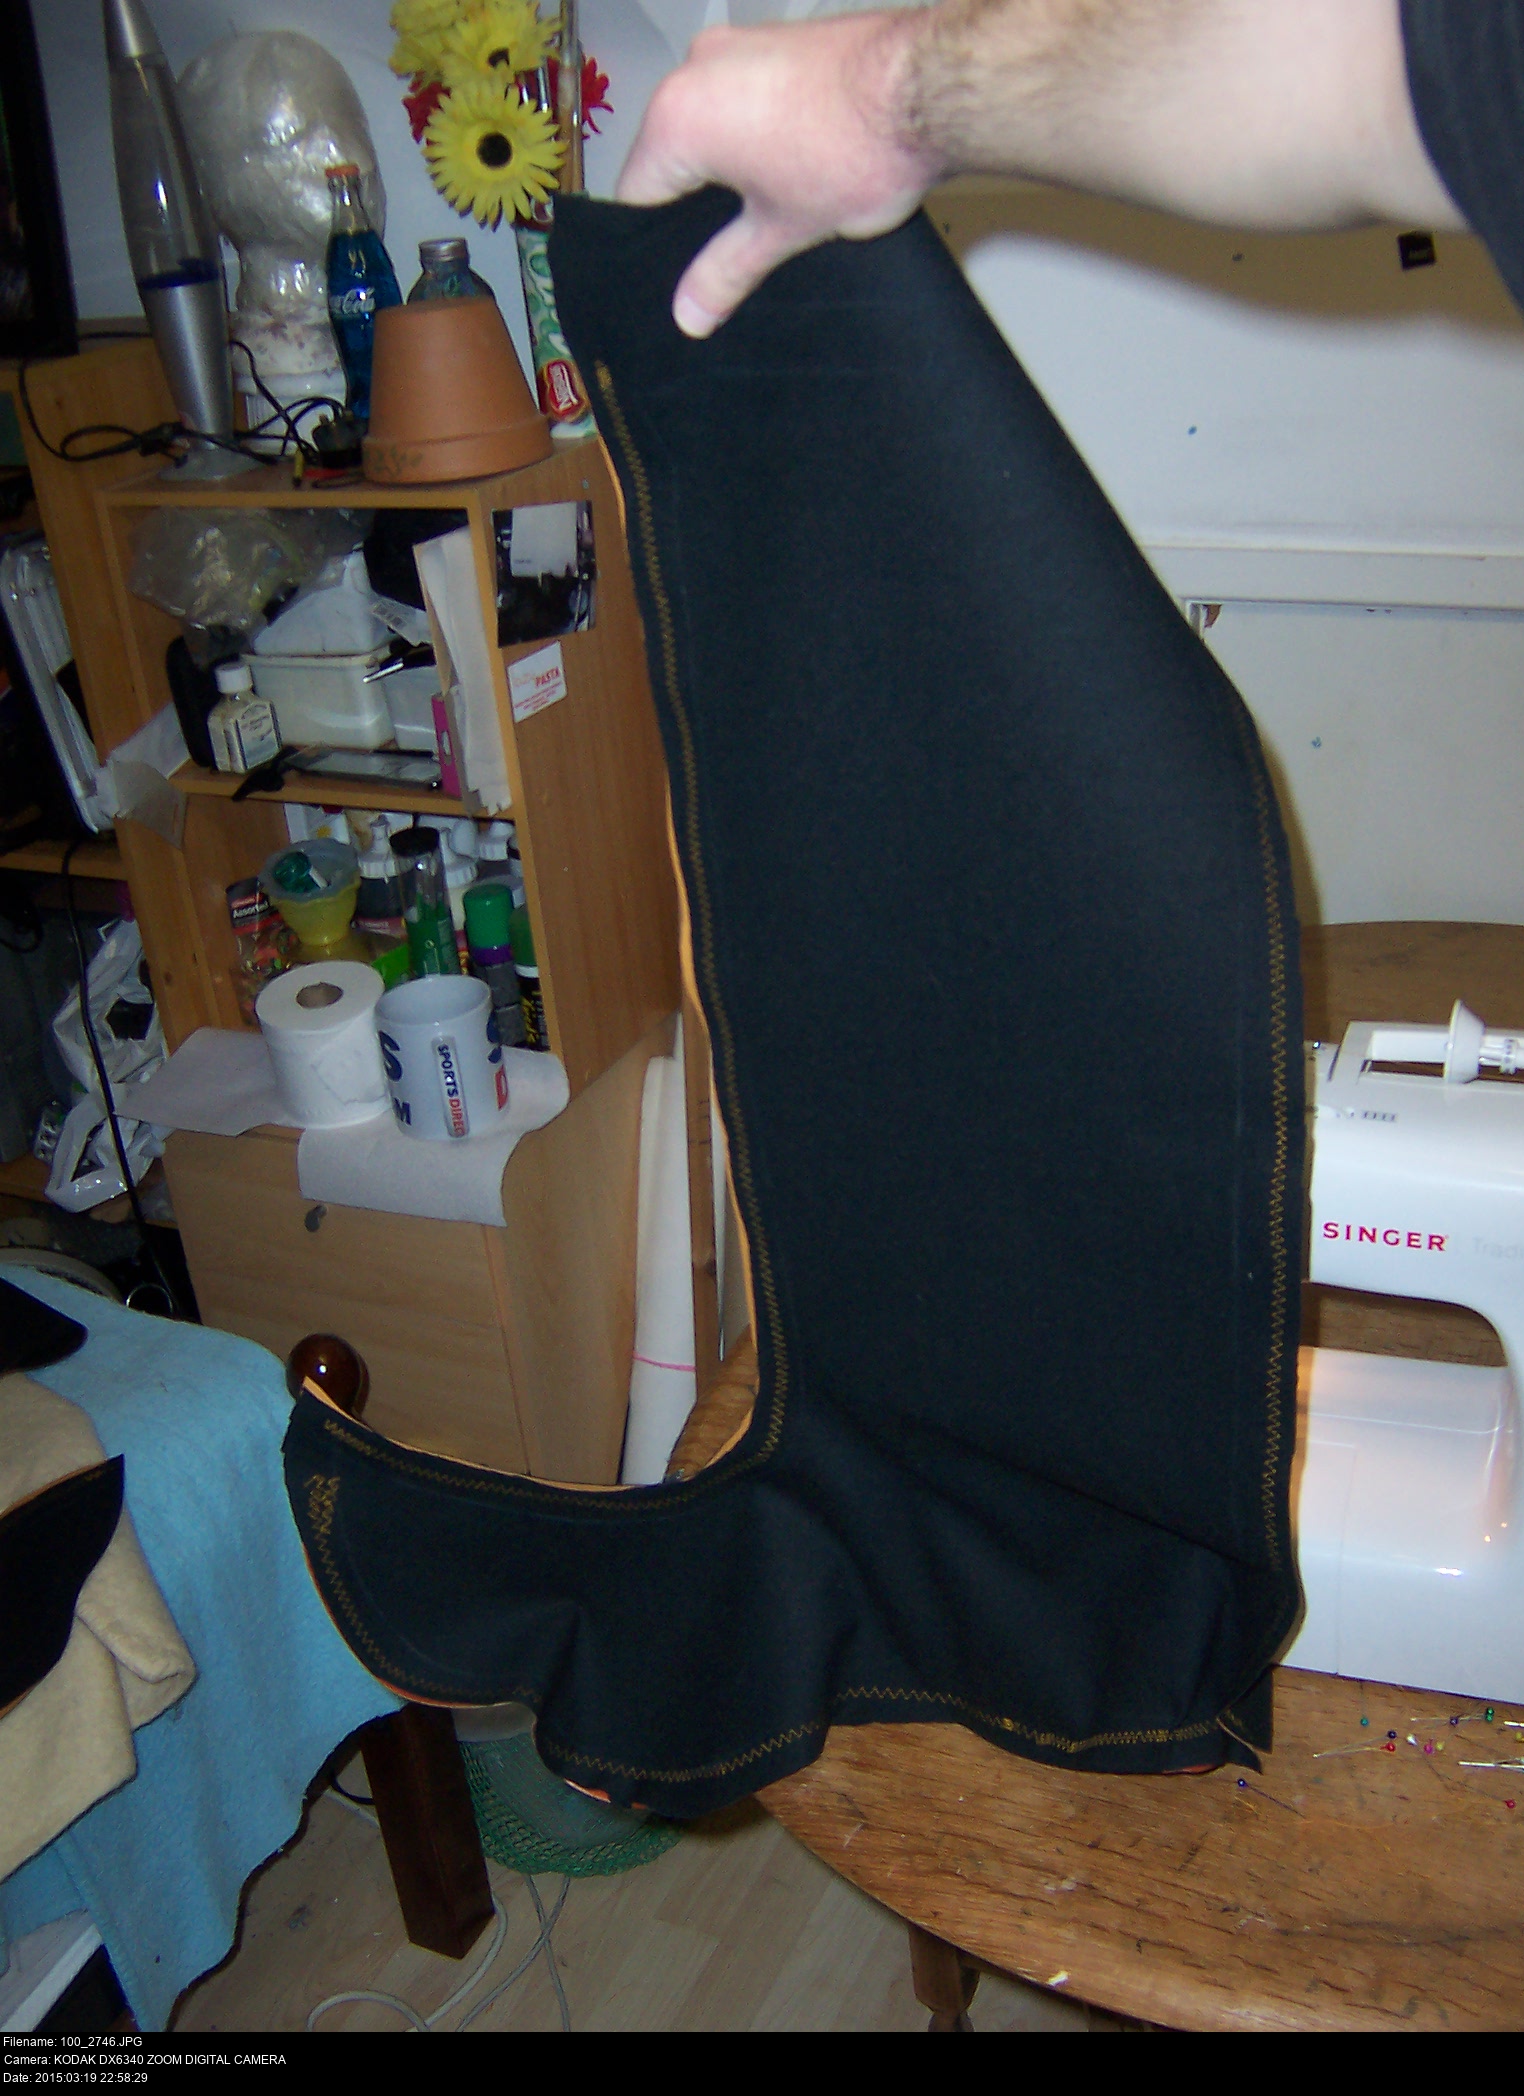
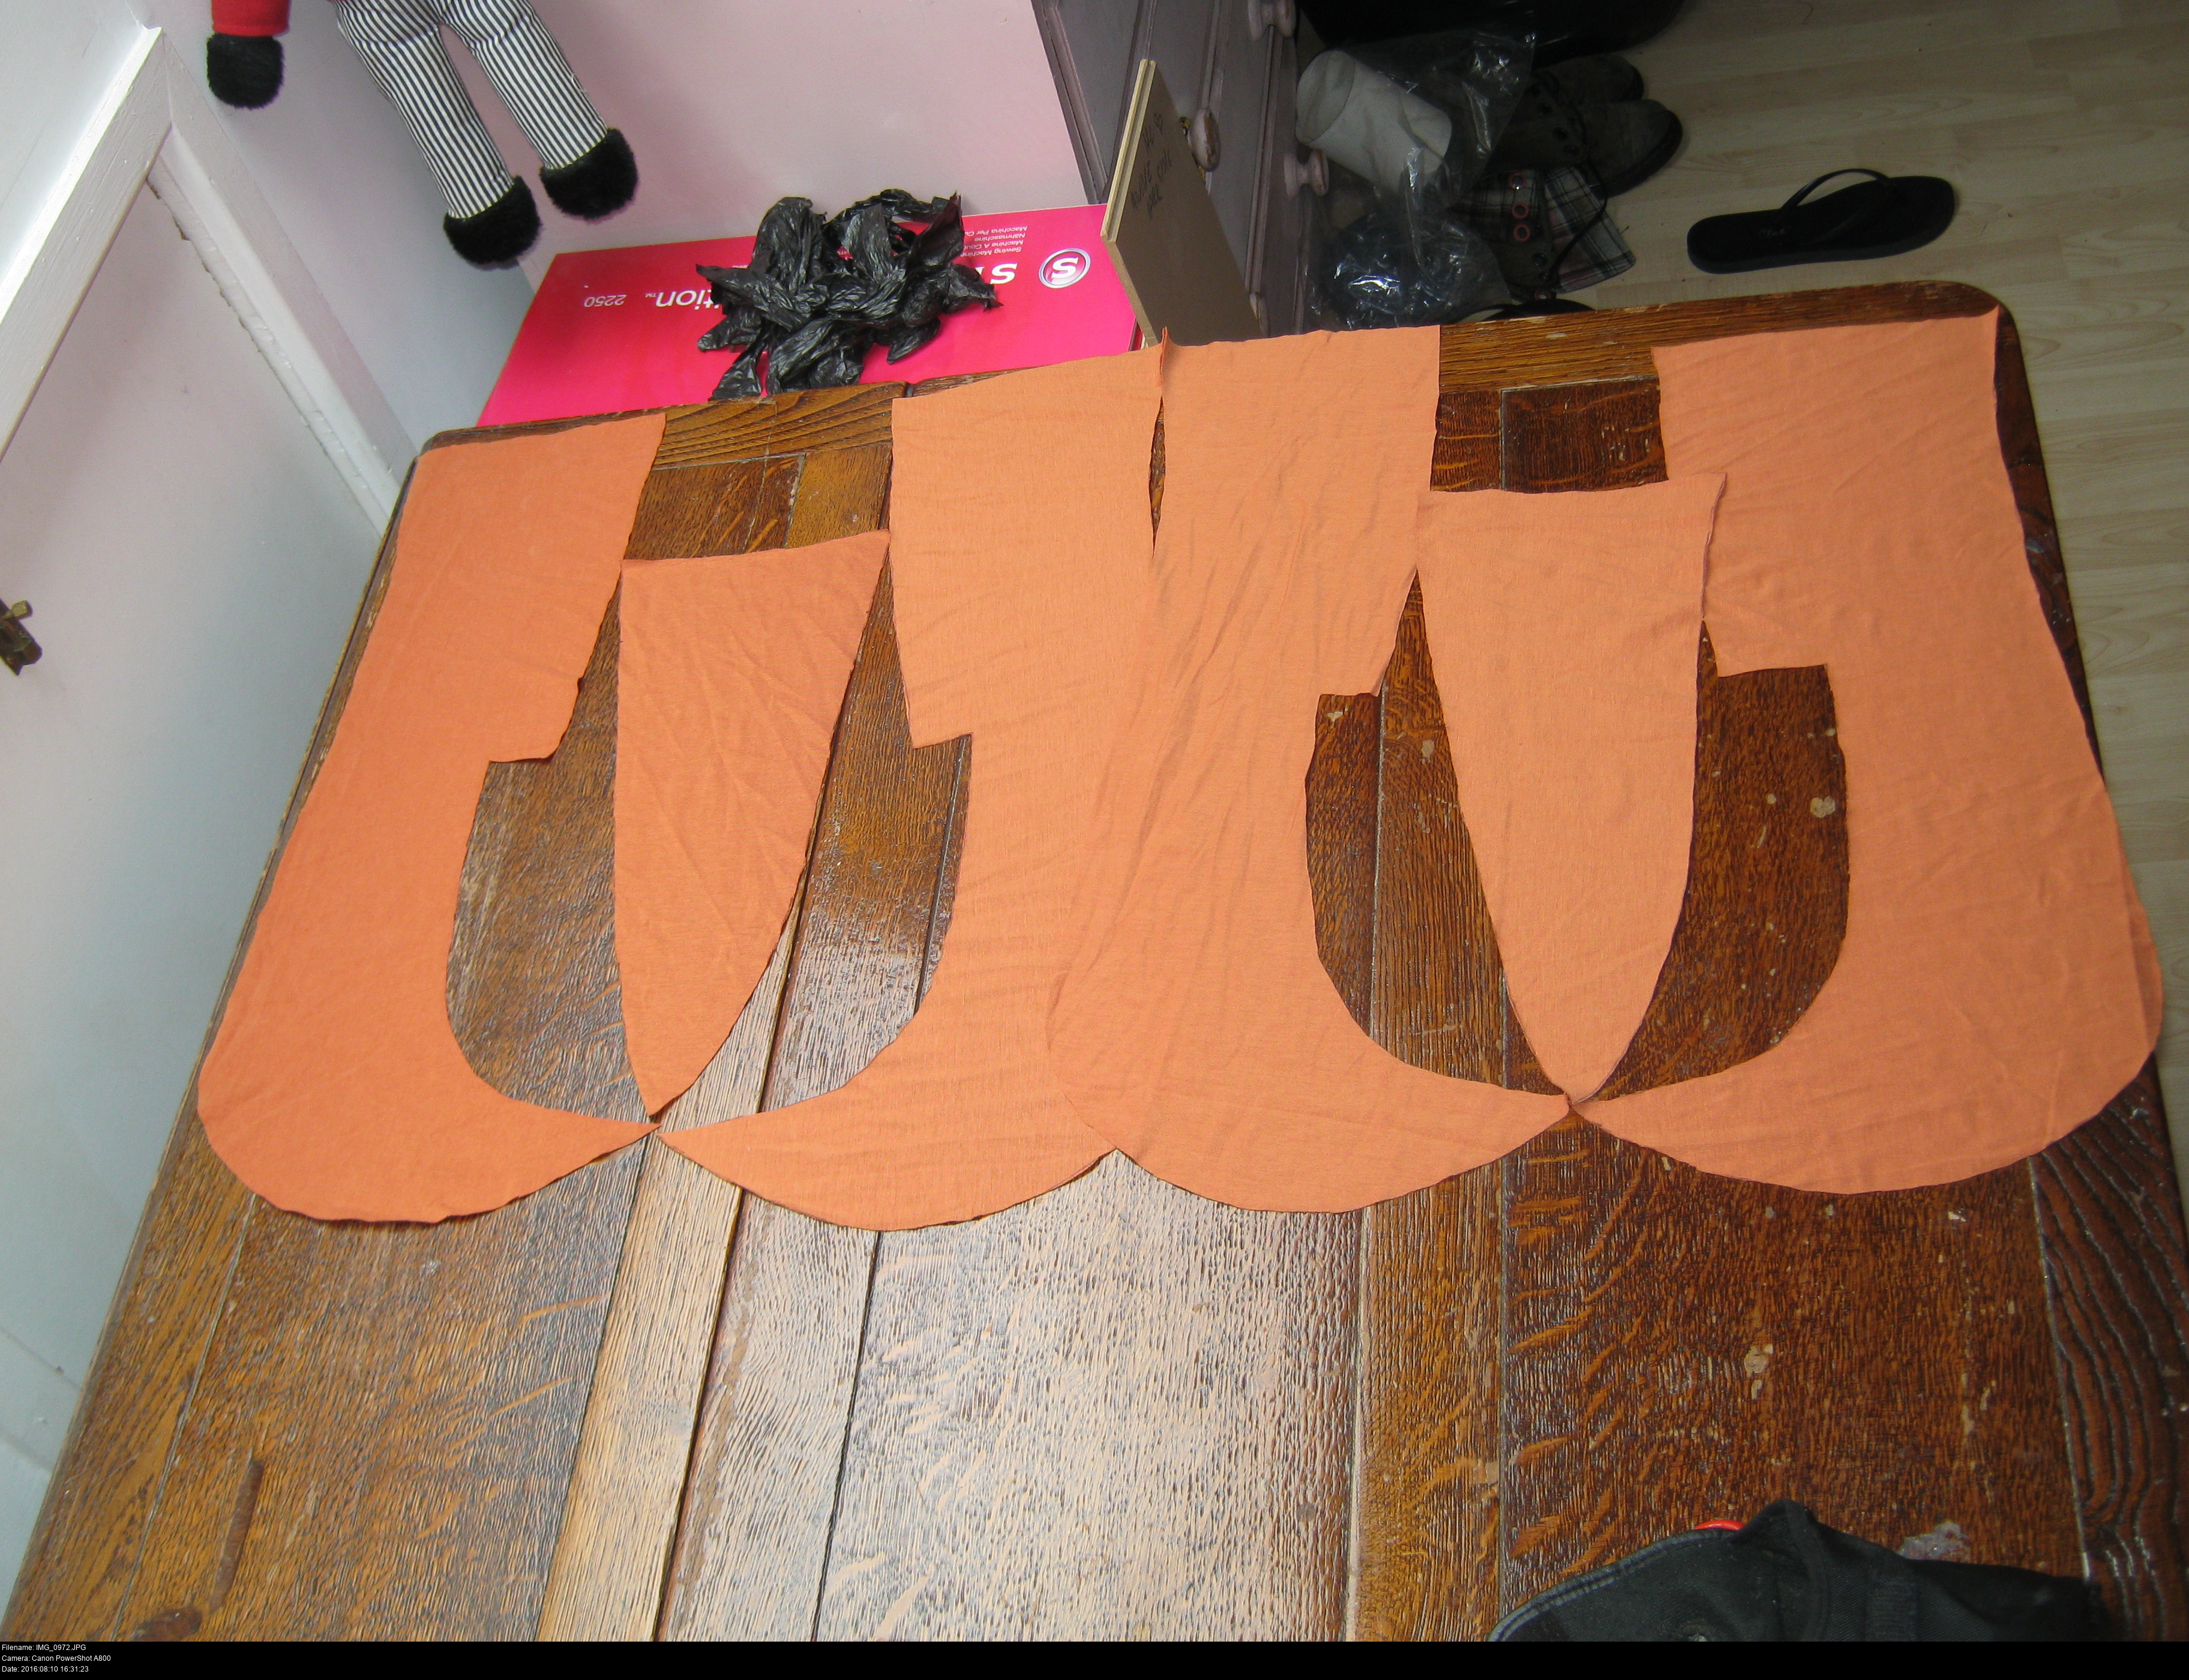
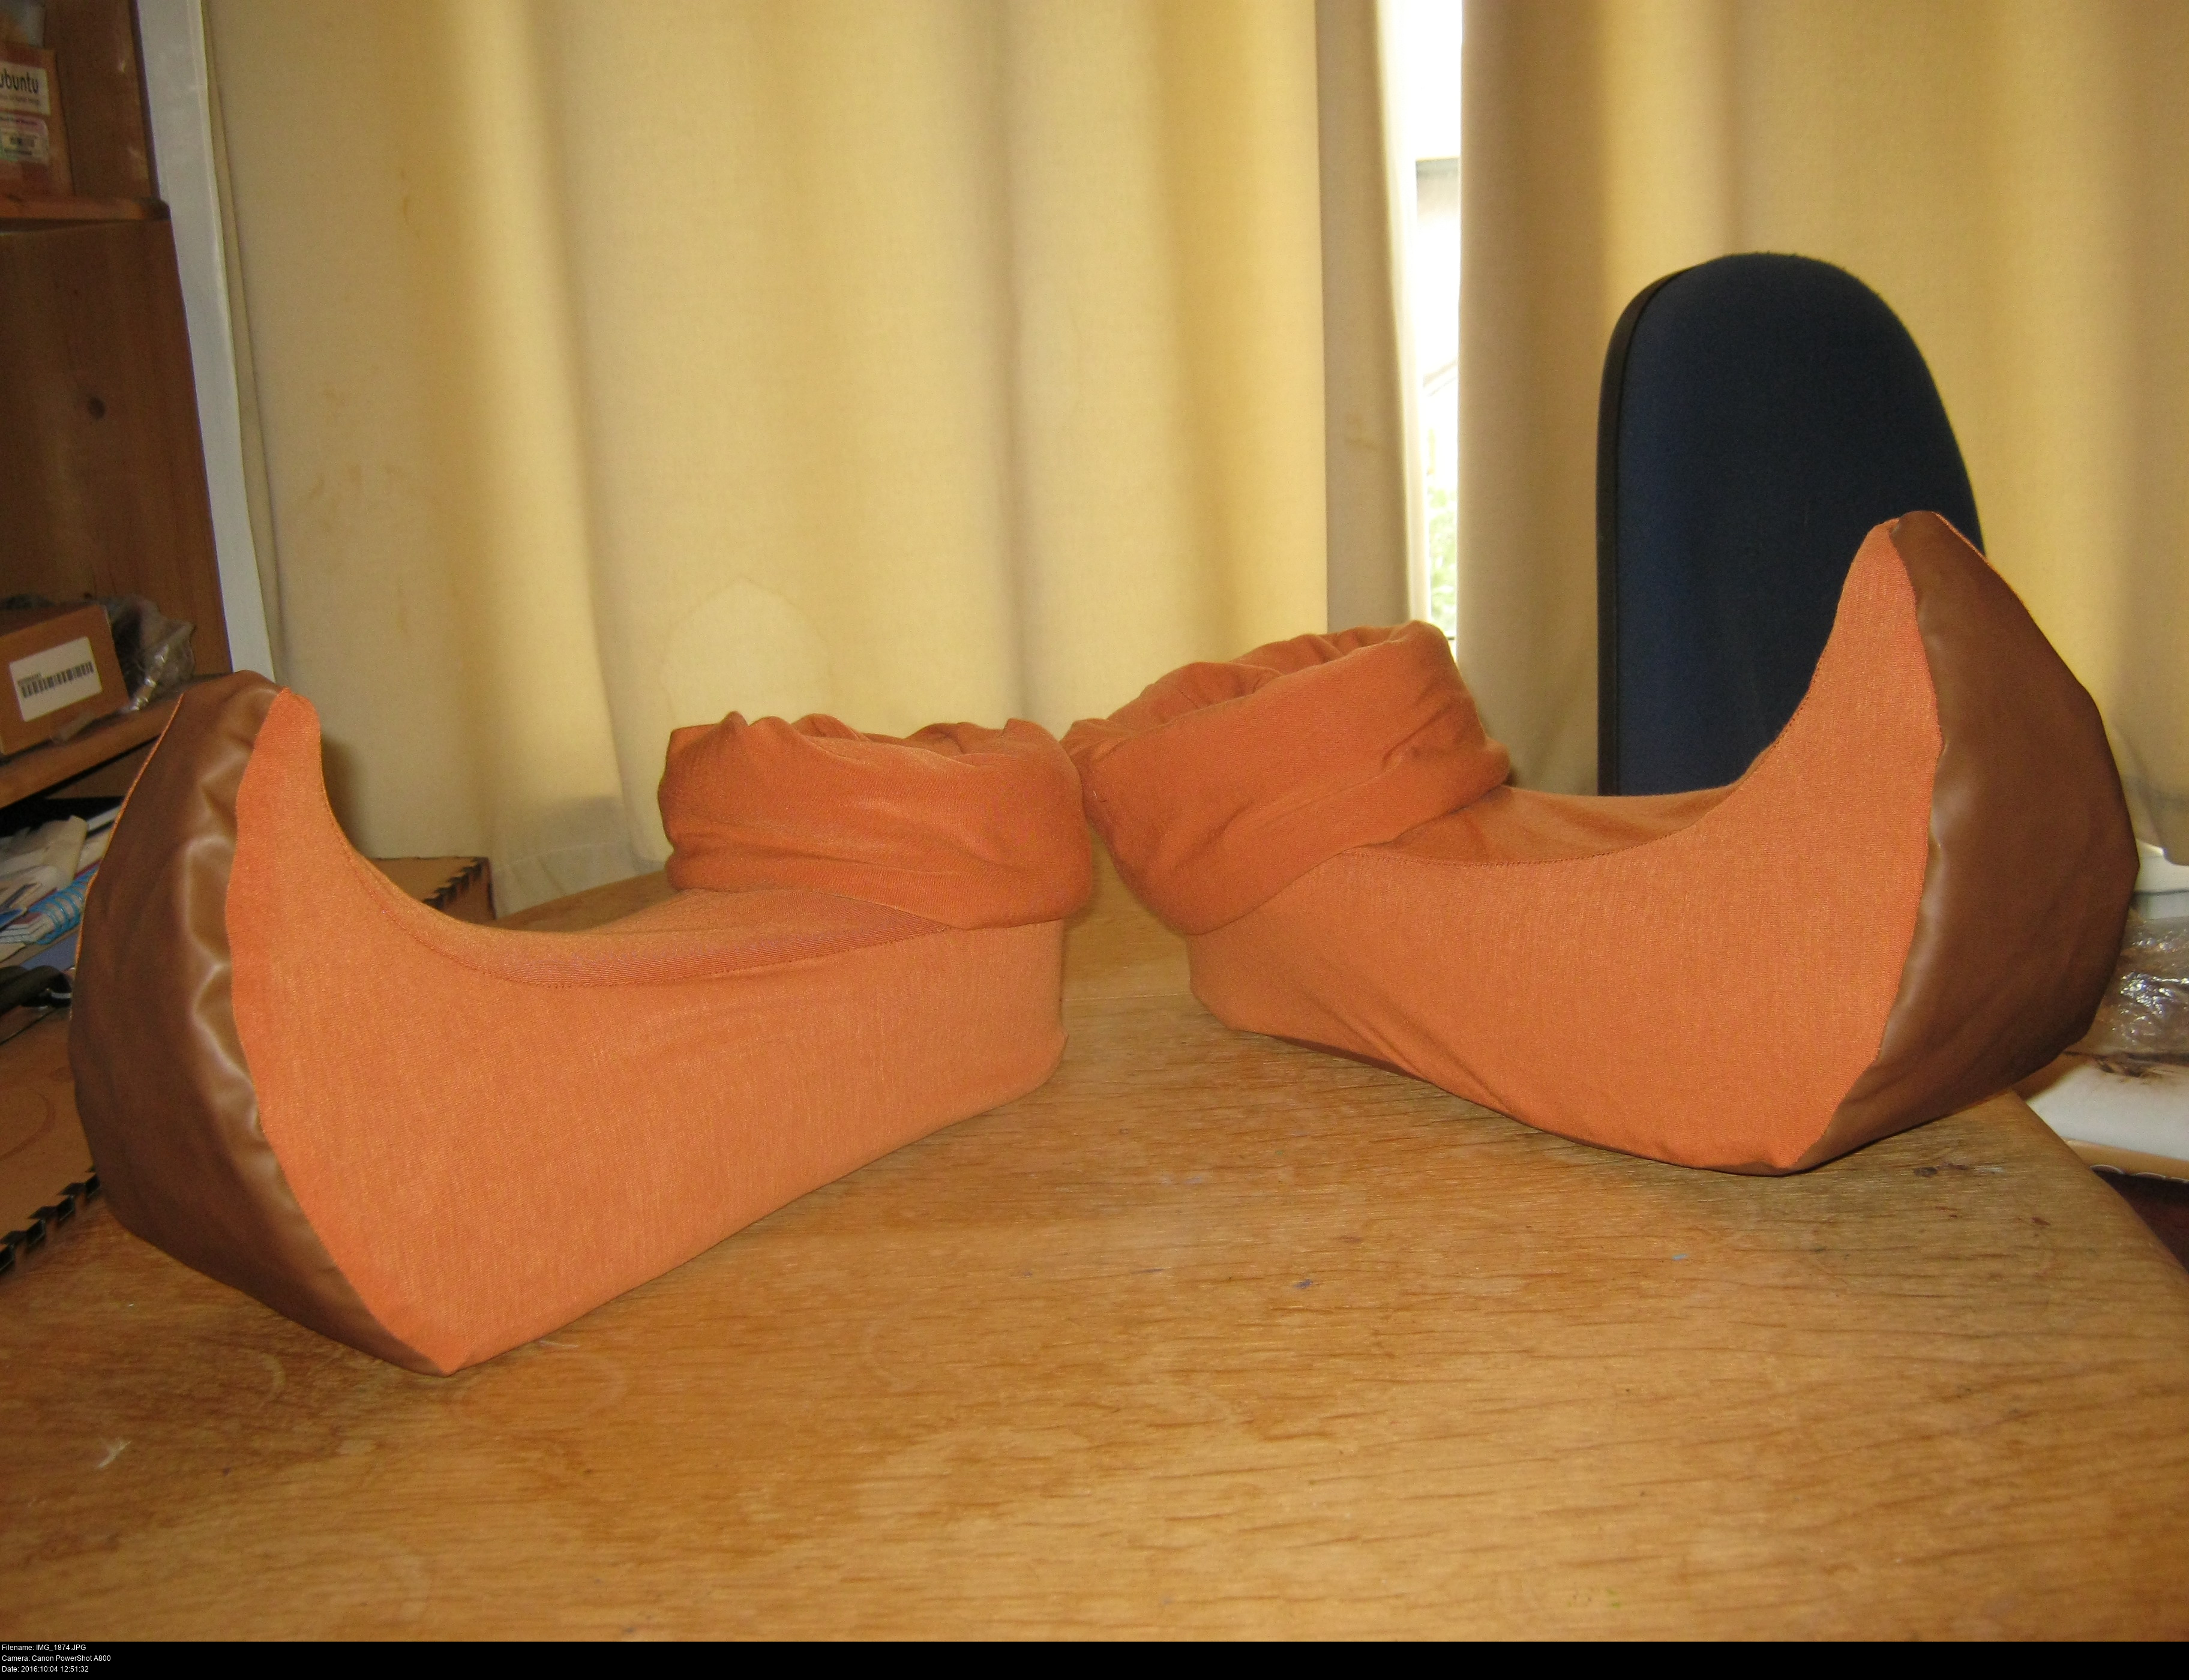
My pattern consists of a side piece, a top piece, and a sole piece. The sole piece has an assymmetrical curve to it because... well I don't know. Probably a quirk of using this method with stretchy fabric. The side piece is flipped to make each side of the shoe covering.
My patterns for the tongue and side pieces have extra area added for seam allowance to sew the shoe cuff on (last).


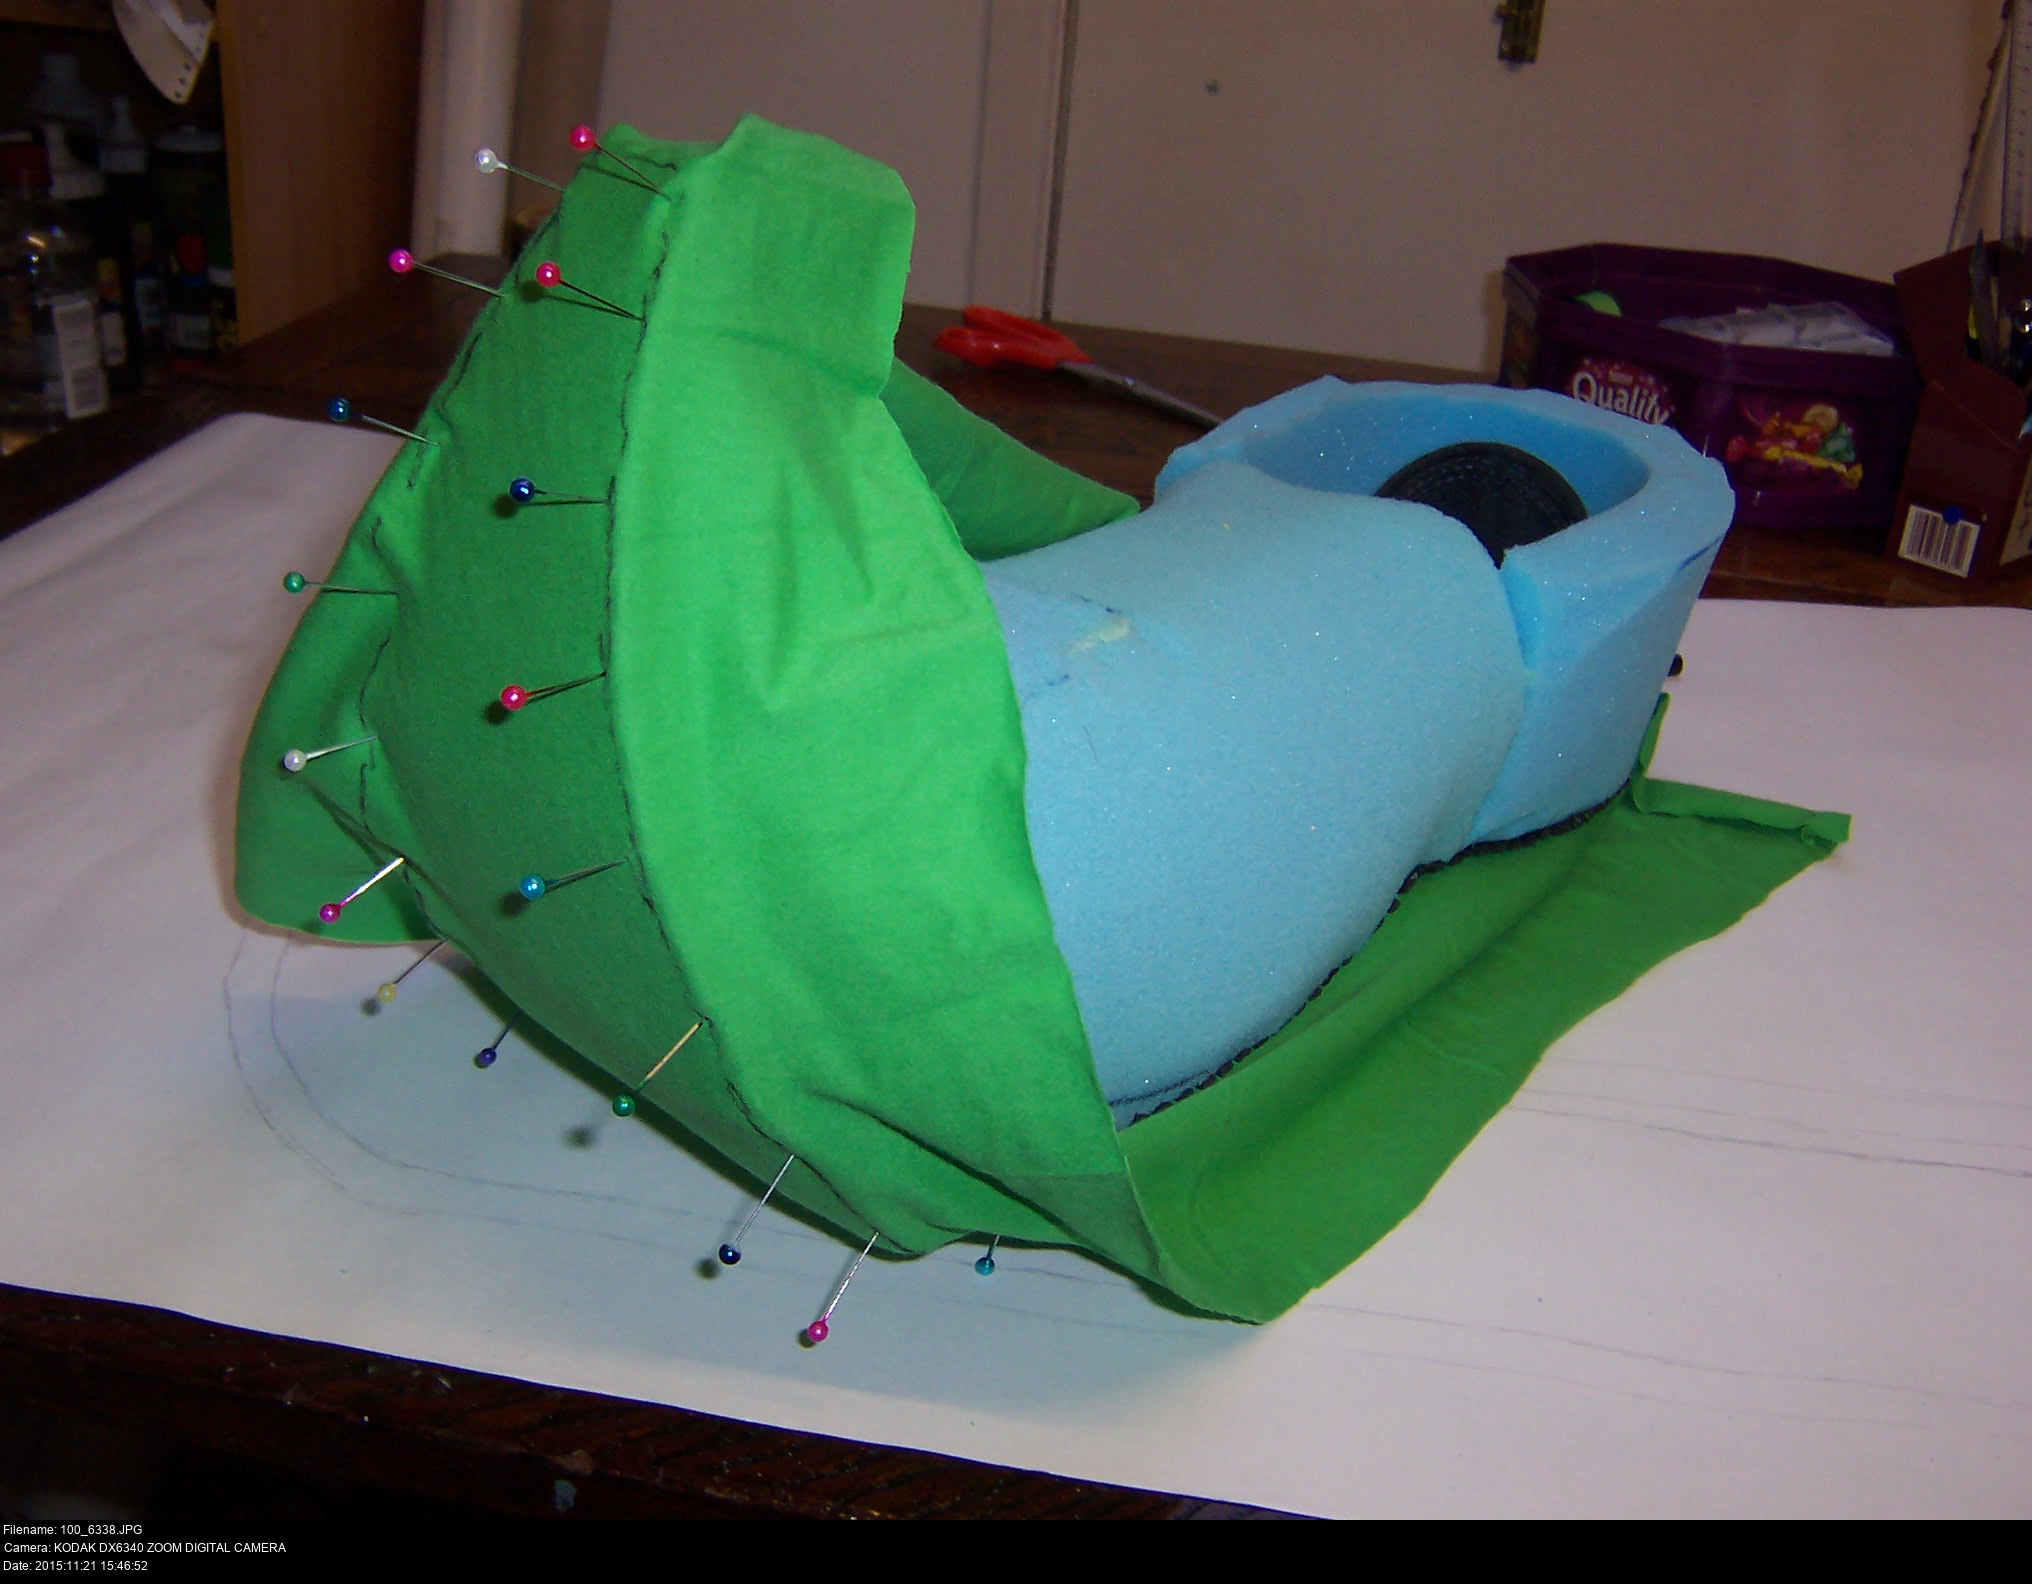
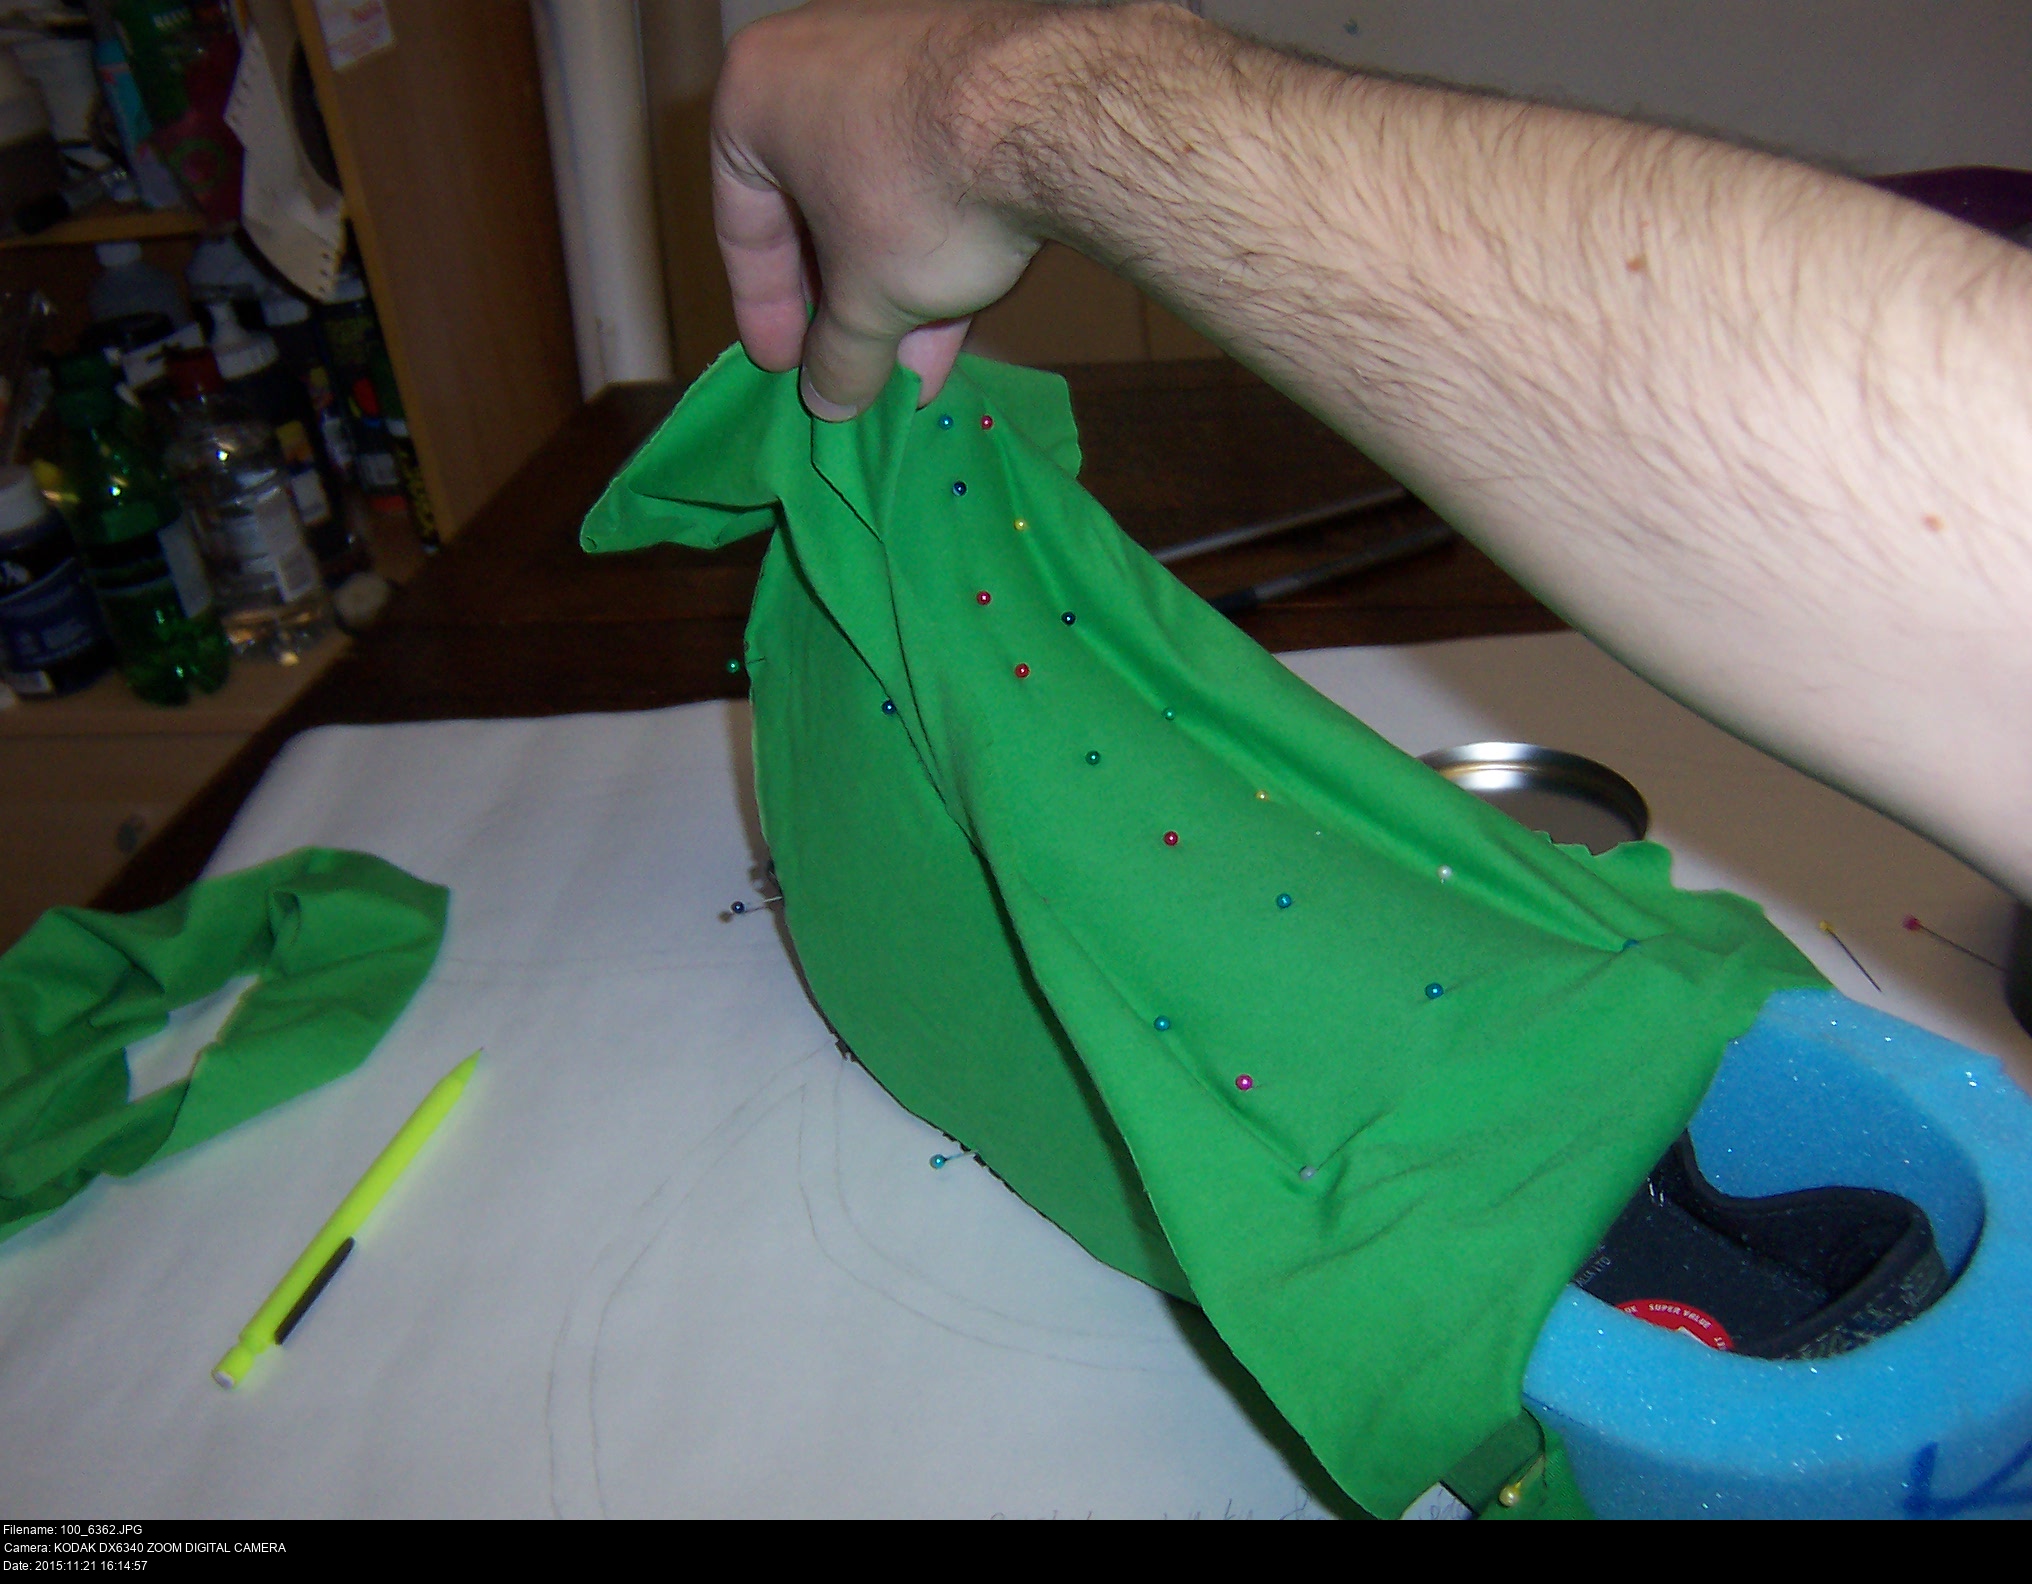
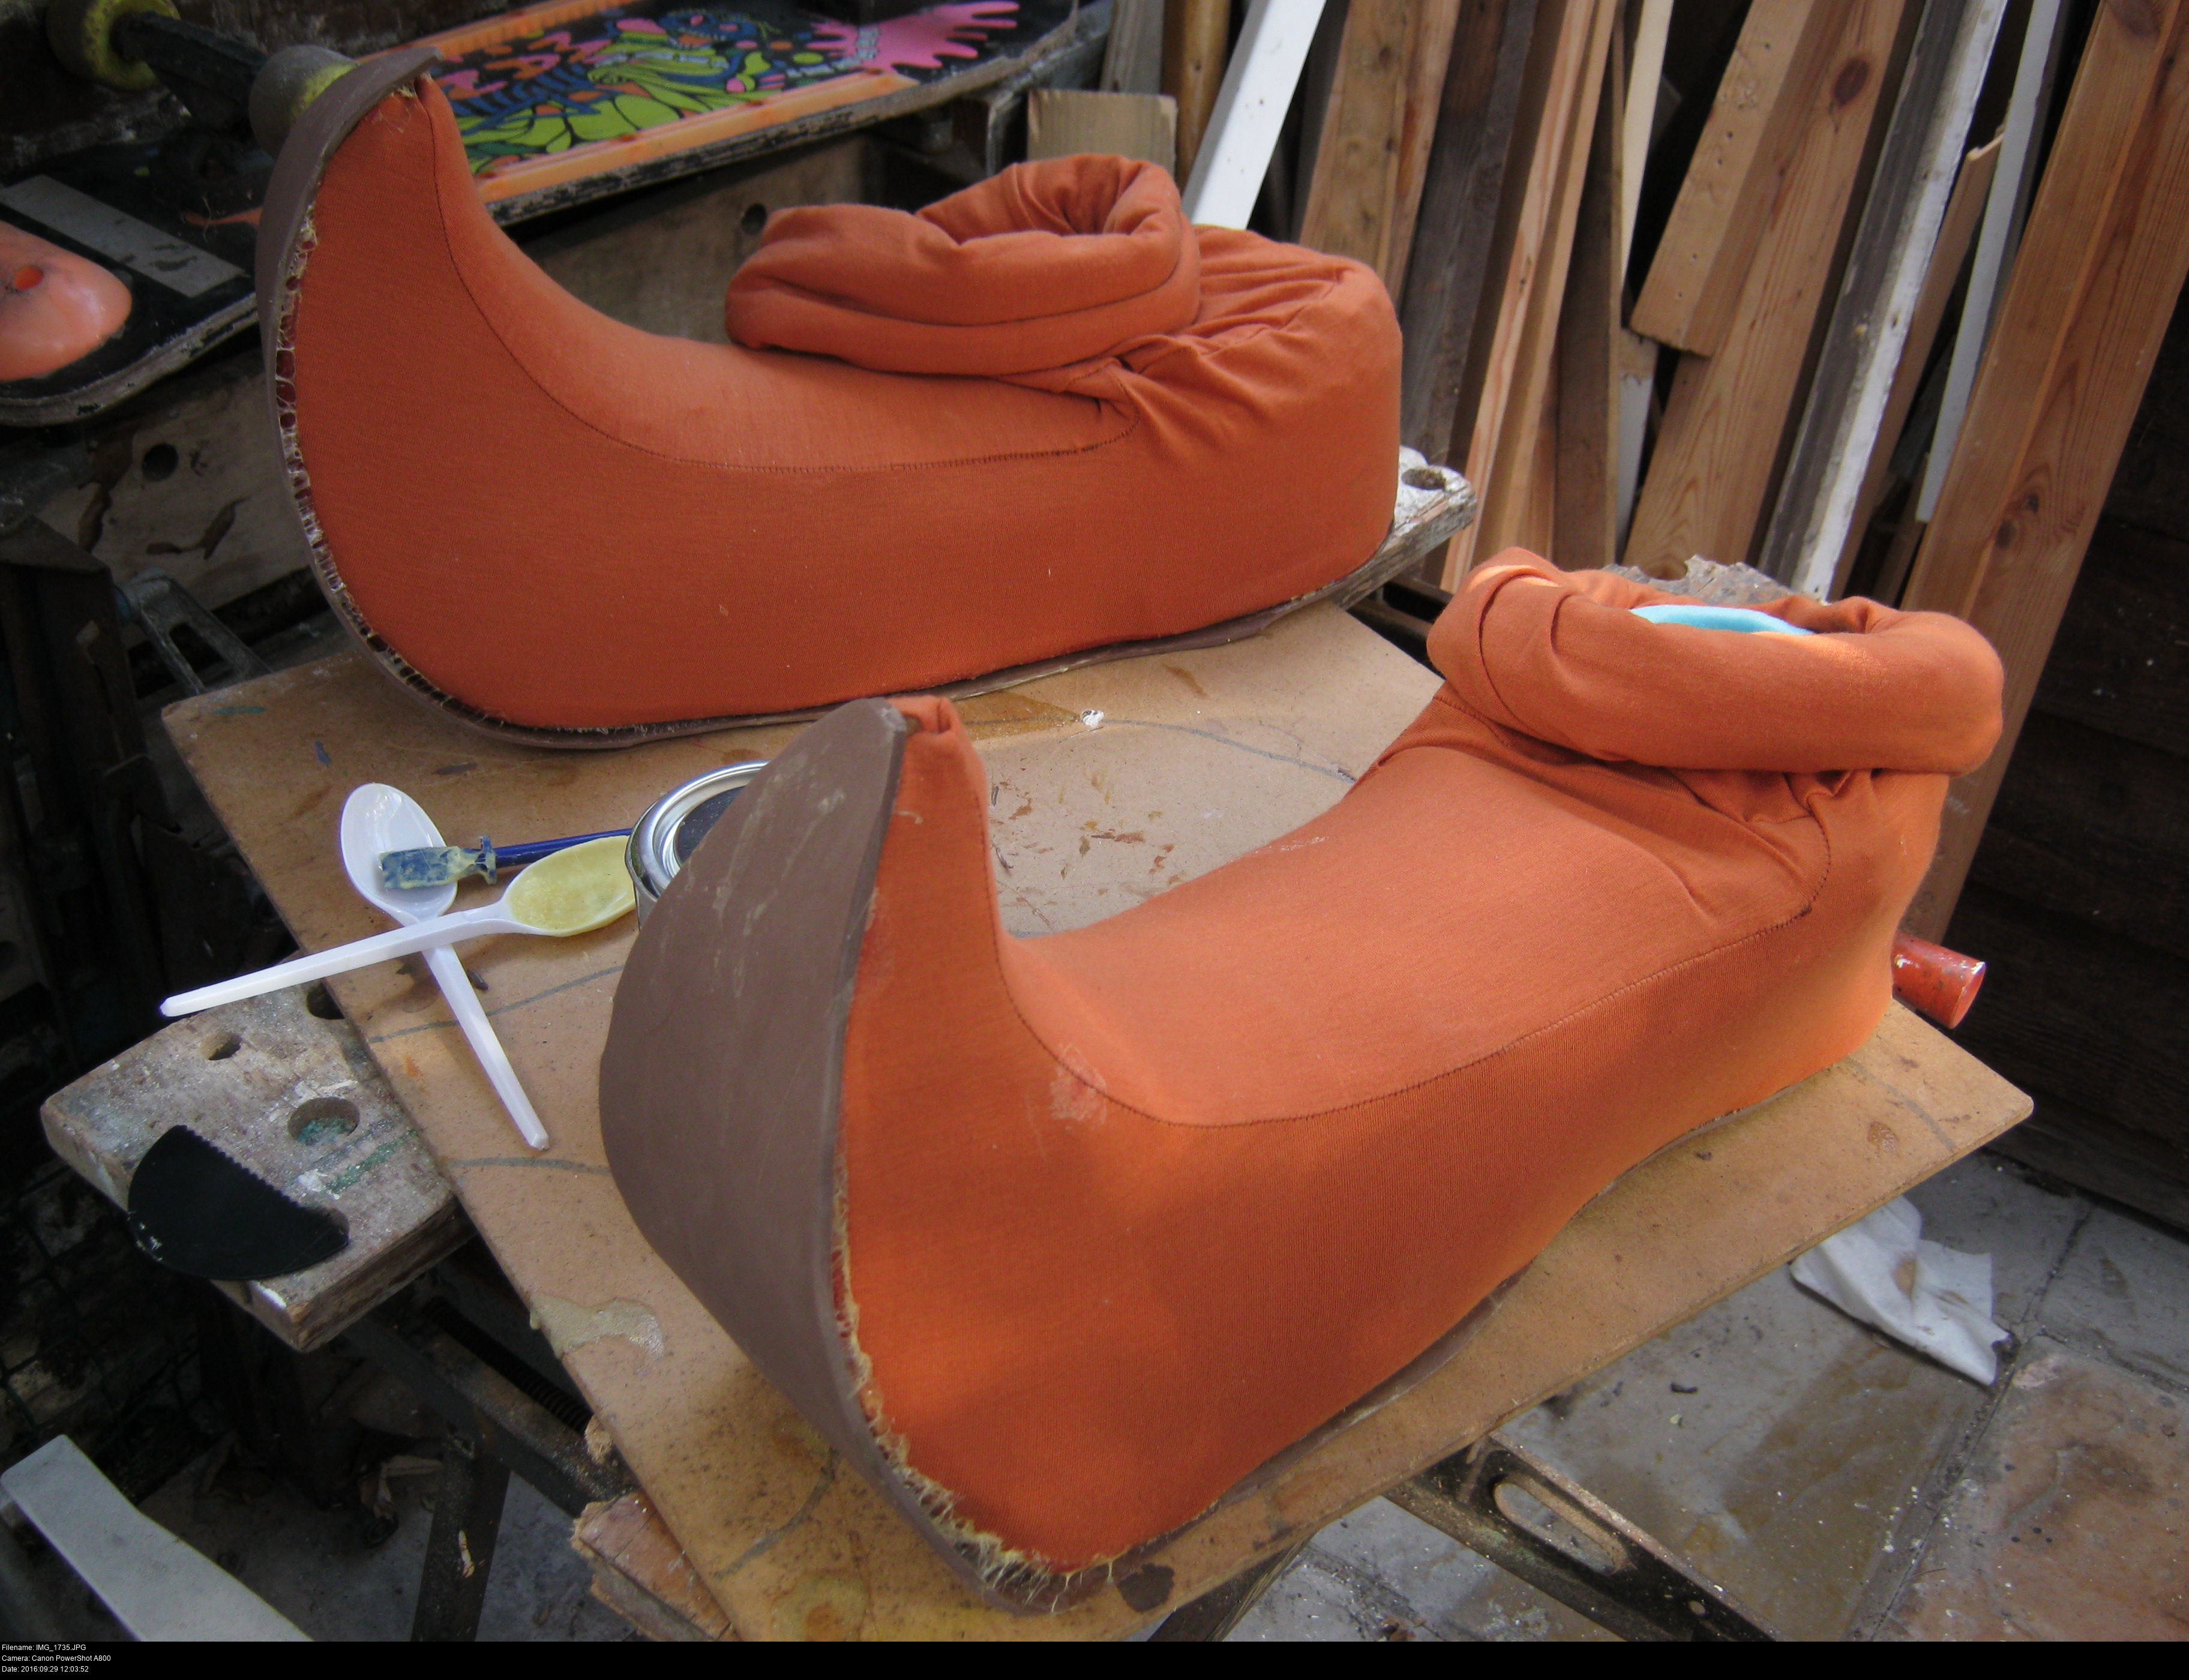
I construct them from the top down, combining all the orange pieces together. Then I sew the sole onto this as best I can. My patterning wasn't perfect; I have to take some care in sewing the pieces together to ensure they go together nicely. I've added a lot of excess at the back of the side pieces in case they weren't long enough to meet. I end up having to trim off a whole lot, but it's better than not being able to construct it at all. It looks ragged at first, but if you take some time to stretch it properly over the form of the shoe, it all flattens out nicely.
It's important to be able to pull it on and off the shoe - this is why I picked a stretchy material! If you can't get it on the shoe, it's useless. If you can't get it off the shoe, you can't replace it (easily).
Once I've stretched it all on nicely and made sure the dark piece matches the shape of the sole, I have to take the whole thing back off again so I can sew on the cuff. From the look of belle43's boots, they've made a ring or strip of foam and clad it in the same fabric and then attached that to the shoe fabric.
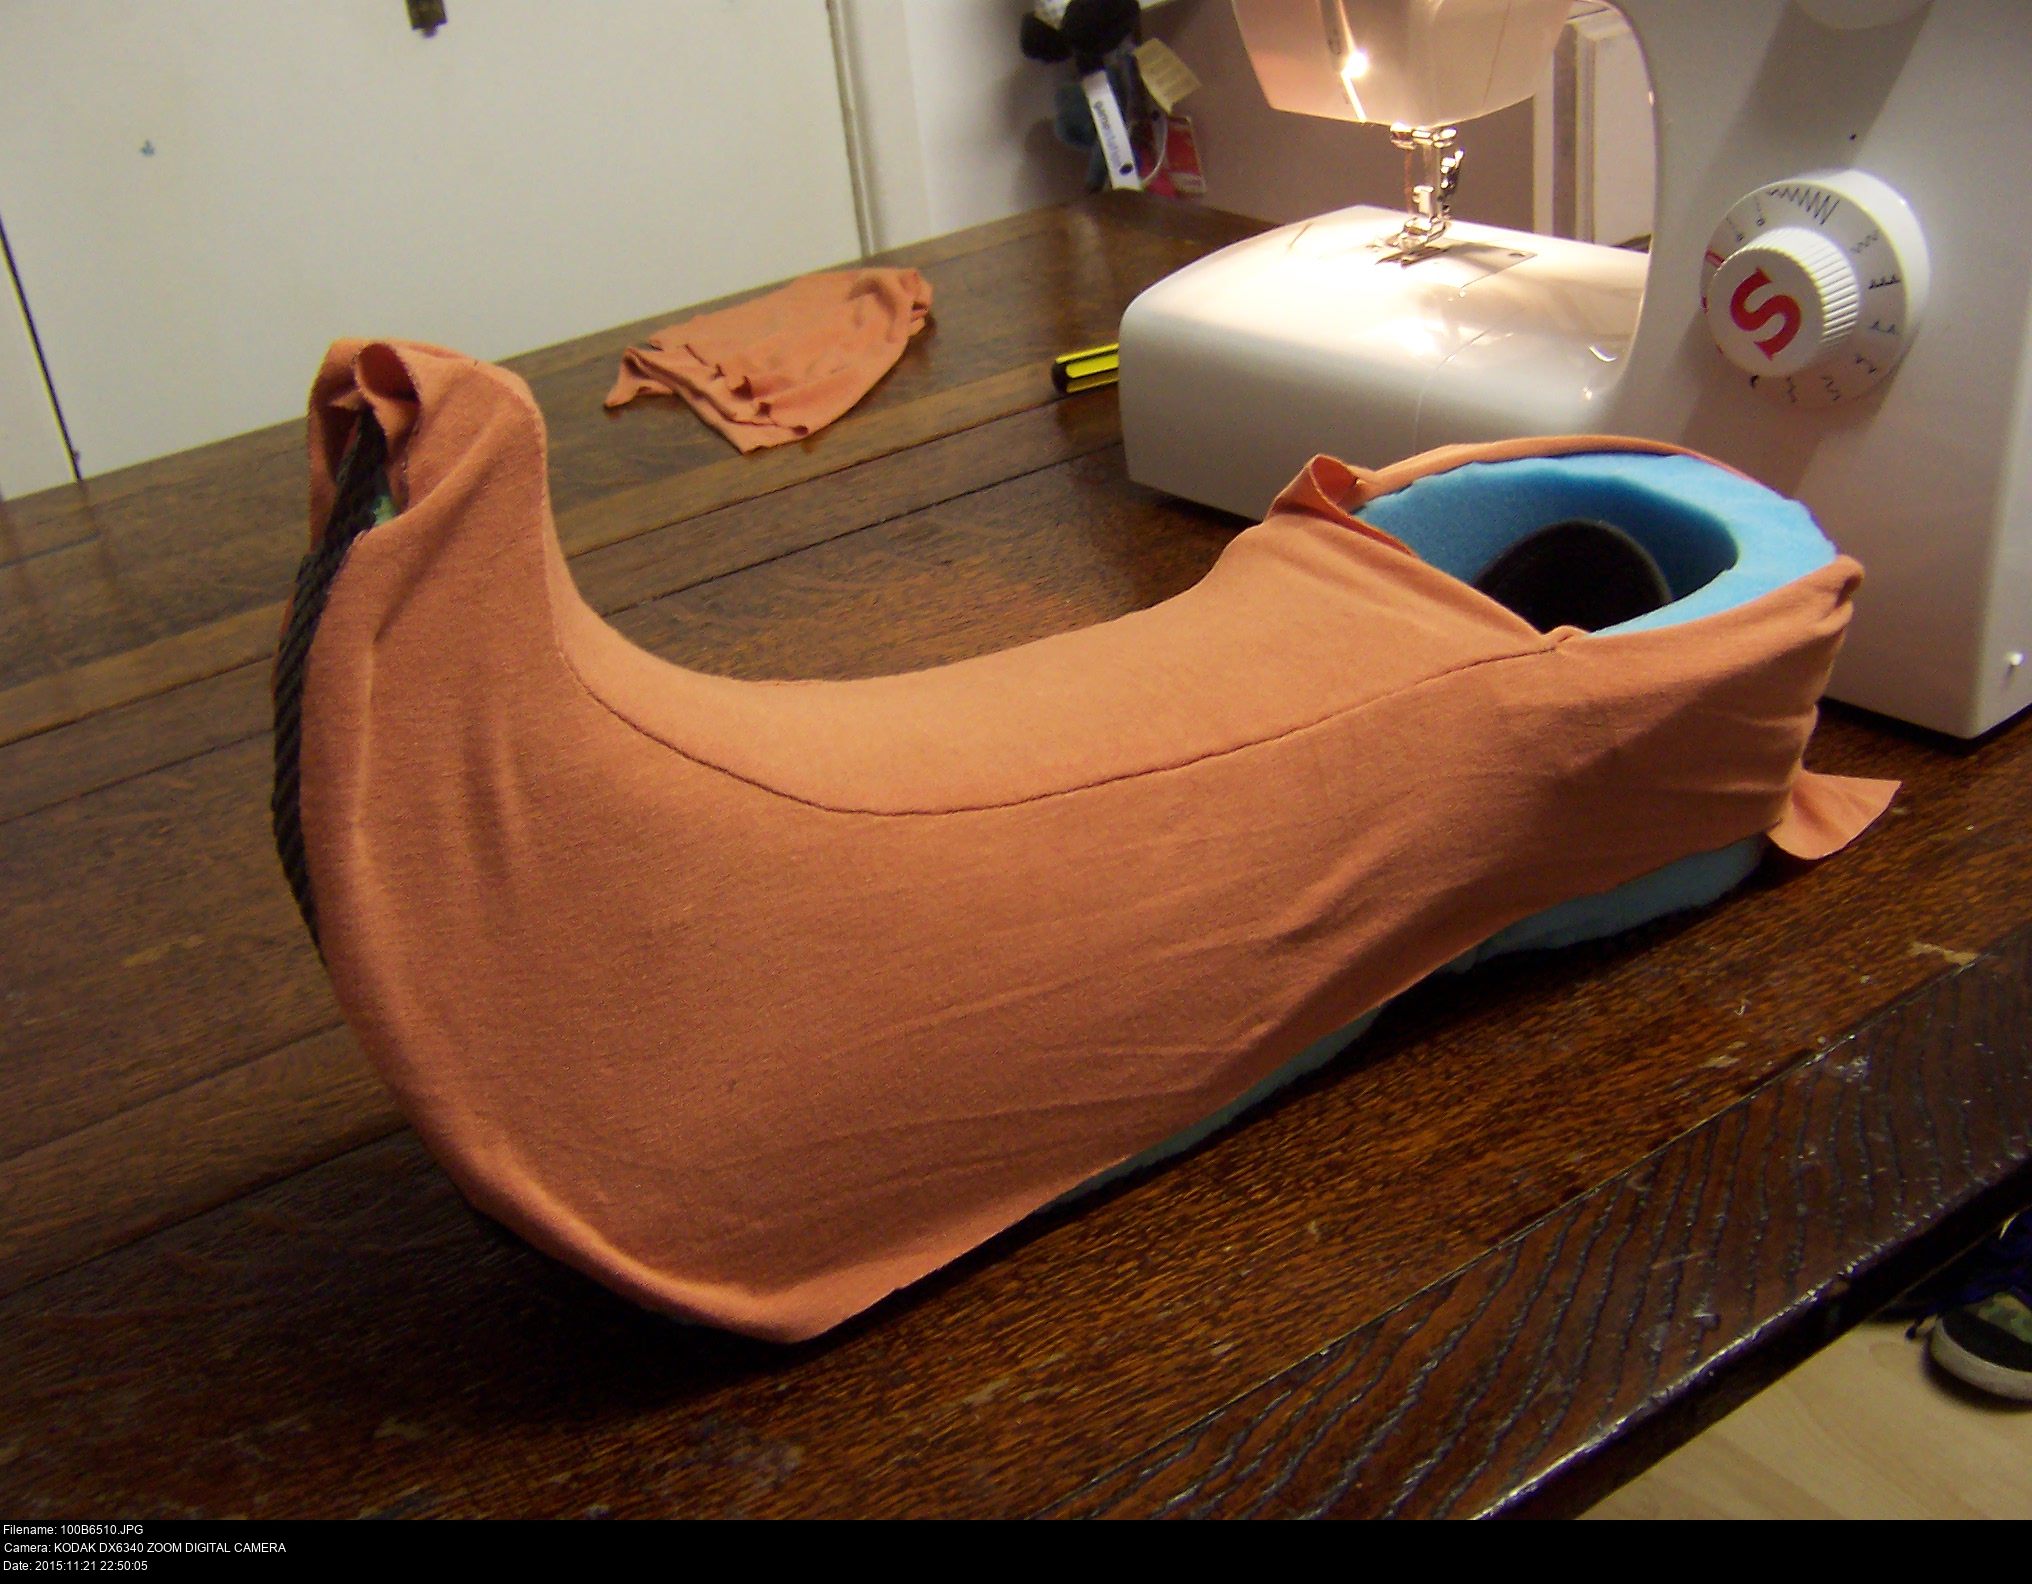
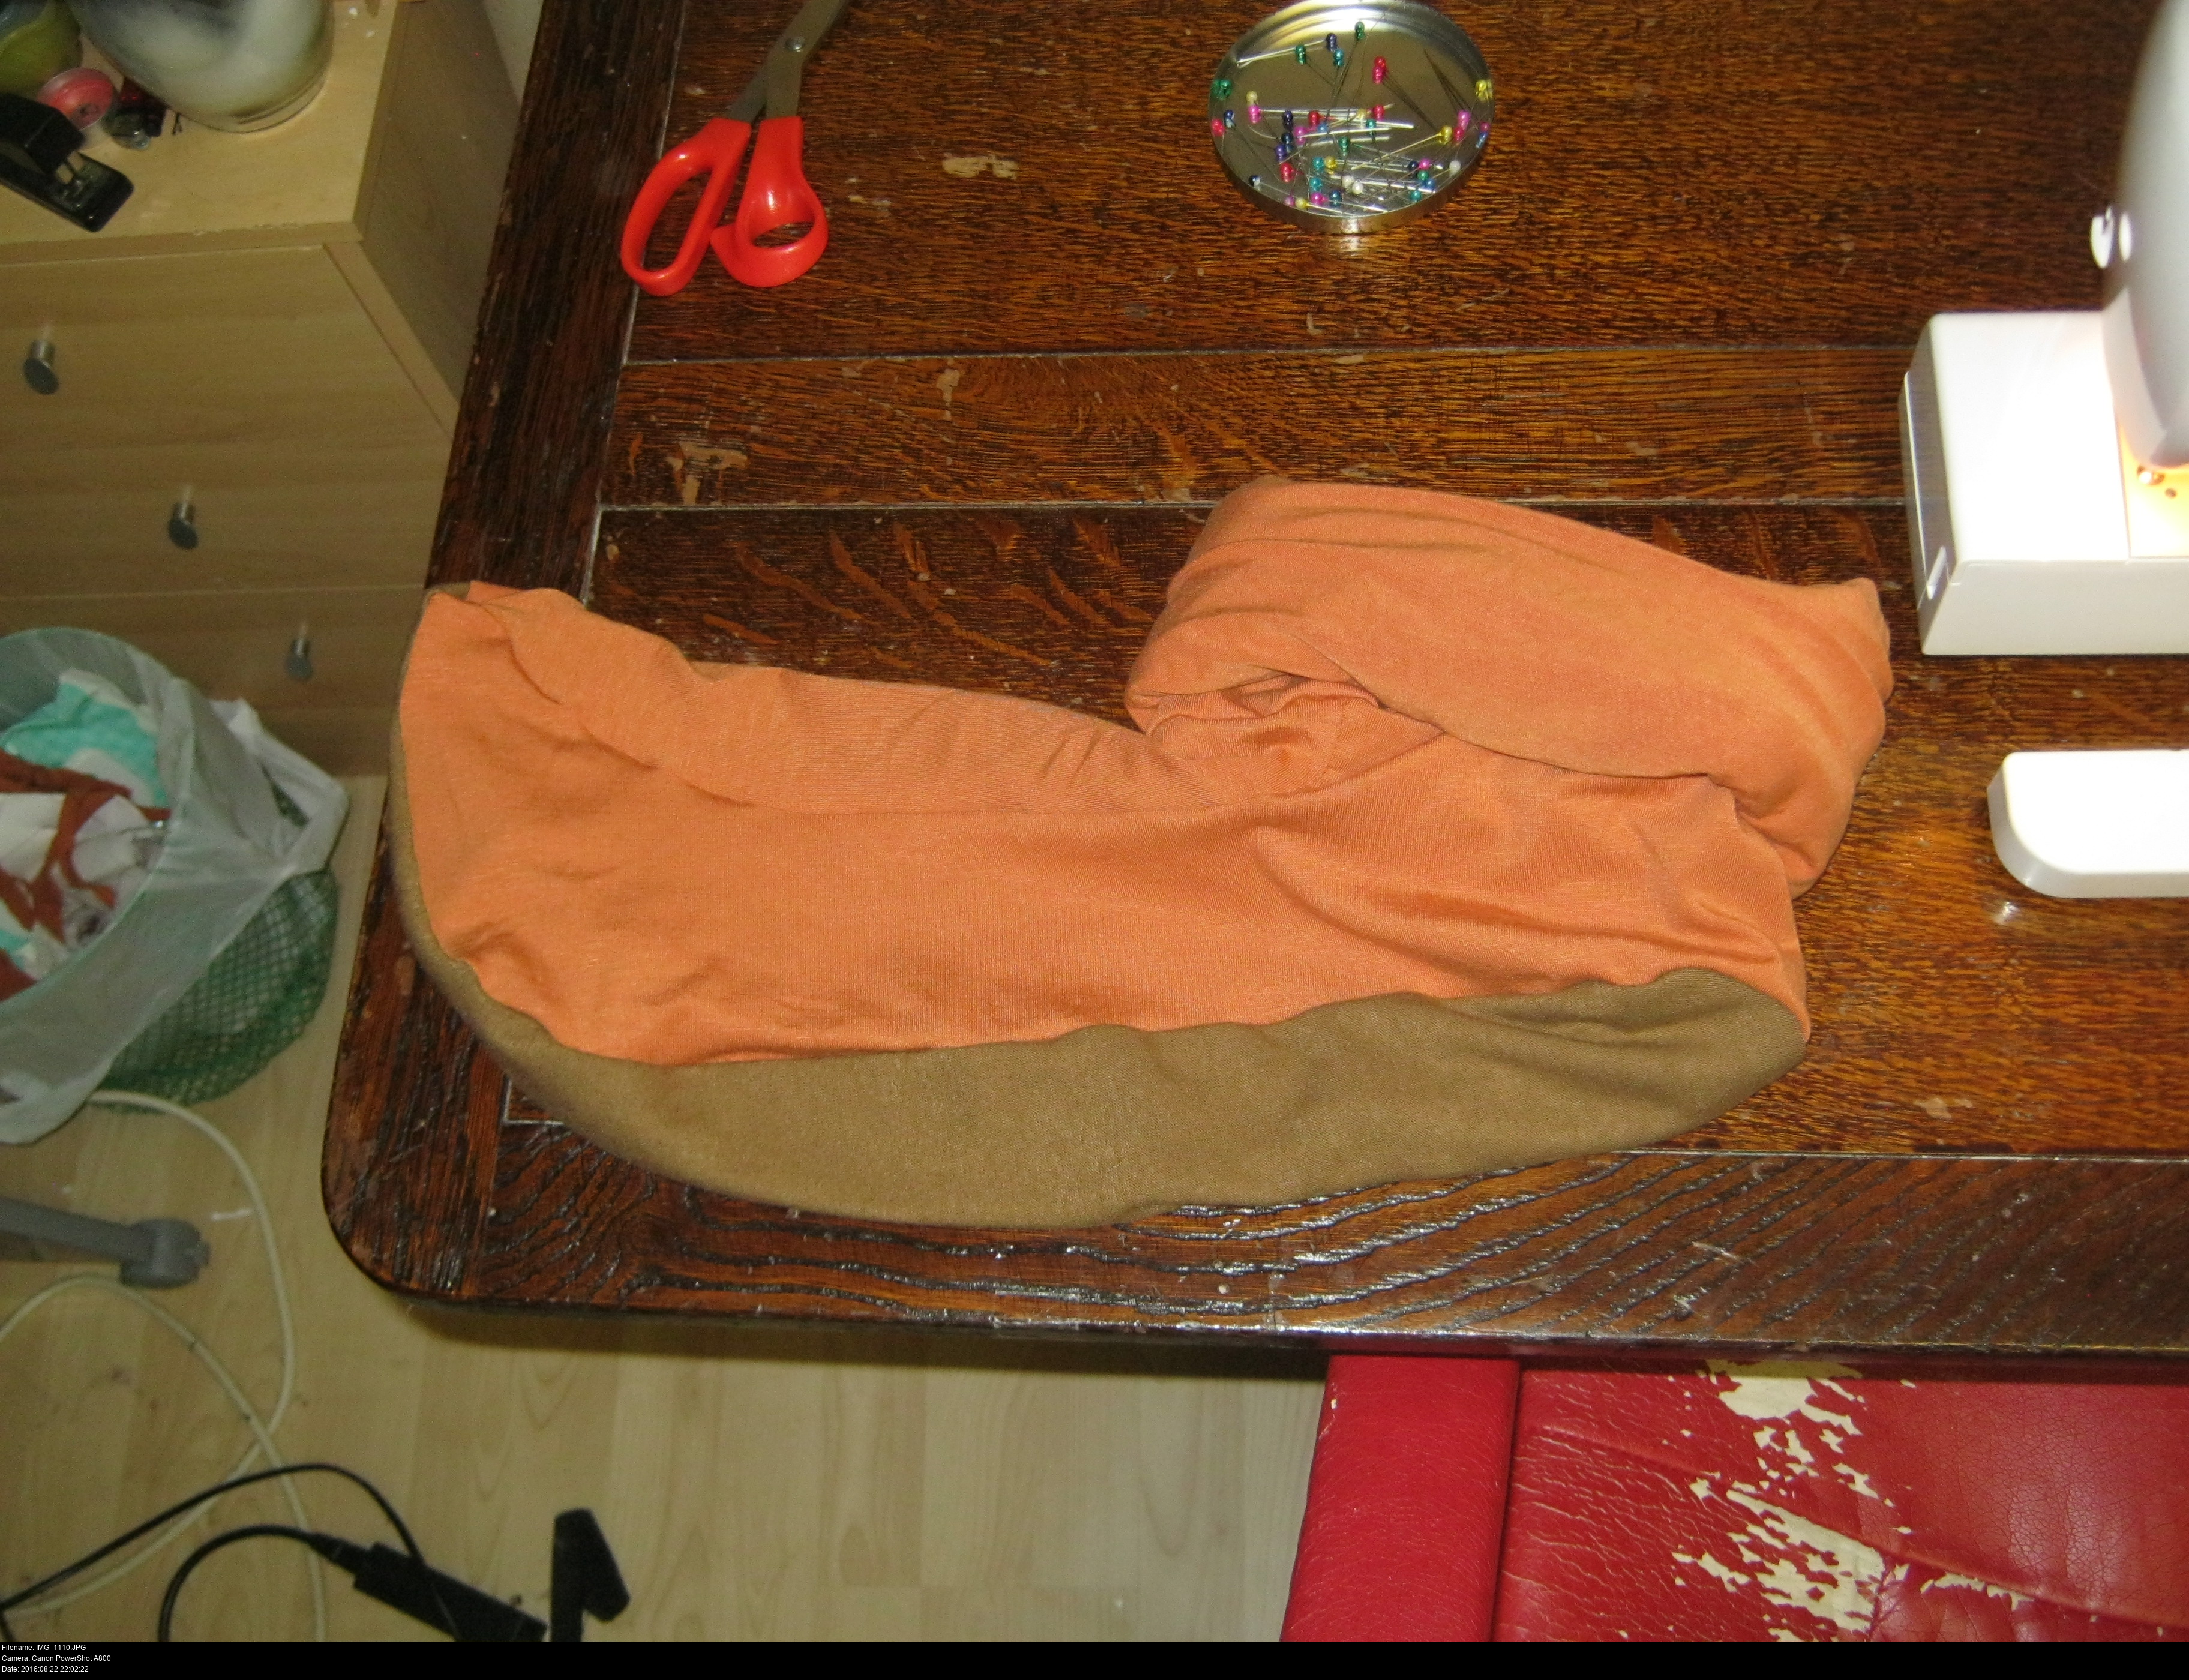
I've decided to go for another route. Instead, I'm going to make a super long cylinder of fabric and sew that onto the shoe. If I roll the fabric down over and over, it'll be all nicely rounded and spongy, and also have a tendency to tug together tight around my calf, helping keep the shoe on.
Attaching the cuff is a topological puzzle. Figuring out which pieces of fabric should be touching is difficult, then figuring how to execute that on the sewing machine is difficult once again! What I want is that the join between the cuff and the boot to have a clean seam in case the cuff rises a little from the boot body, and the visible seam of the rolled-down cuff to be clean as well. The only way to do this is to hold up all the pieces and pin them over and over again until you're certain.
If you can't be certain, make a mock-up with some other fabric first.


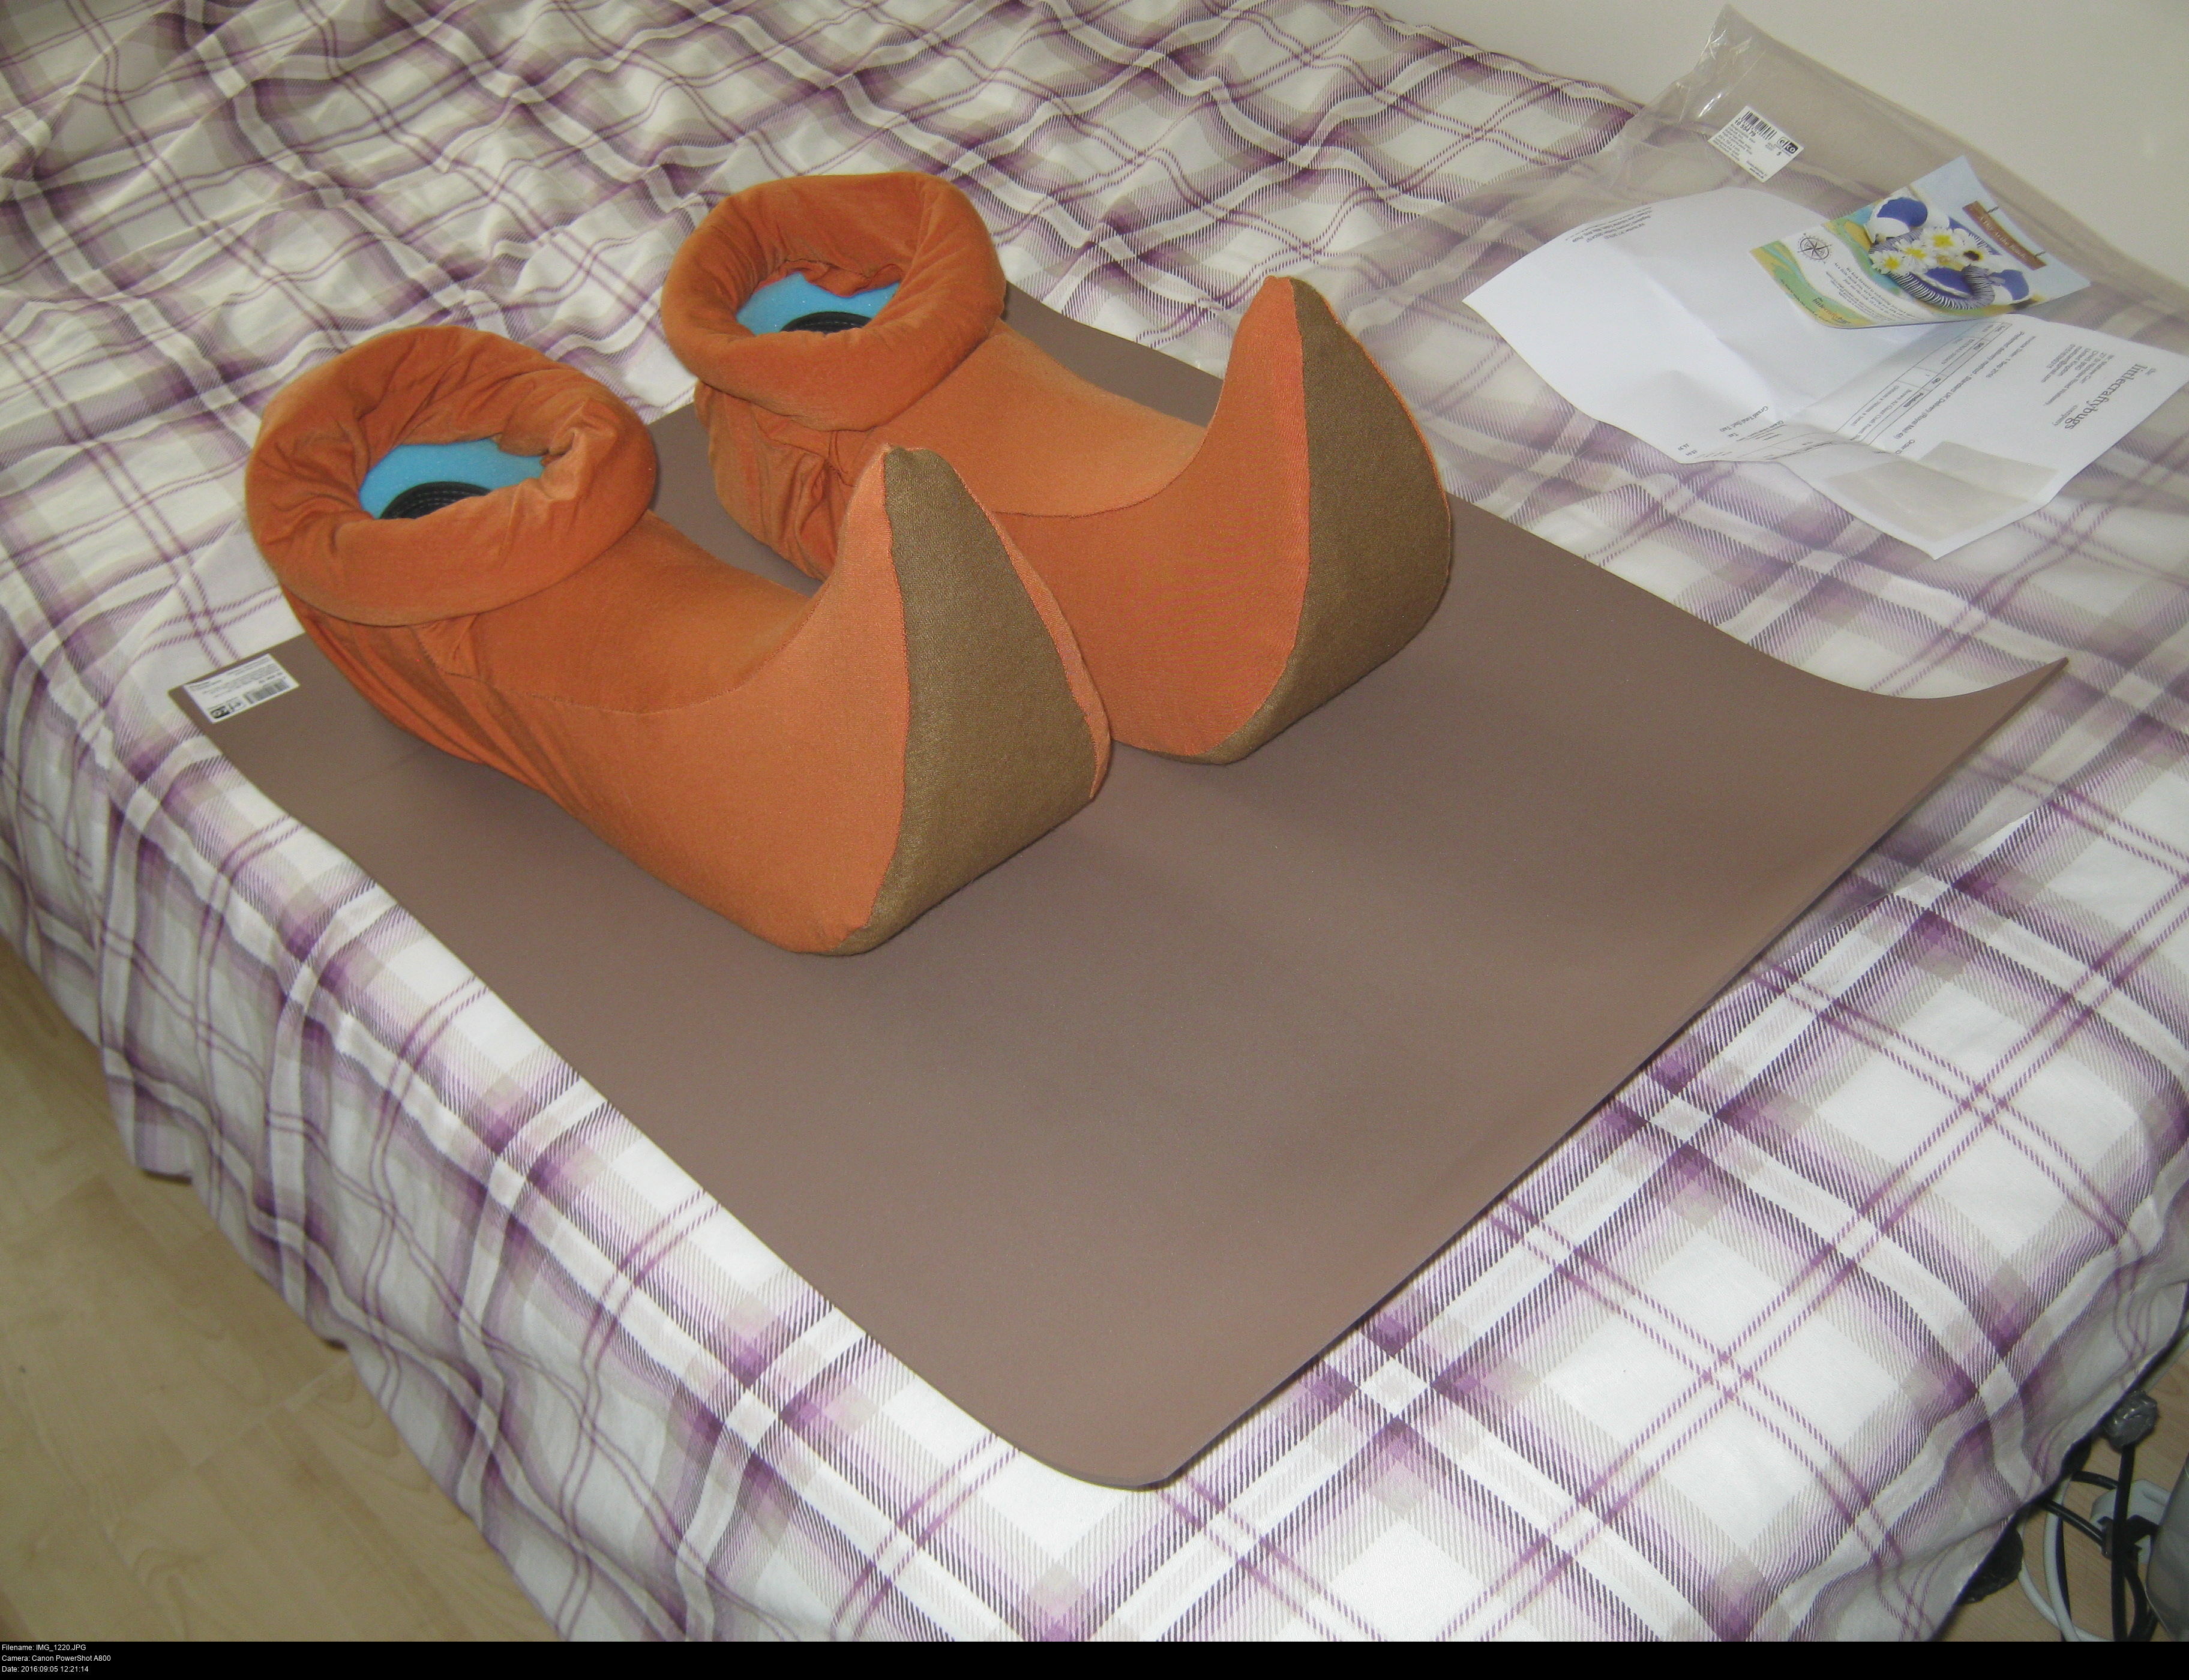
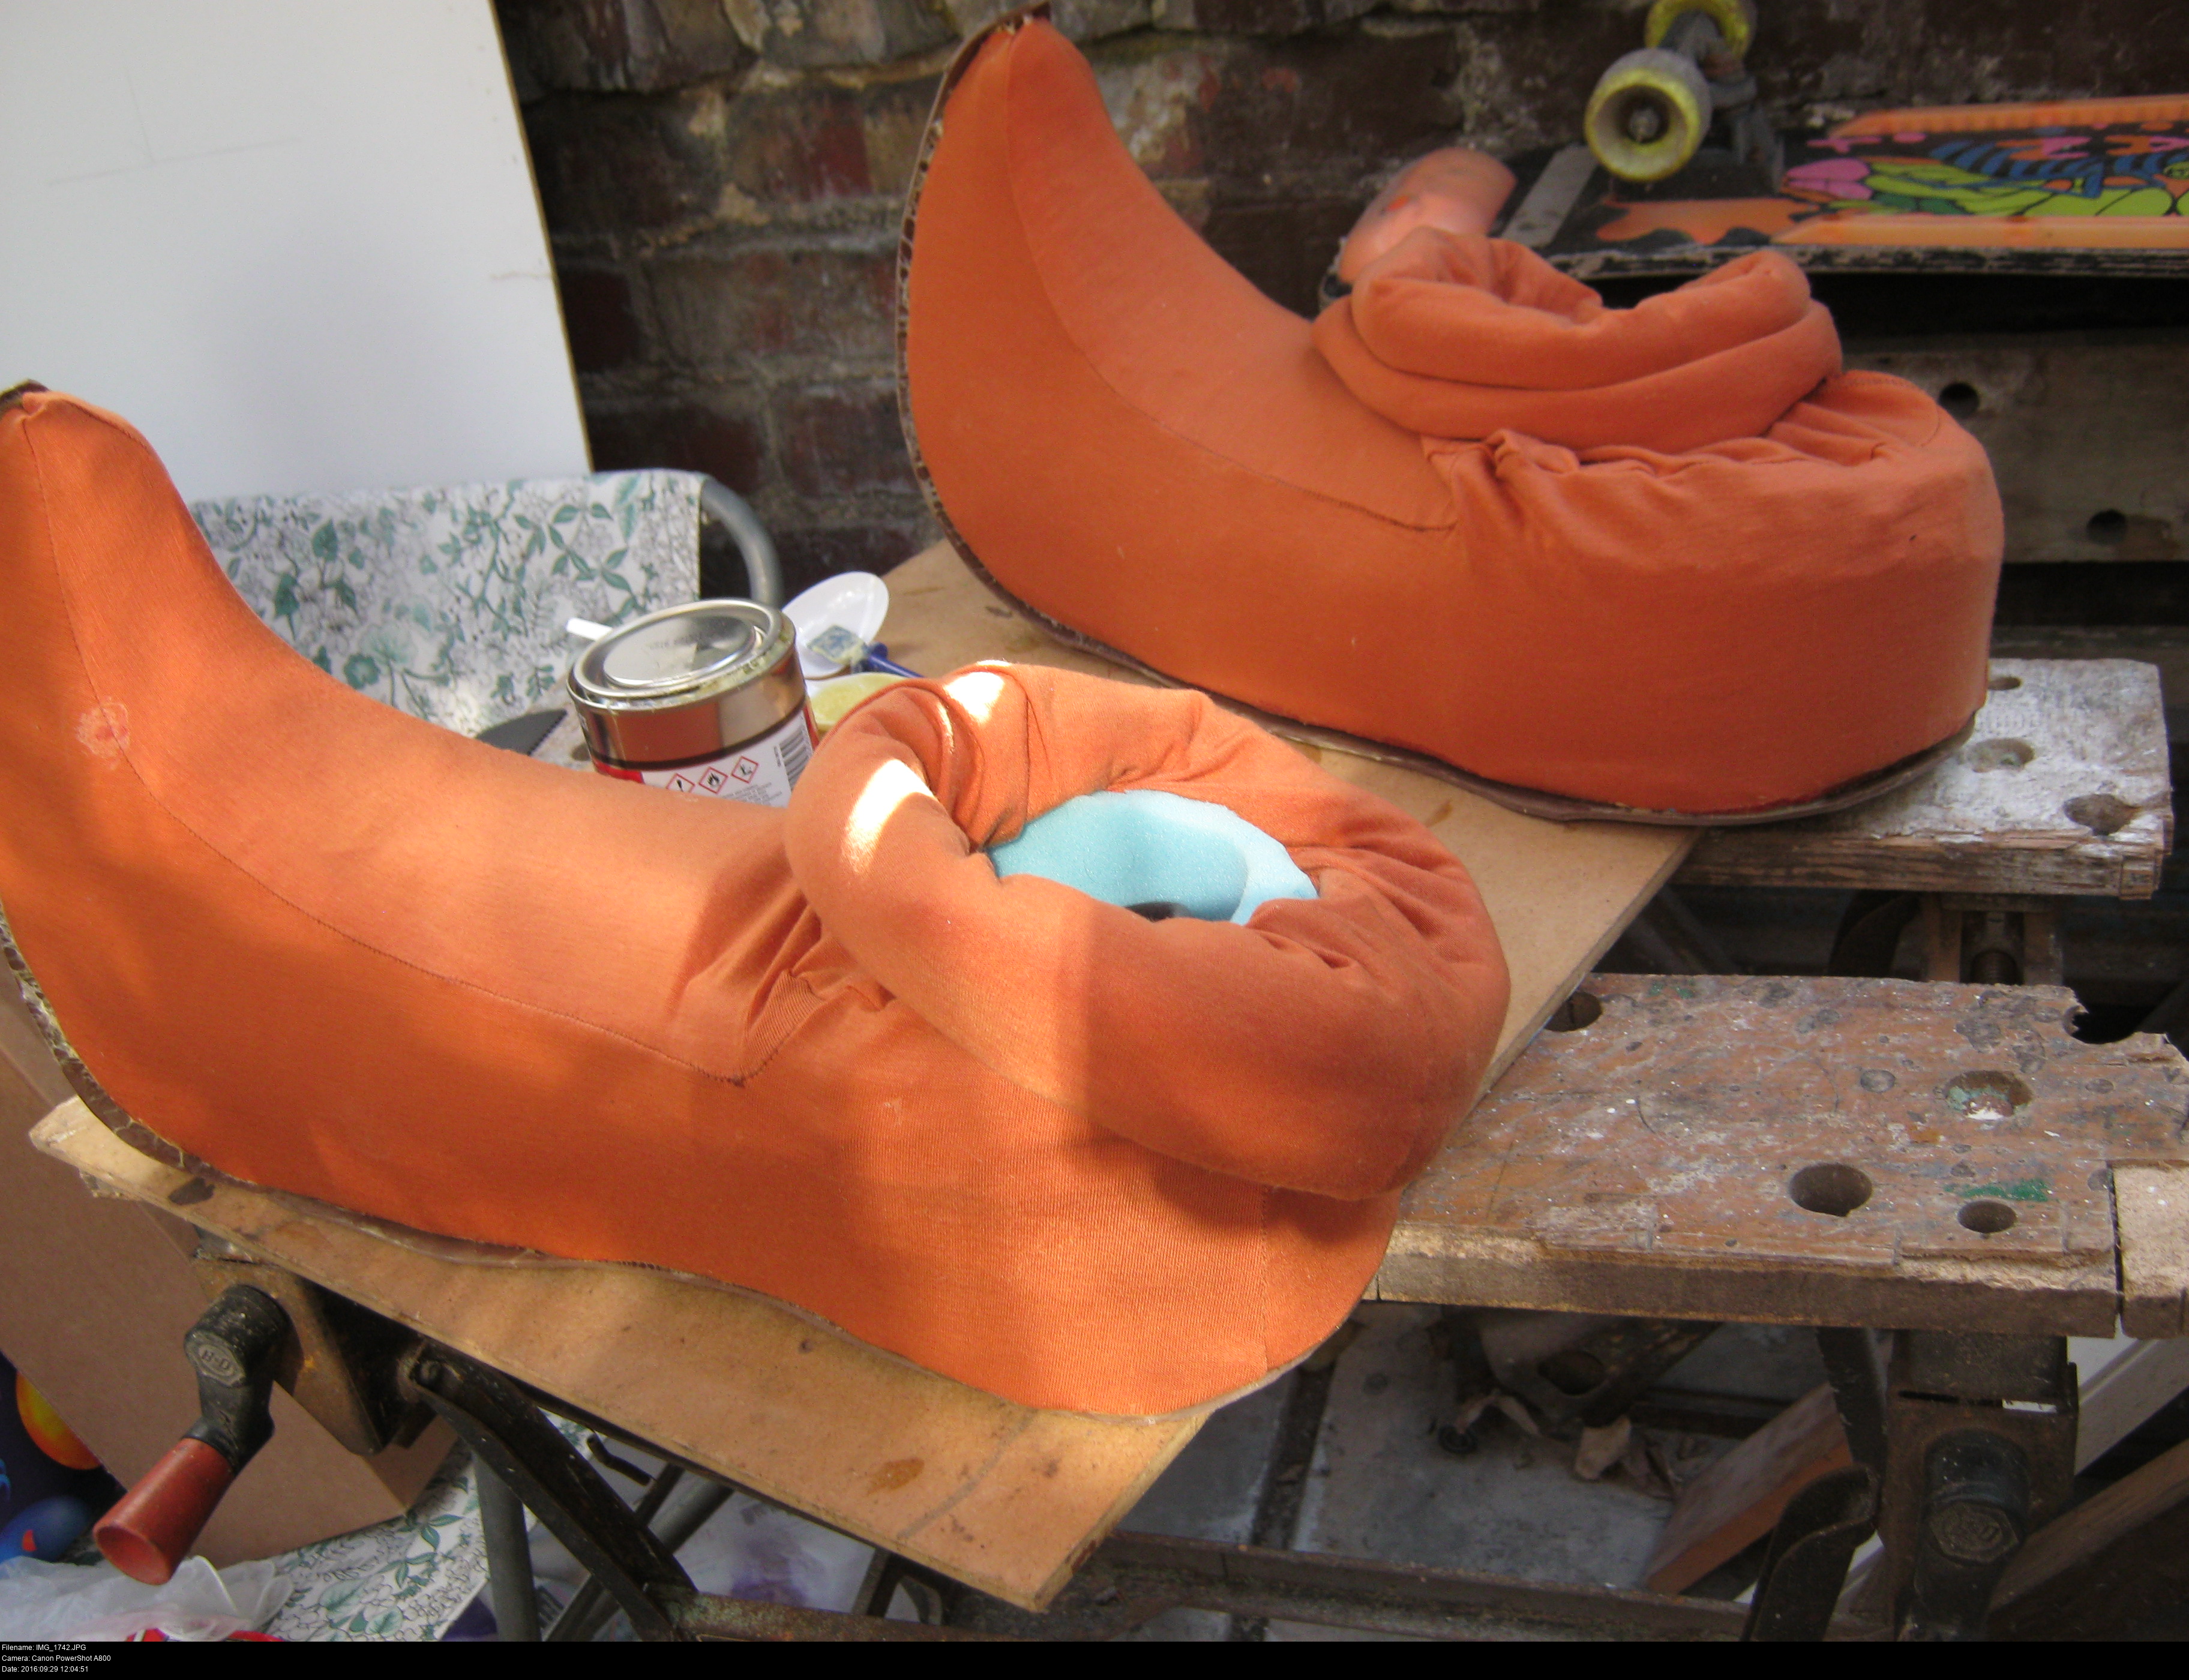
Are you psyched? I'm psyched! Look at THAT!
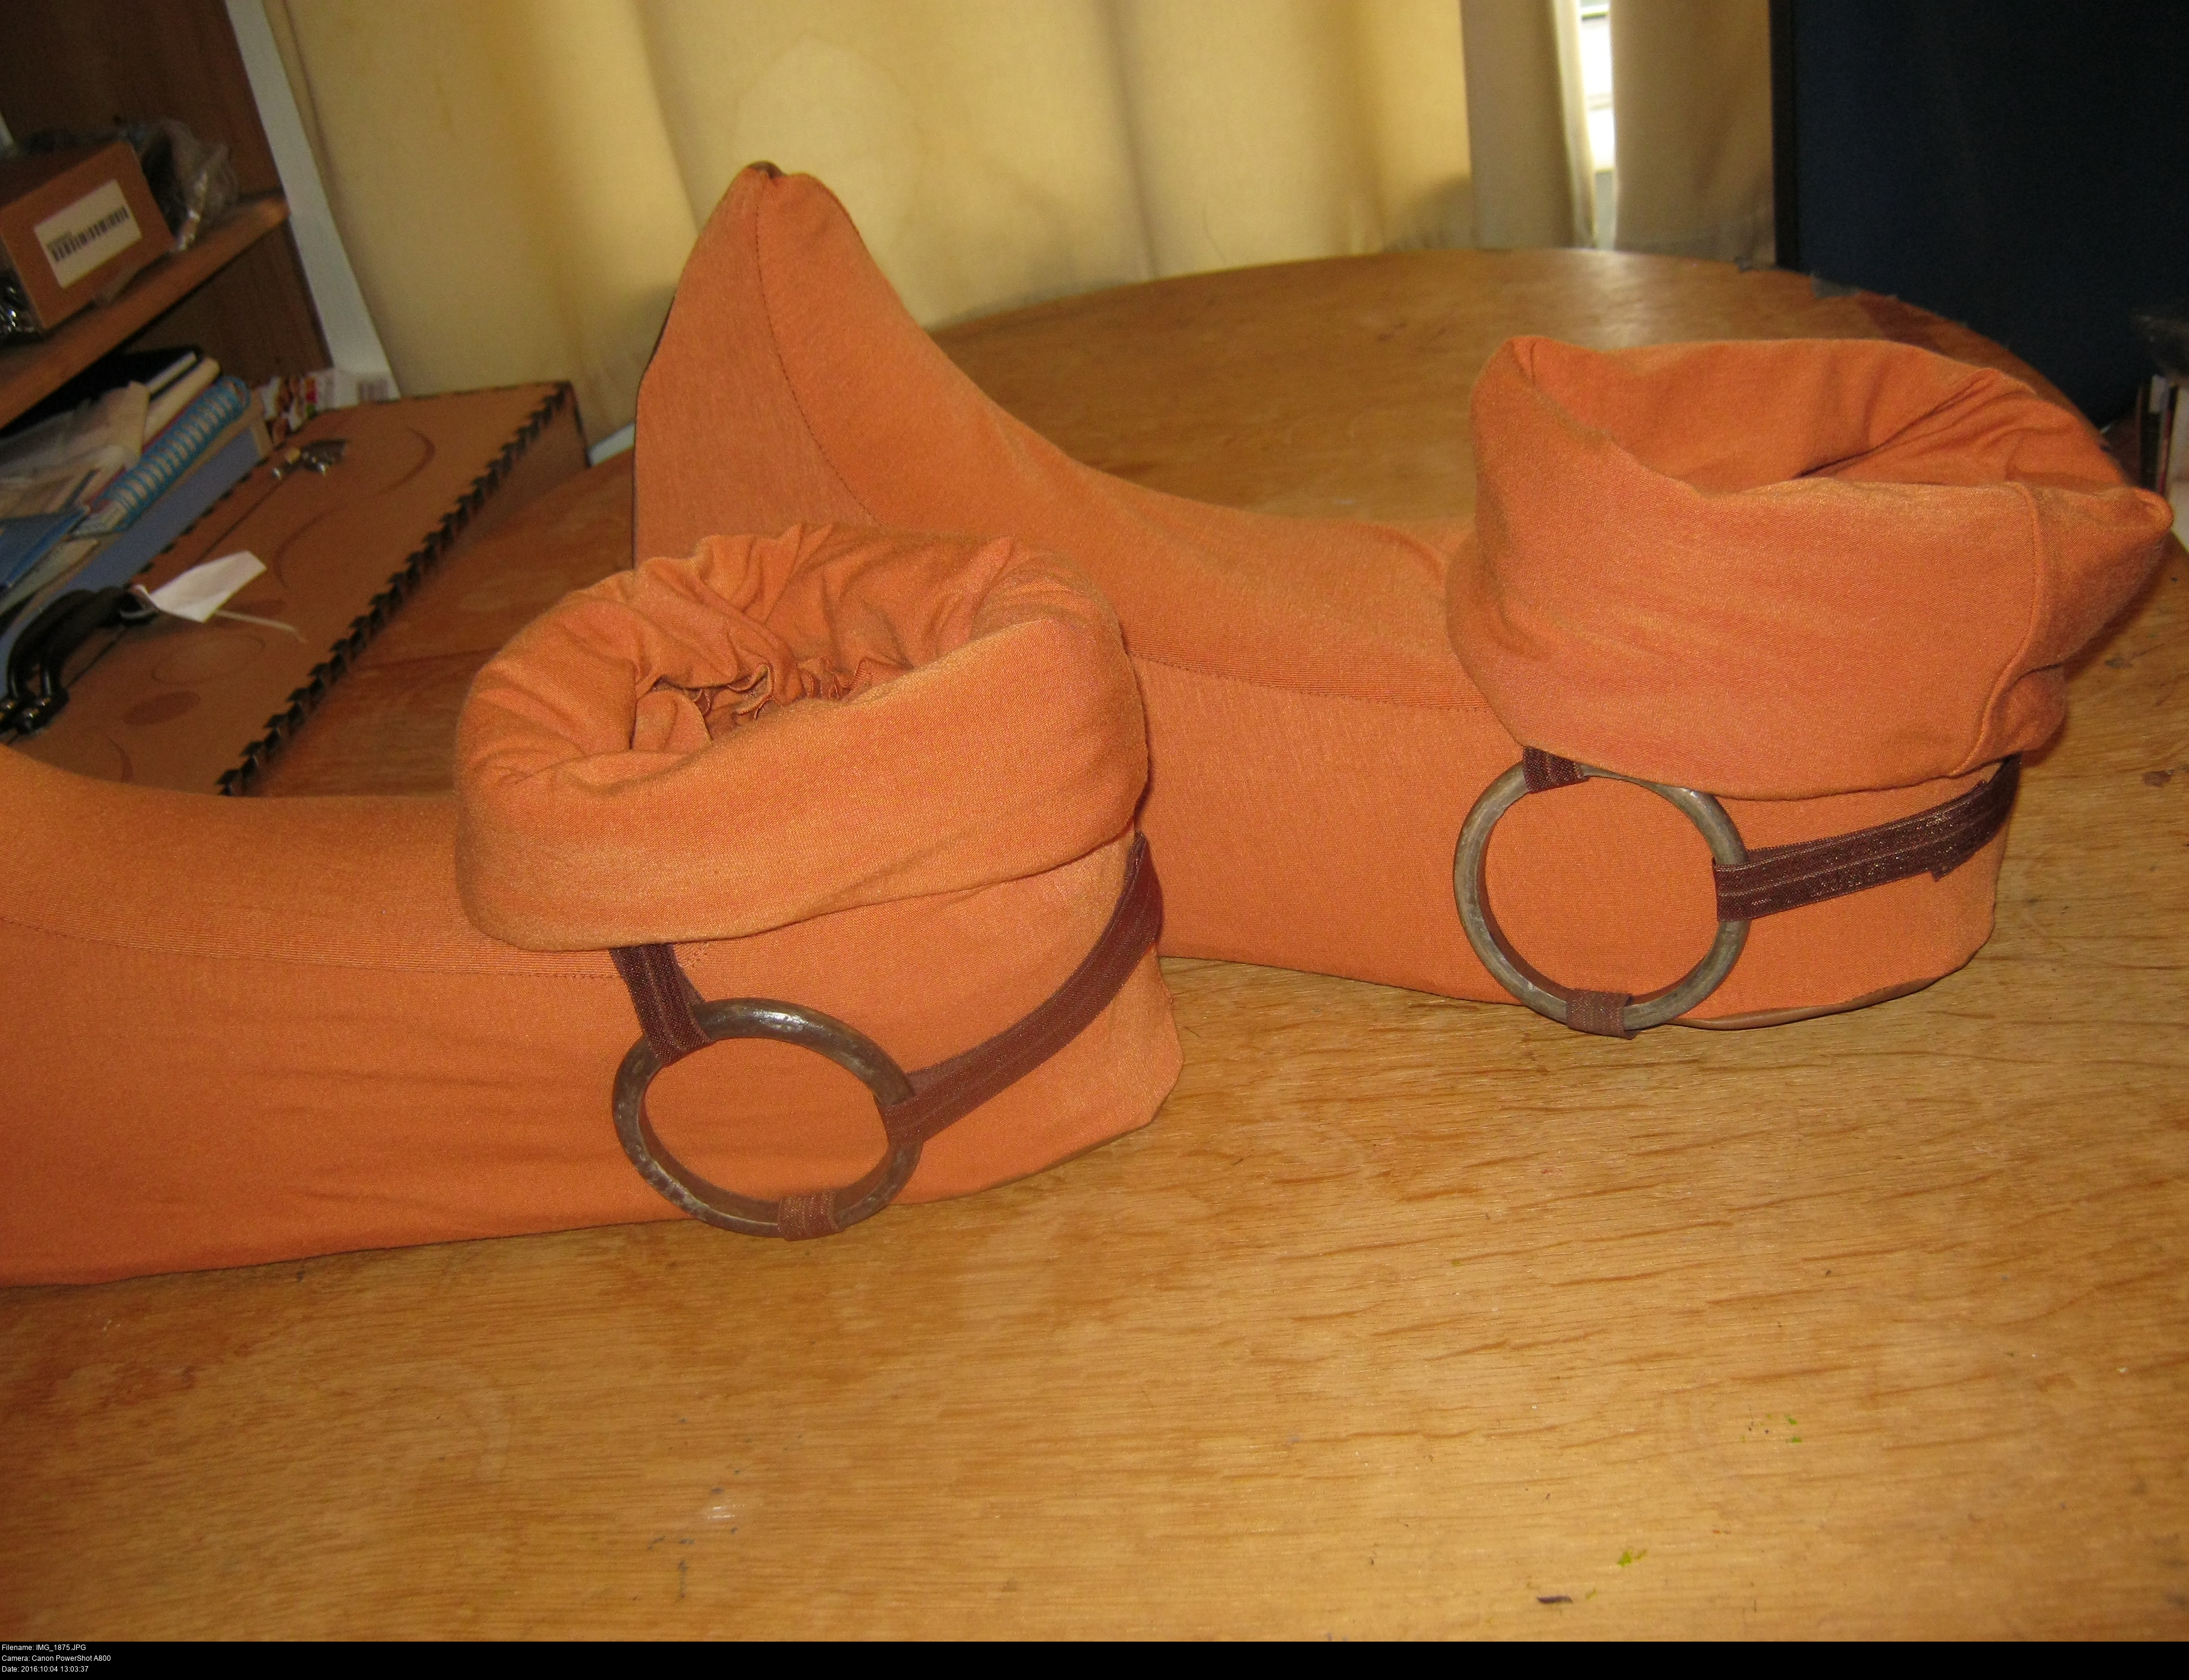
Now all I need is to attach the shoe rings.
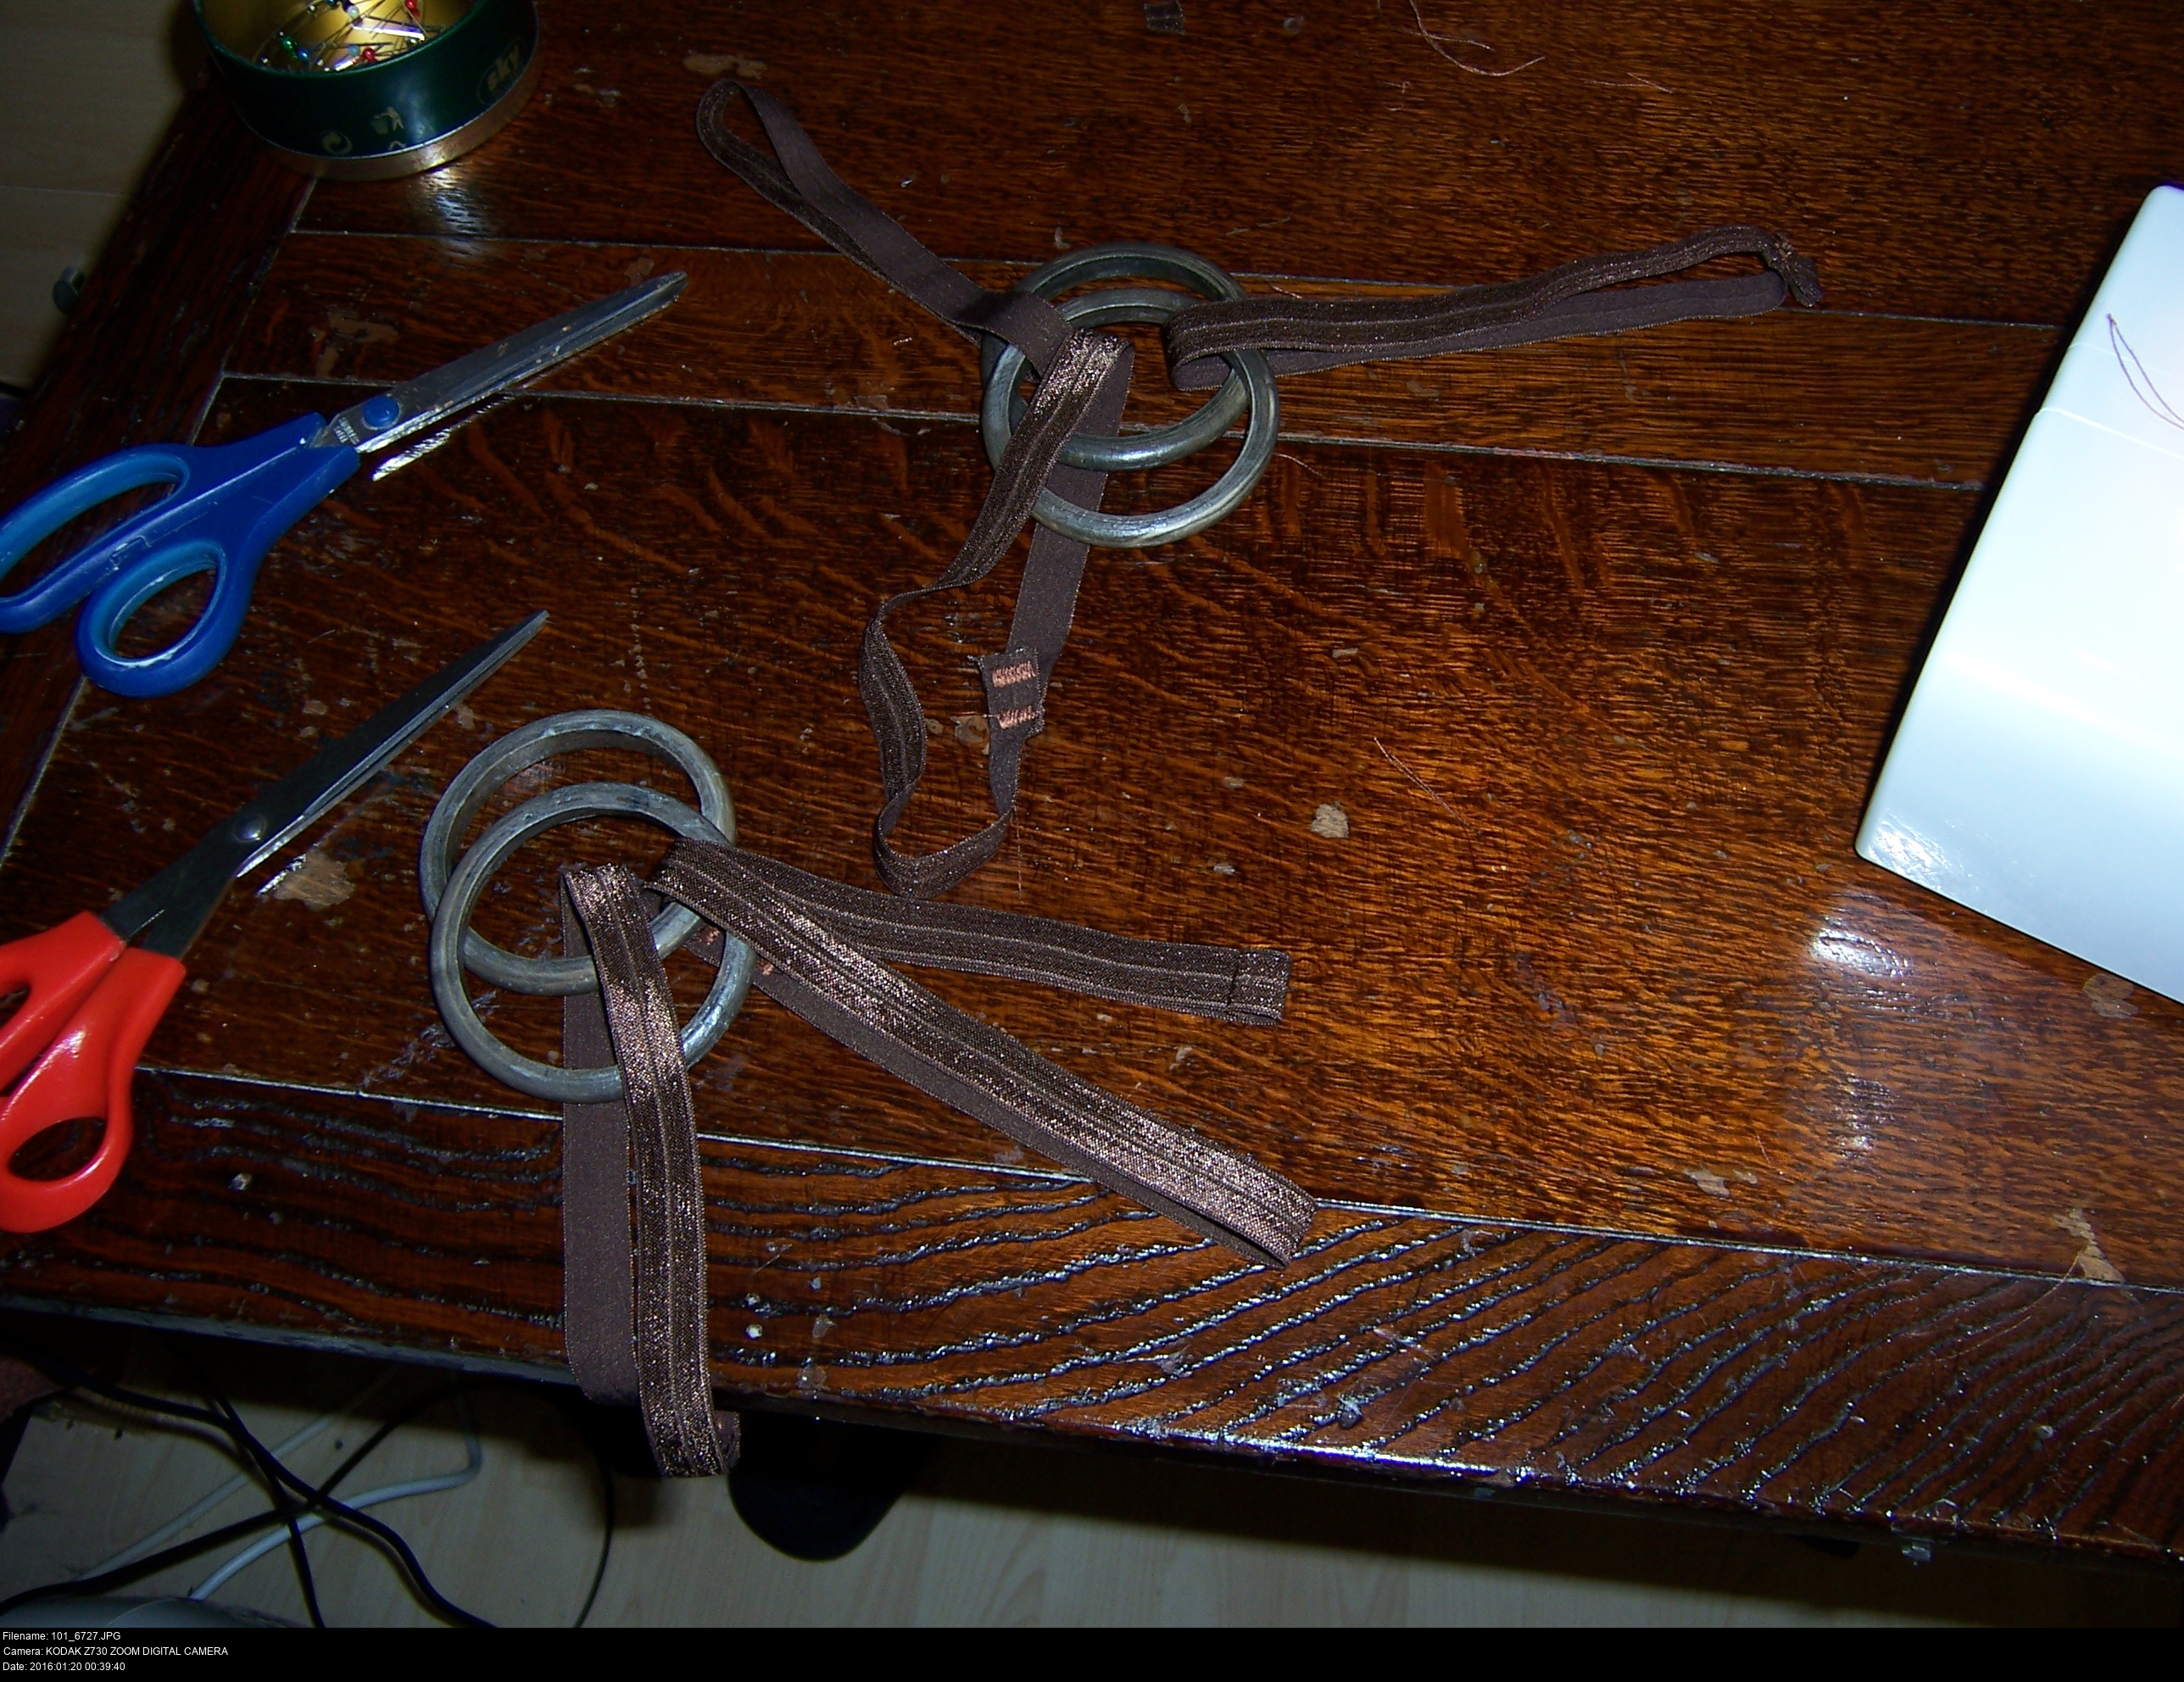
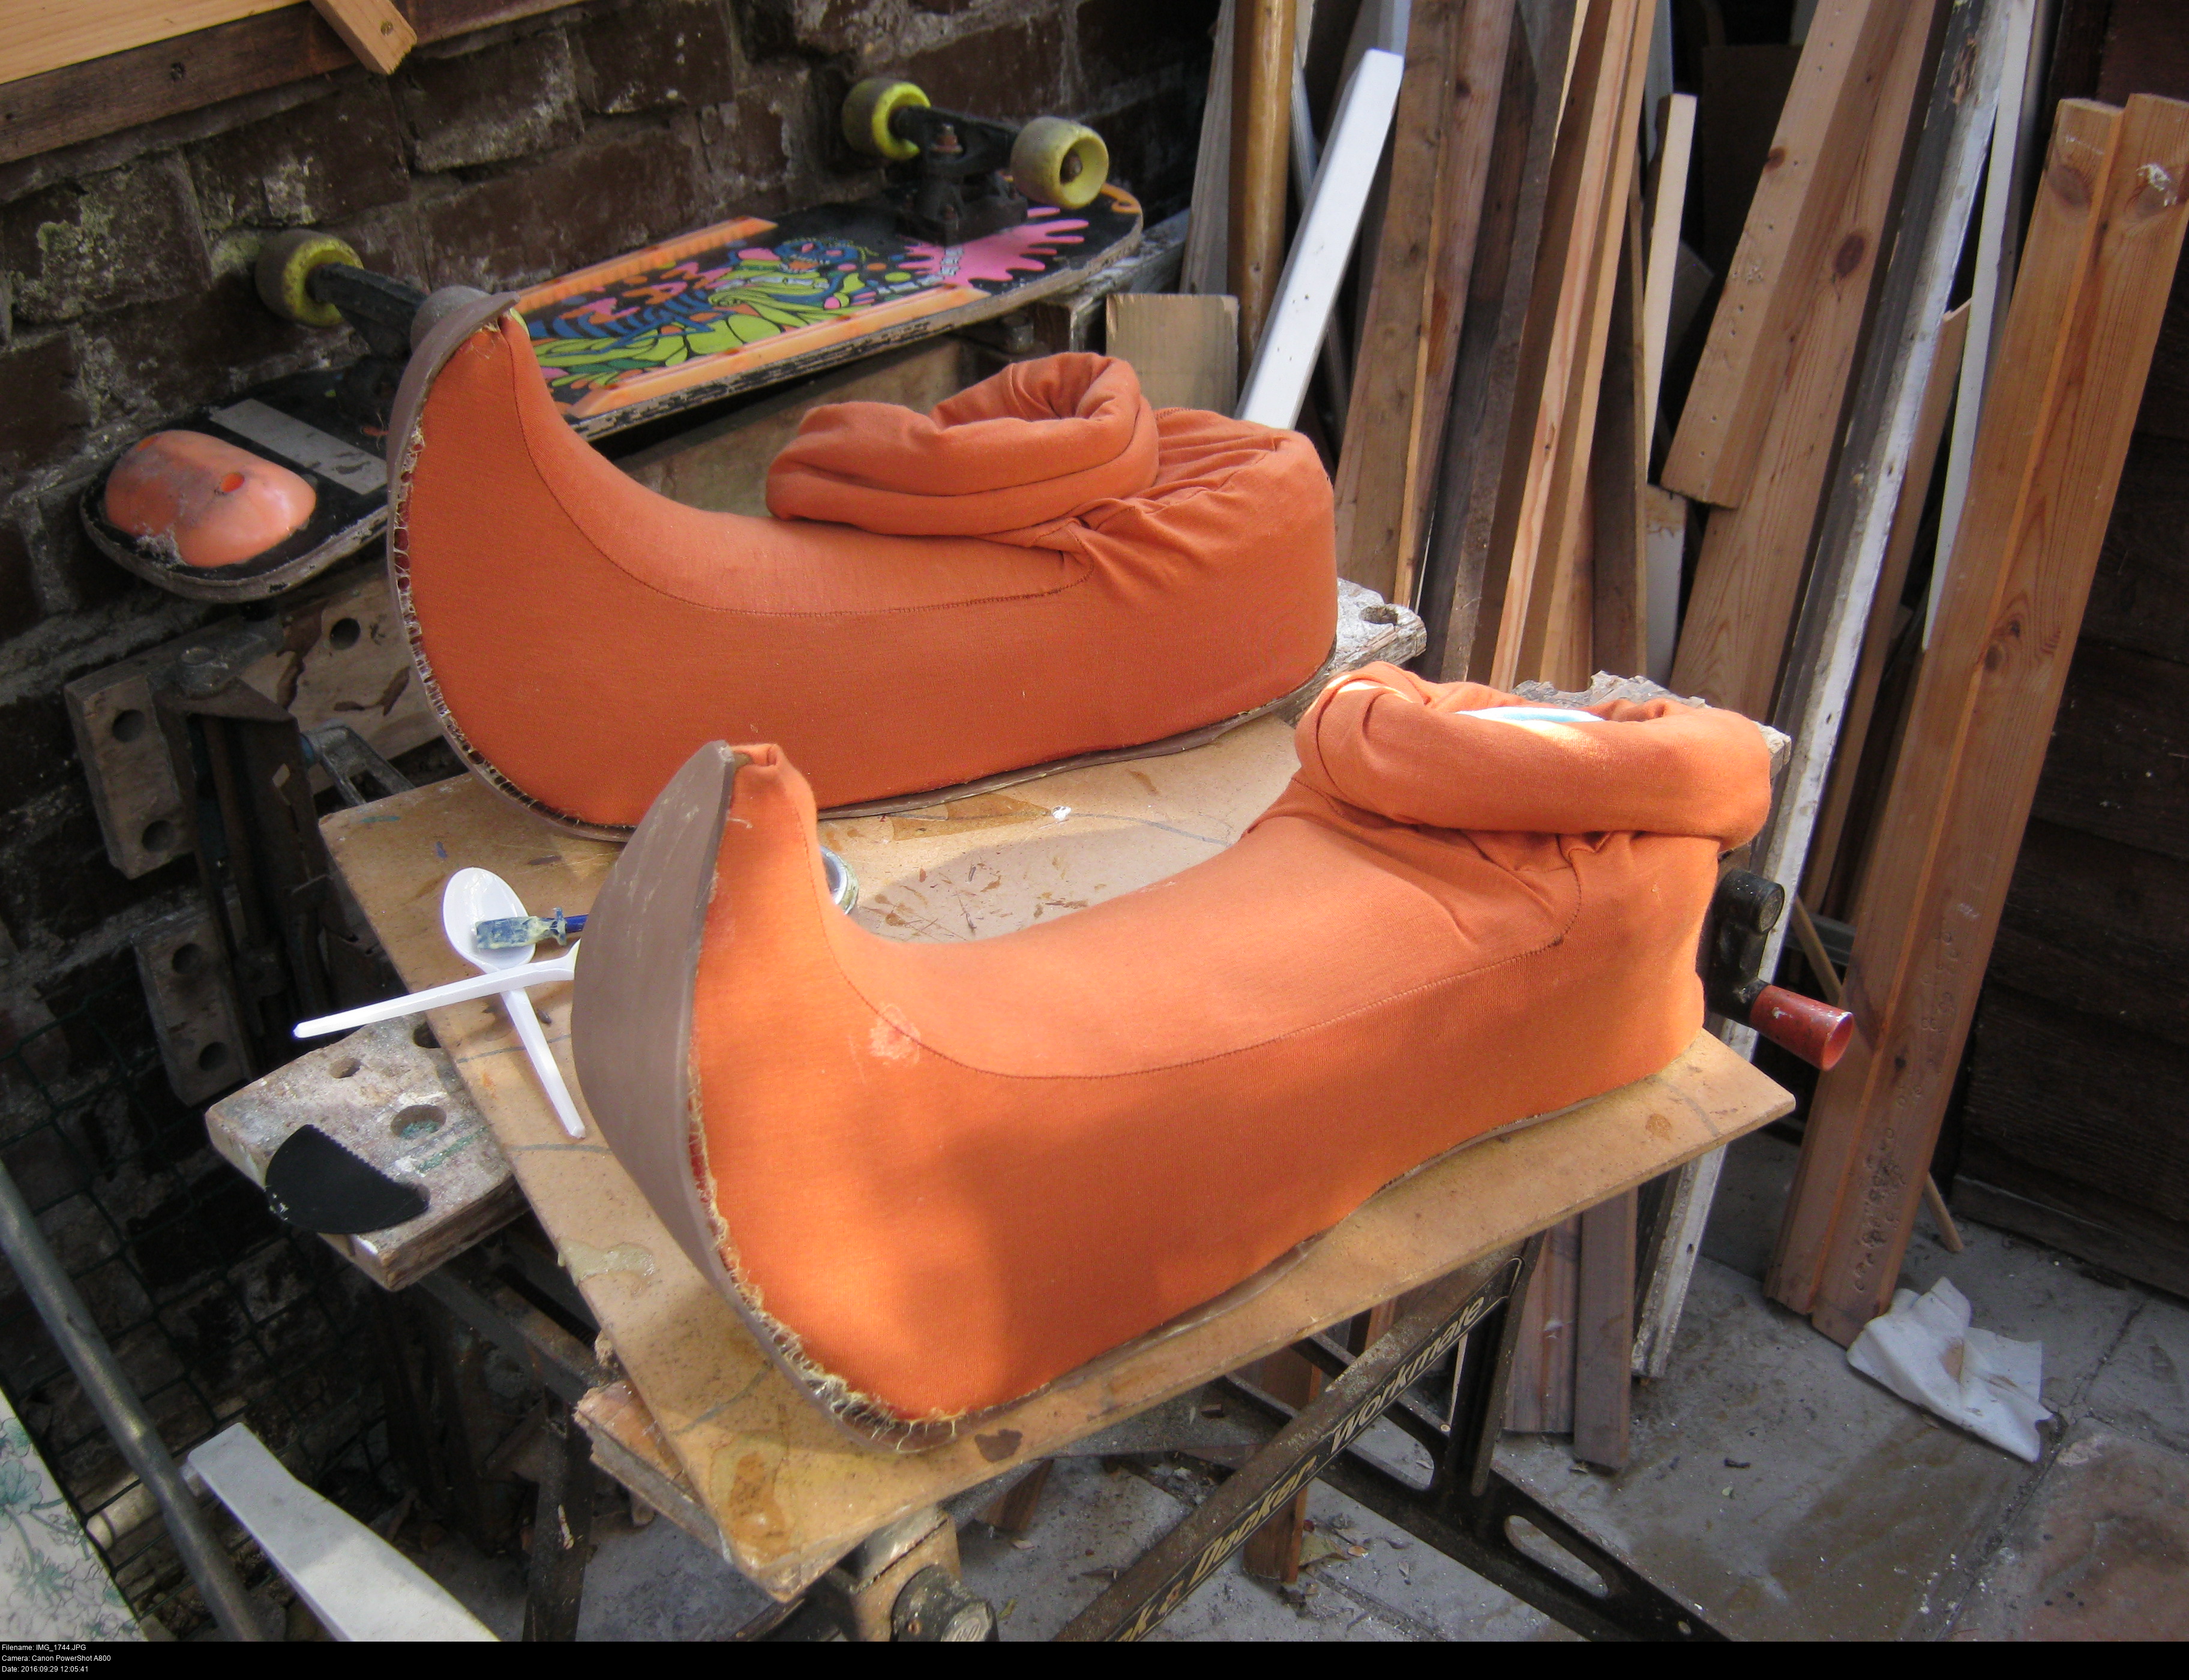
Skull Kid's shoe rings are strapped to the shoe in three places: across the bridge of the foot, around the back of the shoe and underneath. I've made a pair of removable shoe rings with brown elastic strips threaded through. I can pull the rings apart and stretch these onto the shoe to fit them in place.
These rings are the same rings that I used for the belt. That silky looking brown material is elastic I bought from eBay. 5/8"16mm ELASTIC STRETCH RIBBON NYLON Many COLORS selection QUALITY Wholesale. The decorative side is surprisingly fancy. Perfect for these shoes.
I just have to sew them into circles and put them onto the shoe. Or rather, thread them through the rings FIRST, and then put them on the shoe. If you sew them into circles first, you'll be left feeling like a goof holding your wooden ring and elastic ring without any clue how to combine the two.
Make sure to measure first, and also take into account how much your elastic stretches. It's good to have all three lines of elastic taut so that the rings don't move.
I don't sew the elastic or the rings to the shoe, hoping the elastic holds everything in place and the whole lot doesn't snap to pieces from walking. So far so good. (Future note: Five days of conventioning and they haven't died yet!)
Now I've made all the different parts of my Skull Kid costume, all that's left is to...


Try it on!
You can tell I haven't mangled the tabard or the gloves yet and the tunic needs a whole lot of adjusting, but those shoes are ROCKING.
I'm going to call those done! This was taken in March 2016, a few months before Skull Kid's first appearance at MCM Comic Con Manchester 2016 in July.
There's just a little problem with these guys.
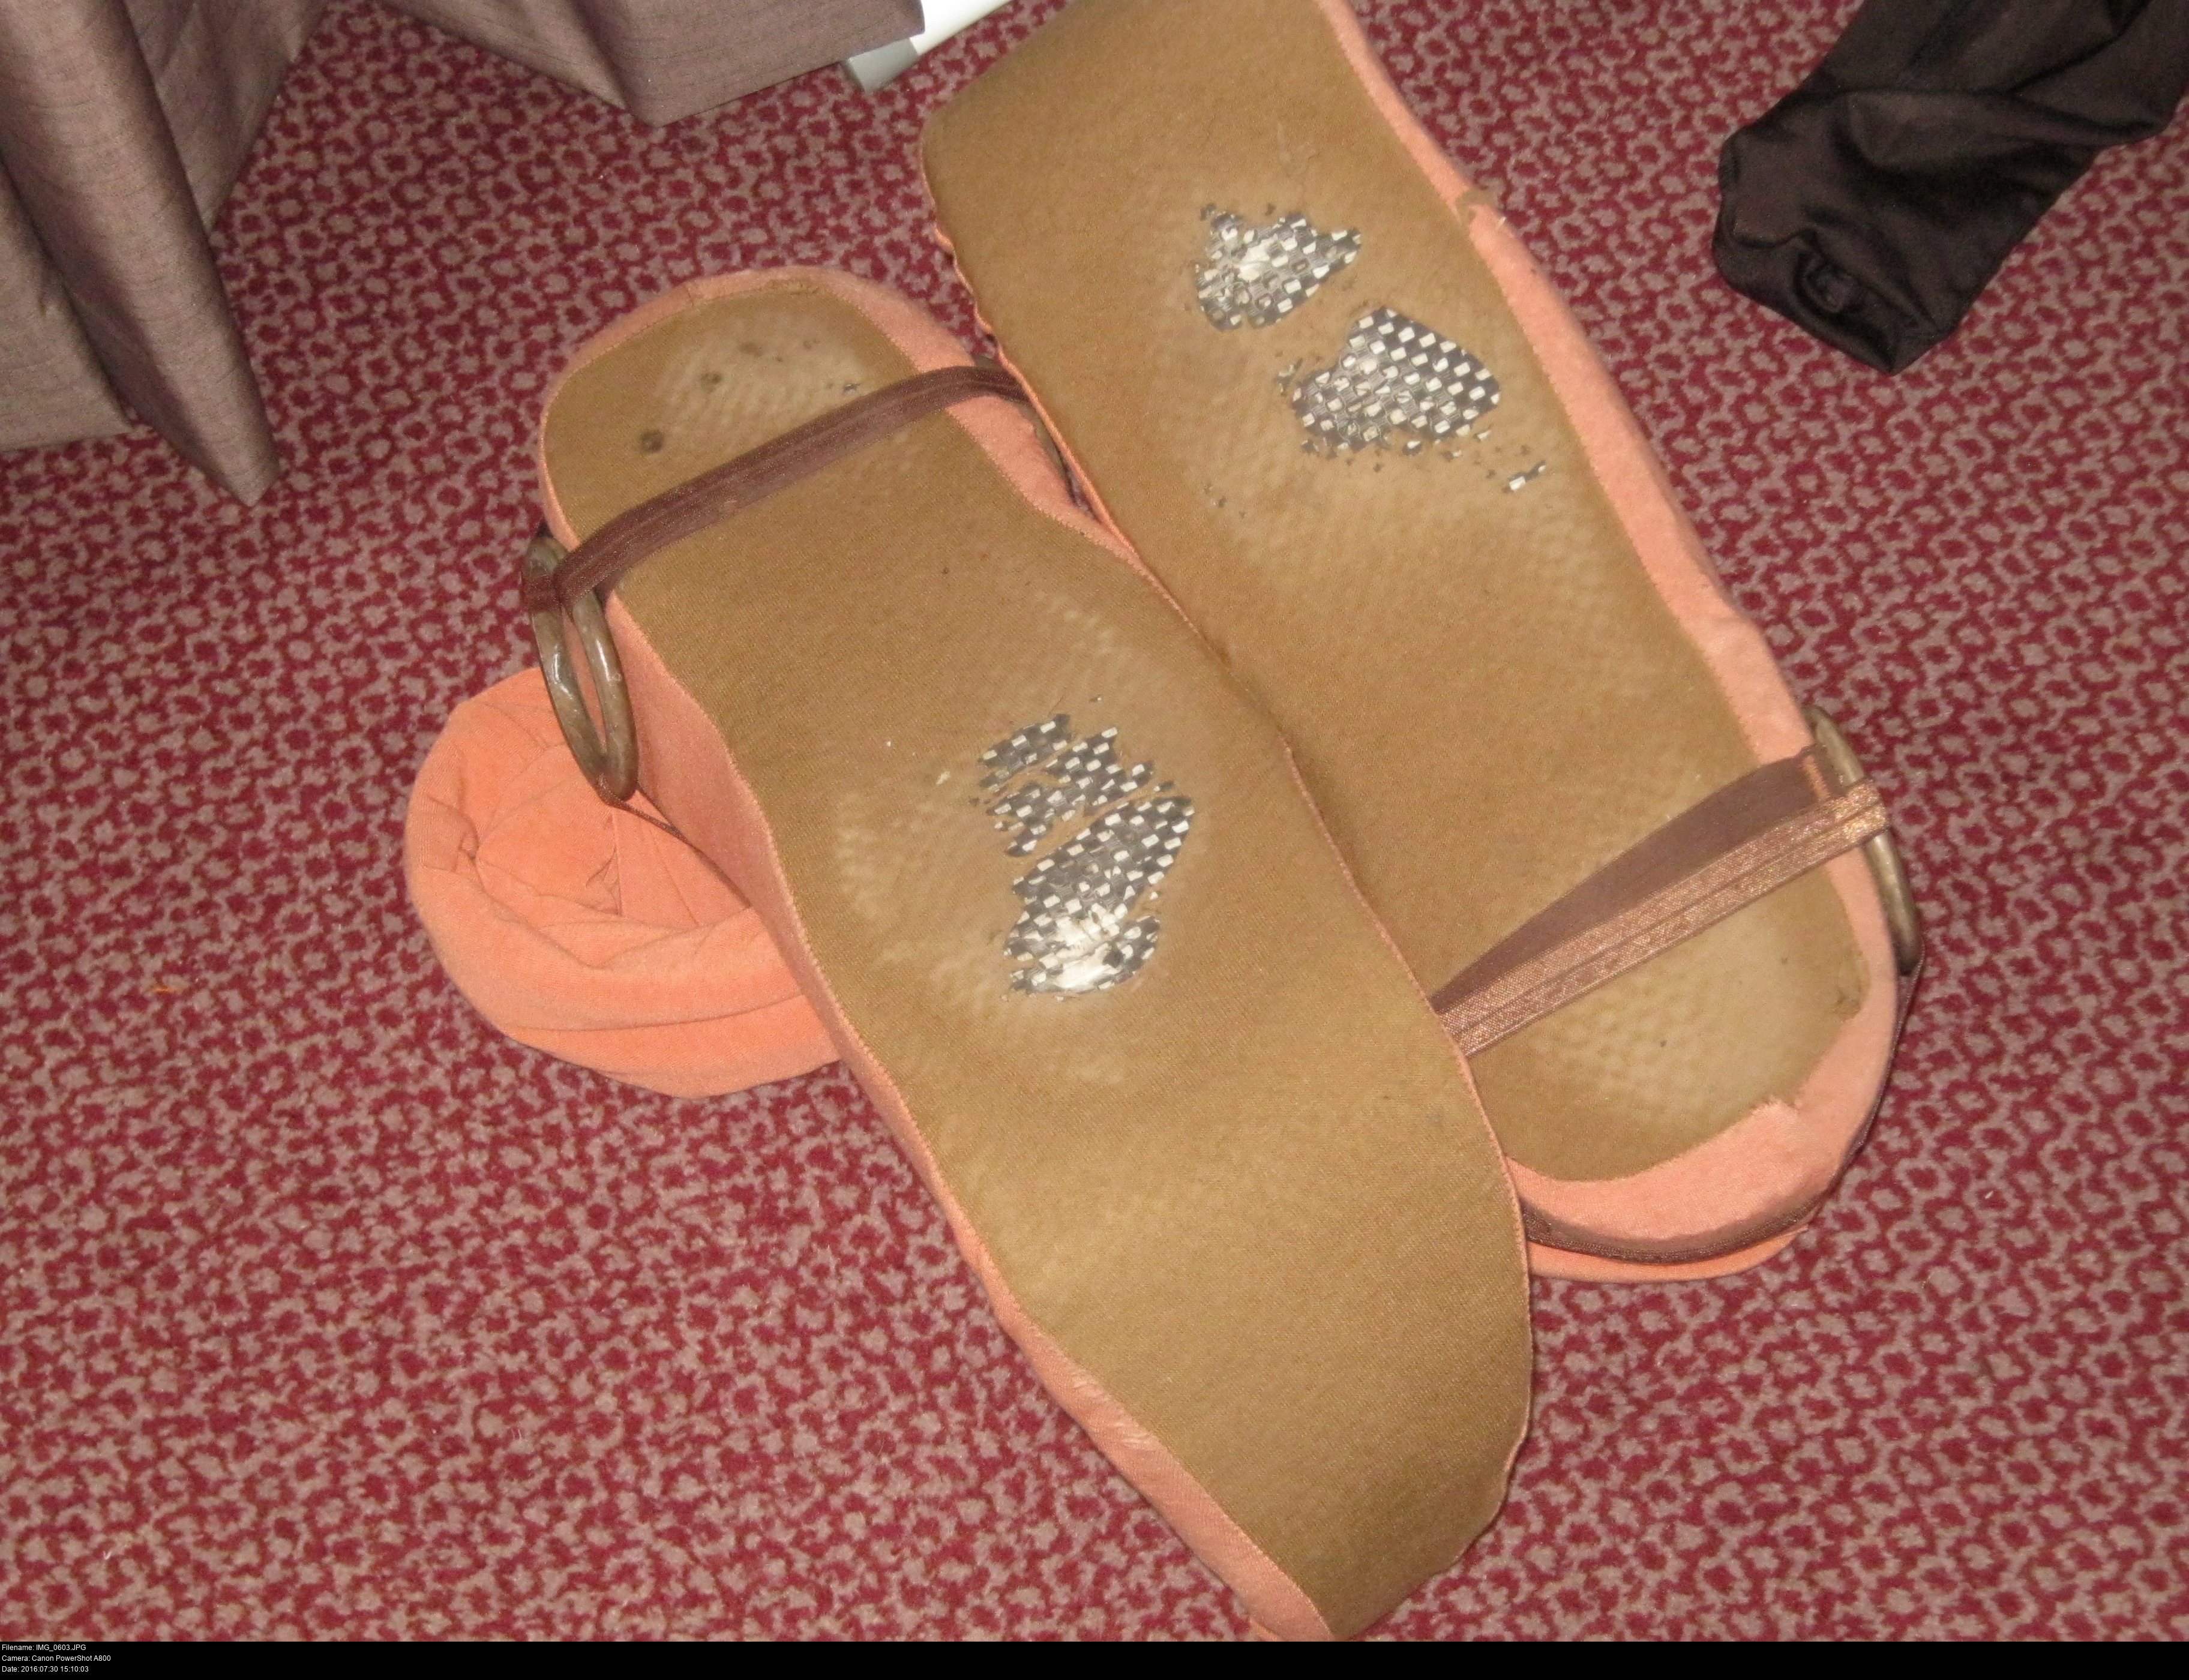

I'm walking on nothing but stretchy cotton fabric. My footsteps are enough to grind 'acid-proof' thick-soled work shoes into a fine paste, so these shoes weren't going to last a second. Since my hotel was very close to the convention centre, I decided to wear the shoes from the hotel to the venue which was a big mistake. Every time since, I've taken a second pair of spare pumps to wear instead, light enough to carry in my bag, until it's time to wear the full costume.
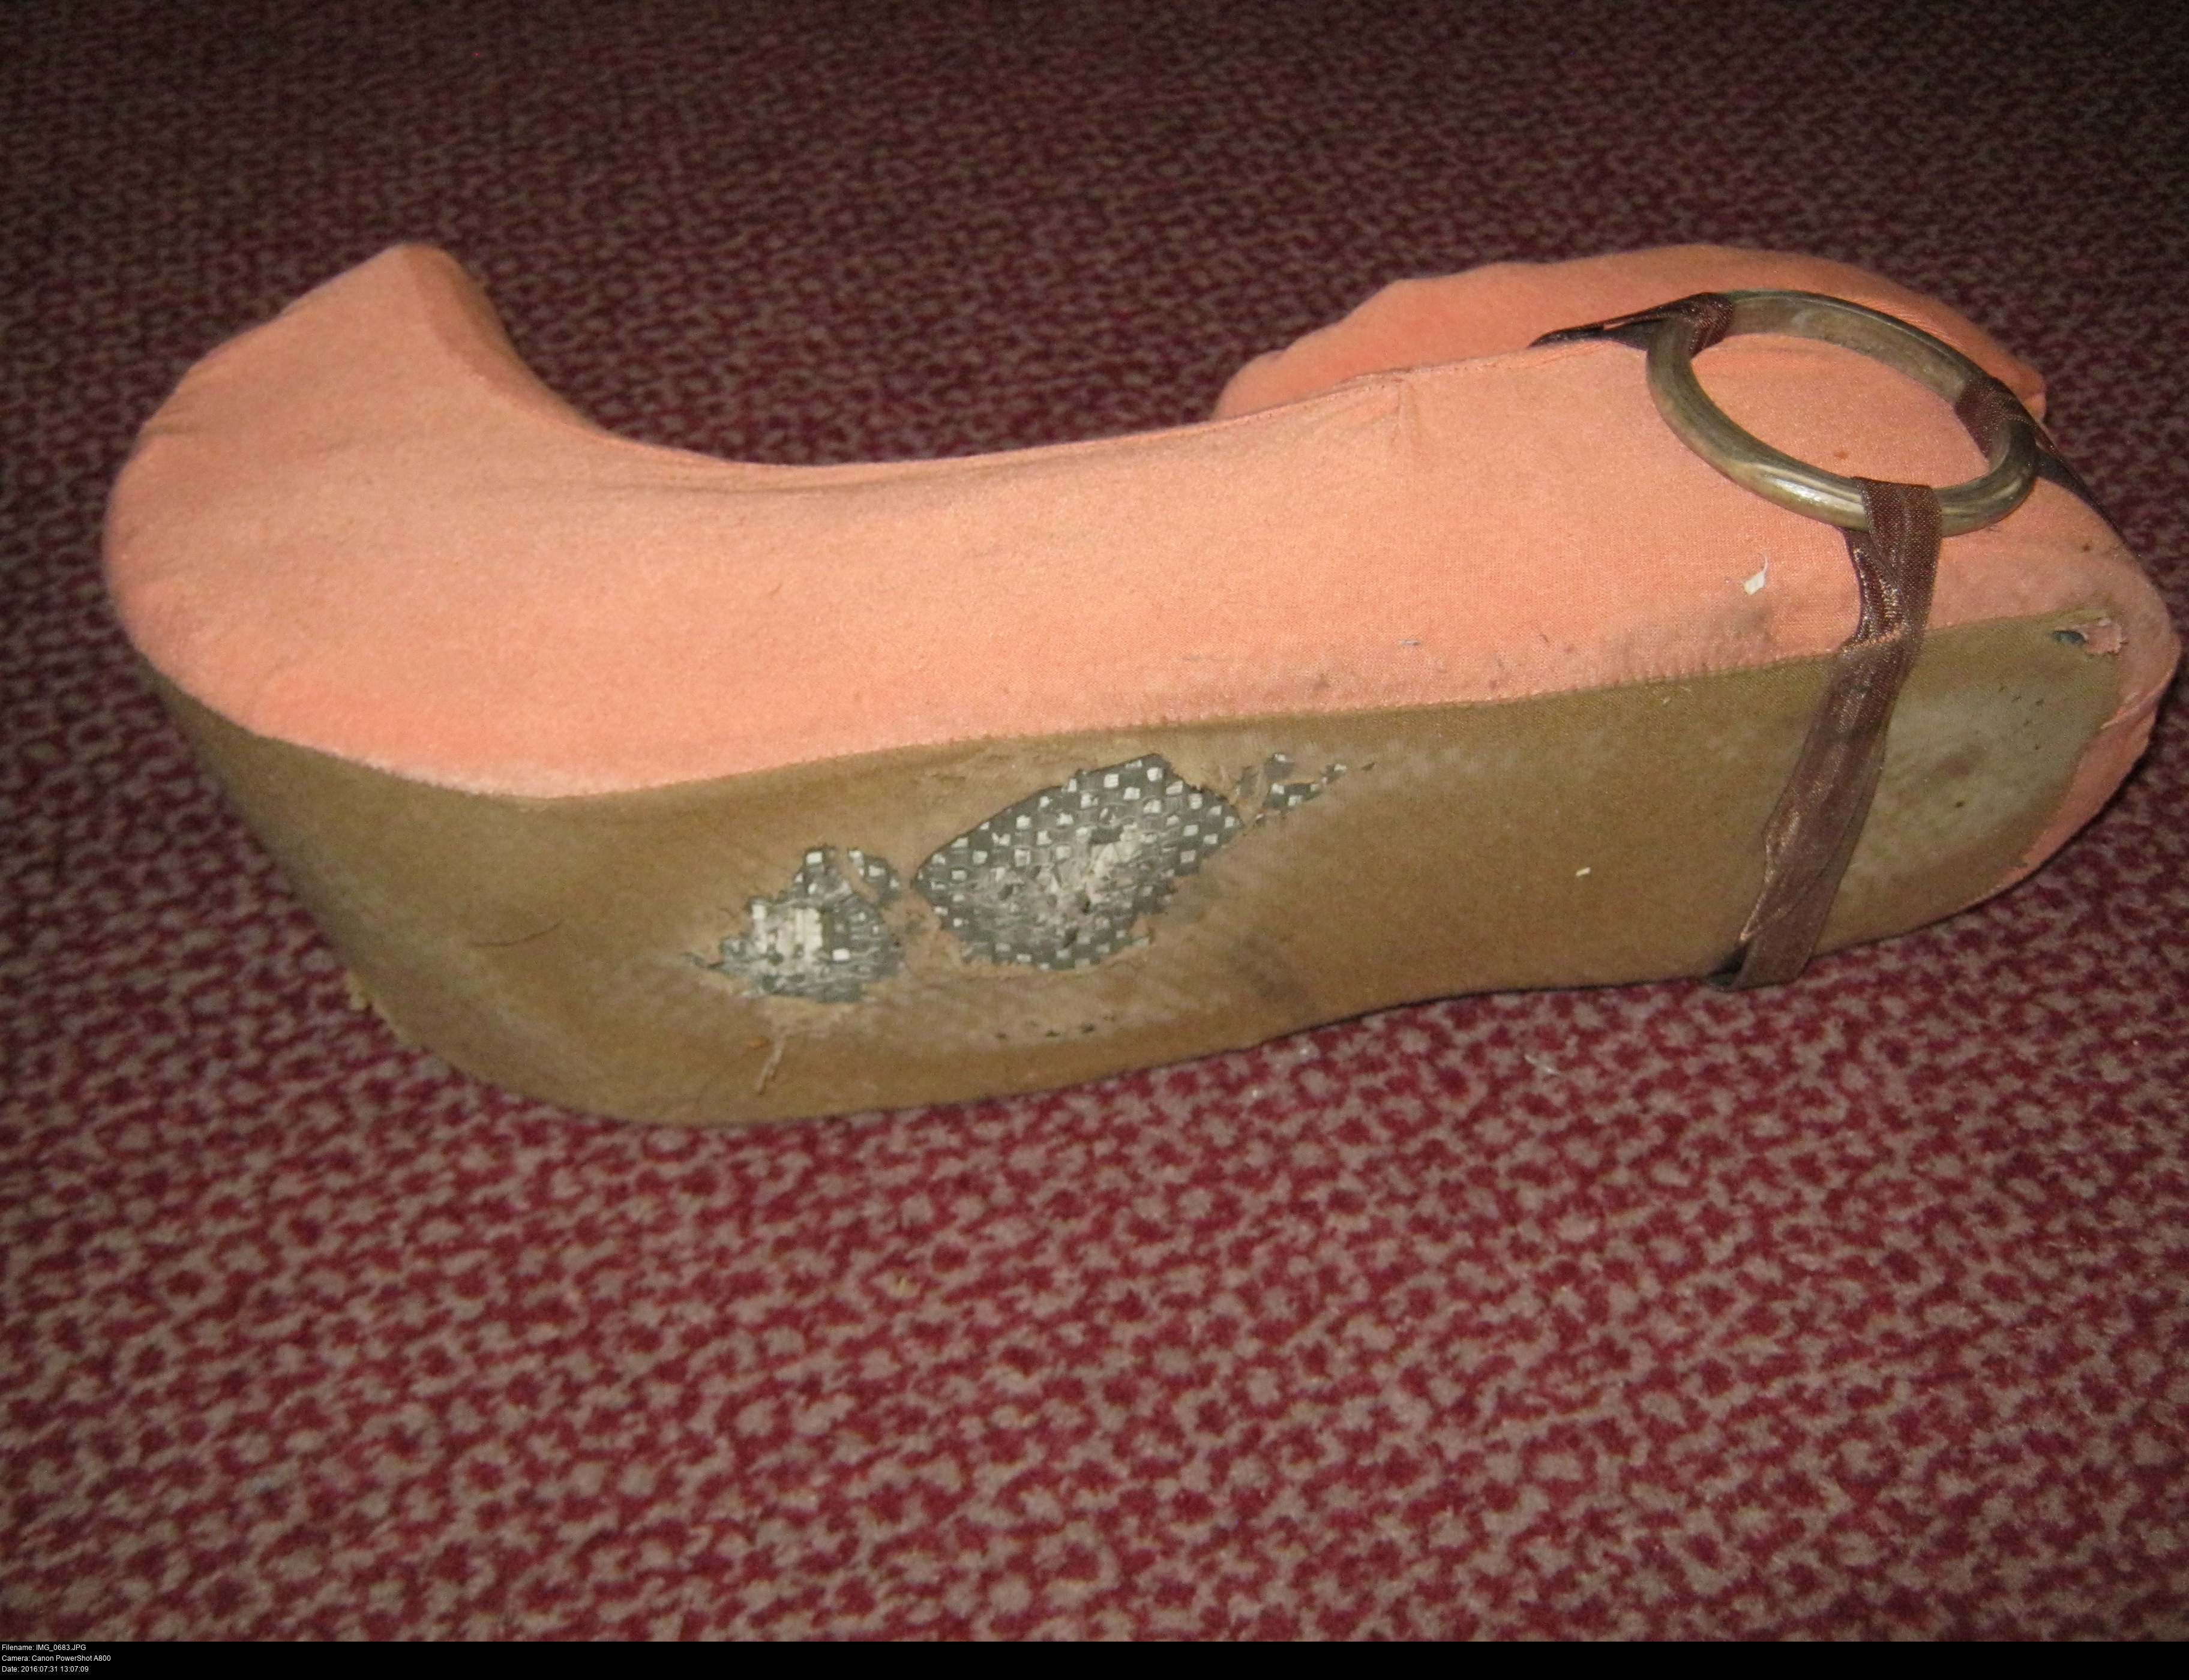
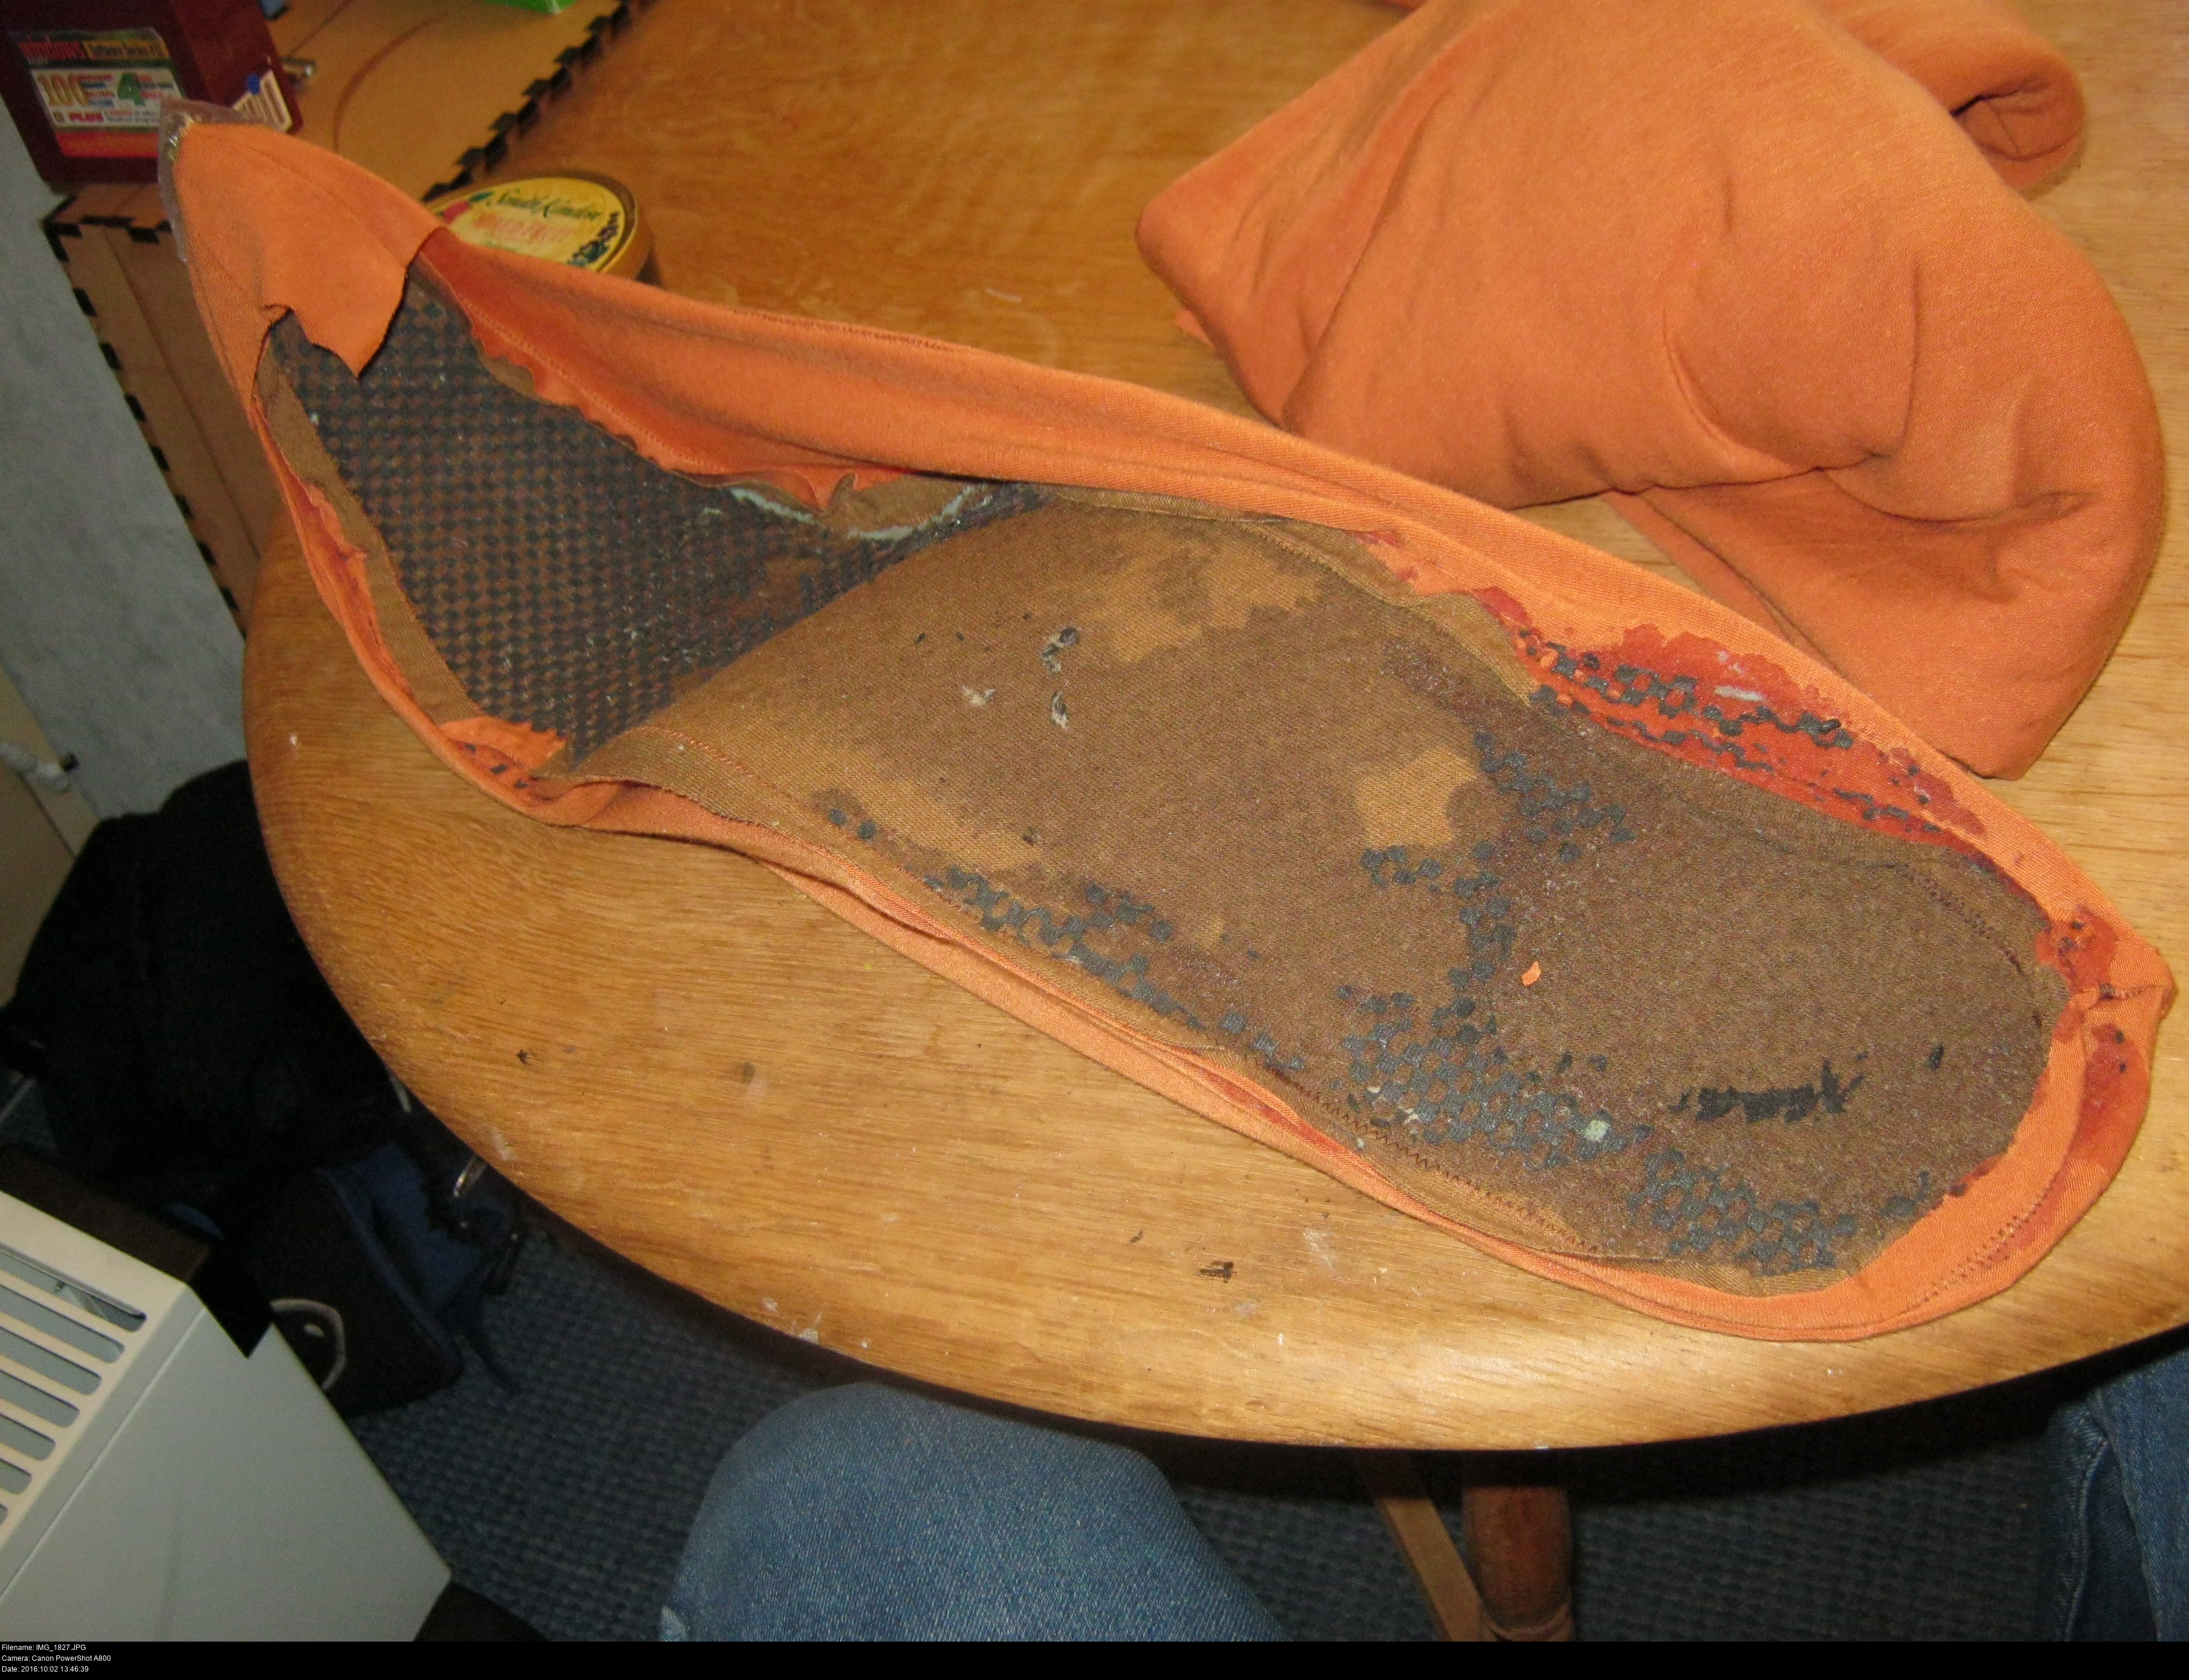
The first picture is the state of the shoes after the first day. The second and third are after the second day.
How am I going to get these guys back into full working order? I could pick apart the parts of the shoe which are still intact (which would be everything except the sole). I'm definitely keeping the rings, since there's nothing wrong with them.


If you're going to try to re-use parts of the shoe, you need to ensure that the fabric is a close match! I buy a lot of my fabric from the remnants floor of Abakhan Fabrics in Liverpool since it's the only fabric shop for a million miles that has a half-way decent selection. The dress fabrics floor barely has anything, but there's a fair amount of interesting stuff on the remnants floor. Unfortunately, it's all luck whether you find something useable or not, or similar or not.
Take the samples with you, because stuff looks a lot different under different light sources. If you're interested in that concept, look up colorimetry or metamerism!
In the end, I decided to just keep the cuff parts, since they were just a long strip of fabric. The rest of the shoe was a little damaged from wear in the street and didn't fancy putting it through the sewing machine. So it's time to redo the shoe!


I could stop here, but they'd just get mangled all over again. I need something that I can attach to the sole to cover the fabric and give it more strength. I did ask about sole materials, but I couldn't find much that was within my reach or price range. Shoe sole material seems to be as expensive as heck, and that's before shipping.
So, in the absence of any better idea, I decided to glue a big strip of EVA foam to the bottom of the shoe. EVA foam is a slightly rubbery lightweight tough foam used for props and all kinds of things. From here!


I used the Evostik again, a big goopy tin of the stuff, smothering it all over the place. I pressed the sole shape to the shoe as best I could, hoping to cut it away from the shoe once it'd dried.
Absolutely everything that could go wrong did go wrong.

The glue wasn't very even on the foam, it didn't stick to the fabric very well in places, especially on the curve. Certain parts were nice and snug with no glue splash. Other parts had the foam lifting up from the shoe, or with ugly green strings showing, or dark splats of glue showing on the material.
So how do we recover from this? Make them AGAIN.


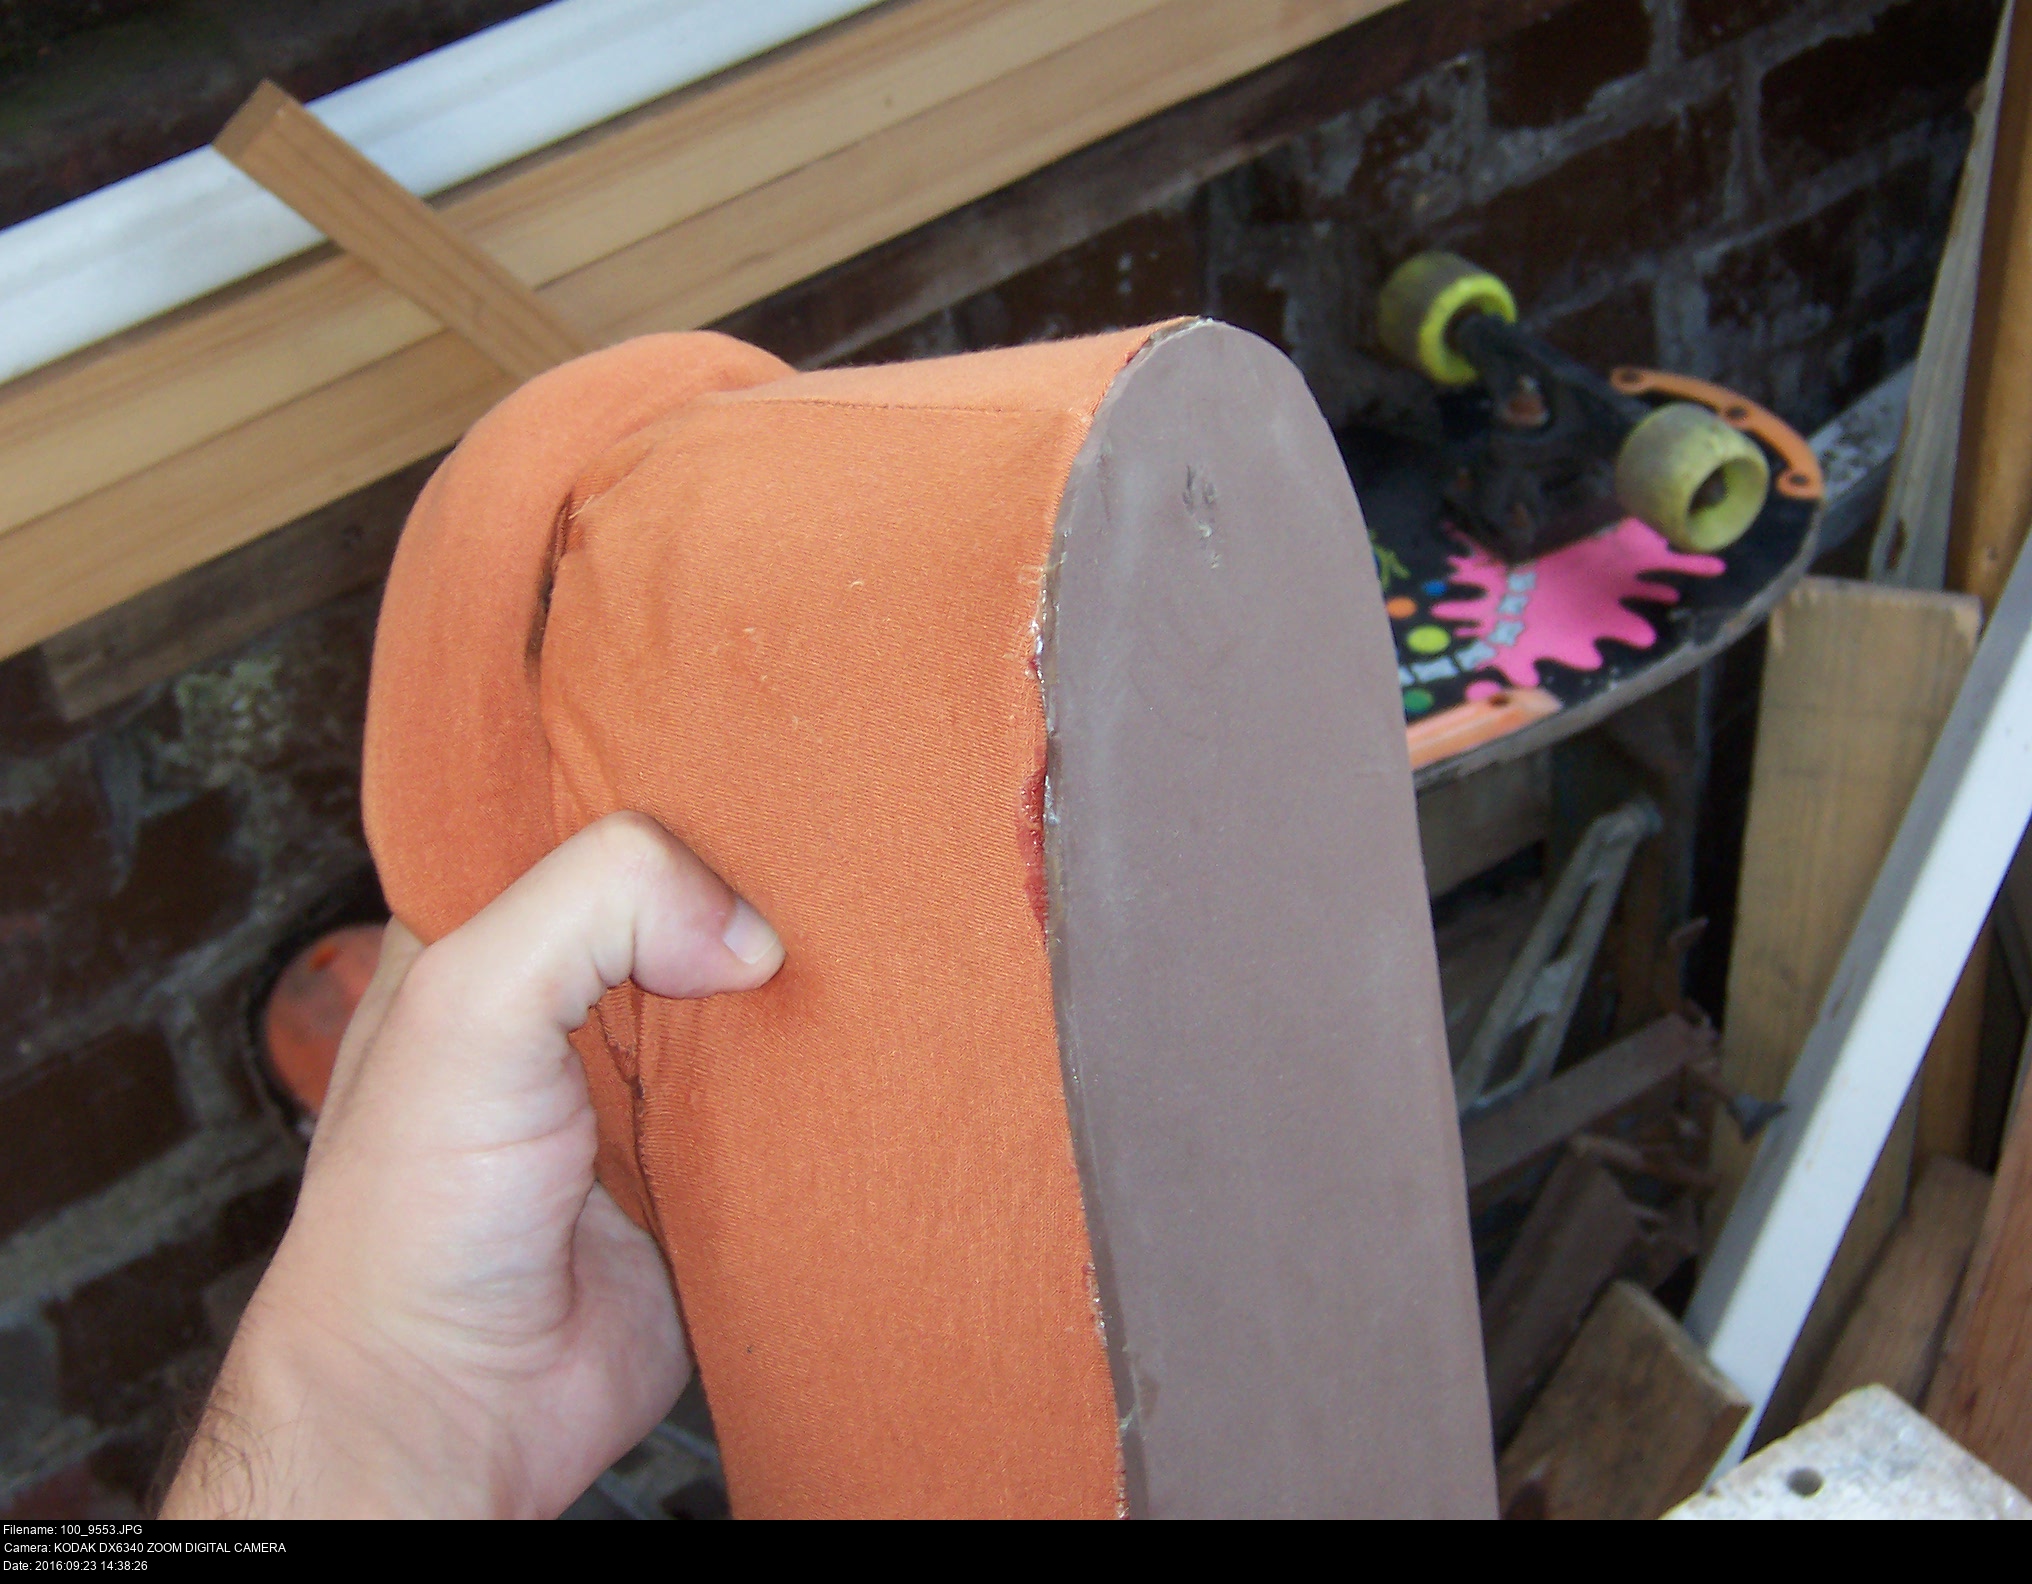
This is the fourth set of boot coverings I've made, counting the pleather ones. What's new this time? VINYL SOLES. More stuff from the remnants bin, though I've found you can get chocolate brown vinyl on a roll rather cheaply, which is perfect for this. And don't forget I had some of this stuff left over from the original pleather shoes, though I didn't reuse it directly. The loss of elasticity makes putting the covering onto the shoe slightly more difficult, but not impossible.
Look at 'em! They're beautiful, like two giant icebreakers effortlessly smashing through ice sheets of the world. A pair of giant middle fingers to all the times that I tried stuff that didn't work.
After a few more days of conventioning the vinyl is starting to crack a little, but since it's a composite material with several layers, it'll last a few more wears before I have to remake it.
And that's the story of shoes!
Written by Matt Carr! mrdictionary.net nonsense.
Questions? E-mail 'em to me, skullkid@mrdictionary.net!
Twitter @SkullKidUK - Facebook facebook.com/mask.smith.cosplay