Lemmings DS Builder
Mathew Carr
Let's Make a Level! - June 2007
When making a Lemmings DS level, there's a number of key things that you have to do:
After you've done all of that, you need to do two very important final things:
Planning your level out!
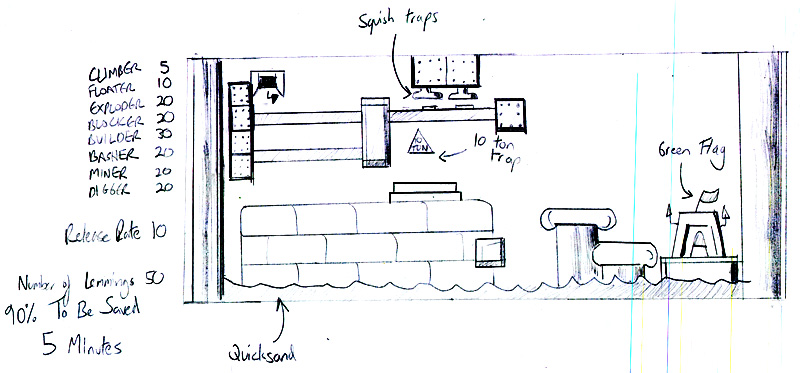
Planning is essential if you're to make a level that's going to work well! In this tutorial, I'm going to make the following level:
One possible solution: The Lemmings fall from the entrance in the upper left, and wander back and forth between the steel to the left and the large sandstone block to the right.
After two Lemmings have been released, turn the first into a digger and the second into a blocker. With the first Lemming, dig to the large stone block below the entrance. To avoid the 10 Ton trap, the Lemming must mine underneath it, and bash to the right. The Lemming will then arrive at the shelf to the right of the large block and should build a path to the exit. Once the path is ready, the first Lemming can be exploded.
A possible 100% solution would be to try and trap the Lemmings in a pit created in the lower stone block instead of using a Blocker.
Let's go!
What level pieces are going to be used to create this level?
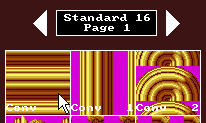
Lemmings DS Builder comes with texture archives containing all of the textures from the original Lemmings and Oh No! More Lemmings games. My level is designed to use the standard 'Pillar' set from Lemmings.
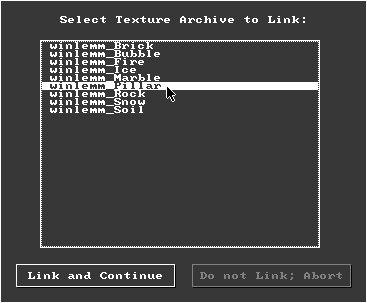
To link a texture archive to your level, start Lemmings DS Builder (or click 'New Level' if Lemmings DS Builder is already open) to activate the 'Select Texture Archive to Link:' dialog, and select the texture archive to wish to link. I'll be using winlemm_Pillar.LTA.
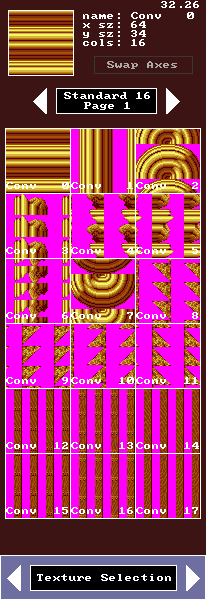
After you specify the texture archive to link to, you'll see the pieces listed in the Standard 16 category in the Texture Selection page of the RIGHT pane.
How do I import my own custom level pieces?
Firstly, you need to have your level pieces ready. Lemmings DS Builder will only accept 16 or 256 colour BMP files.
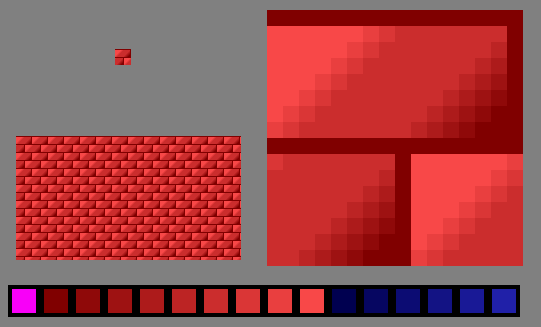
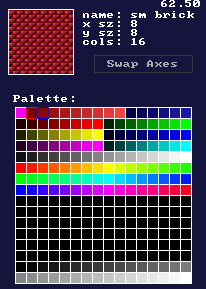
Here's the piece that I'm going to import for this example. In the top left is the piece by itself, below that is what the piece looks like looped. On the right is a zoomed in example of the piece, and across the bottom is the piece's palette. Notice that I've marked out colour 0 as the transparent colour, even though this piece does not have any transparent areas.
To import this piece together with its palette, hold right mouse button and left click on the Import 16 Img button on the UPPER panel.
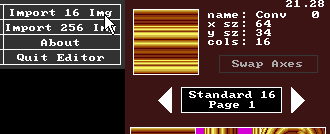
After that, you'll be prompted to specify the location of the BMP file. After the file has loaded, you'll be asked which line of the palette you want to replace with the palette from this piece.
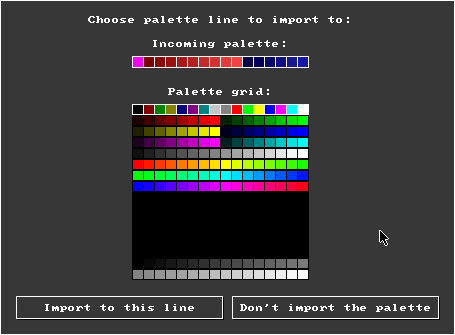
For this example, let's replace the first line of the palette.
Head to the Palette Editor page to check that this palette has successfully been imported.
Remember that you don't have to import the palette if you don't want to. Many piece sets are designed so that you can use the same palette (and usually the same mapping) for multiple pieces.
Go back to the Texture Selection page and select the Custom 16 page. Lets see if our new piece is in the database.
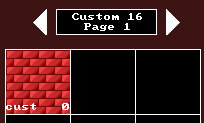
There it is!
Click on it with the left mouse button to put it as the ready texture. Now, we're ready to draw some scenery!
How do I build scenery?
Building a level with Lemmings DS Builder is easy. First, you have to choose what texture you want to make new level texture objects with.
Then, go to the Palette Mapper page to configure what colours you want to use: The Palette grid at the bottom shows all of the available colours. The Mapping grid at the top shows what set of colours have been chosen to draw the current texture.
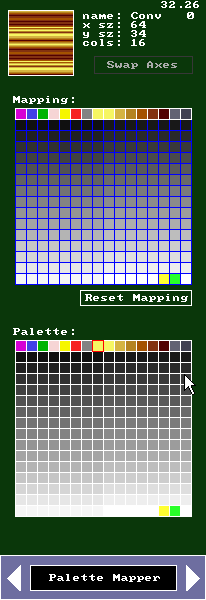
Then, click New Cur Texture on the LOWER panel.

After that, drag out a box on the LEVEL pane.

To make complex levels, you'll need to use multiple textures with different palette mappings. You can control the ordering of texture objects using the Push Backwards and Pull Forwards tools. Remember to pay attention to the Scroll indicator on the UPPER panel unless you want your level to appear off-centre on the map preview. If you find that your level is off-centre, right click on the Select Texture button to select all of the textures so you can move them all together.
Practice makes perfect when using the level texture object tools, so stick at it. Remember you can copy the style of an existing object to ready using Grab Texture after selecting it, and copy the style back from ready using Apply Texture. You can manipulate the order of objects using the Pull Backwards and Push Forwards tools: don't worry about being messy, just cover it up and make it look neat!
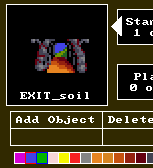
How do I place special objects?
Hold on a sec! First, you need to decide what special objects you're going to use in the level.
Any one level can have ONE Genus of exit, ONE Genus of entrance, SIXTEEN genera of Trap (objects that are triggered by Lemmings standing on a hot-spot, killing them instantly), EIGHT genera of Hazard (objects that instantly incinerate any Lemmings within their reach), TWENTY-SIX genera of Uninteractive (objects which do not affect the Lemmings, and cannot be walked on), and ONE genus of water.
A 'genus' of objects all act the same, and use the same palette. Different genera can be of the same type, but use different palettes if necessary.
How do I pick what special objects I want to use?
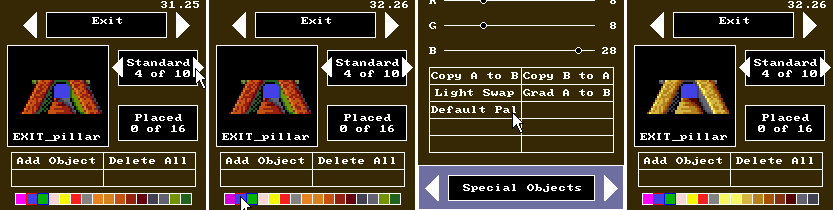
Head to the Special Objects tab.
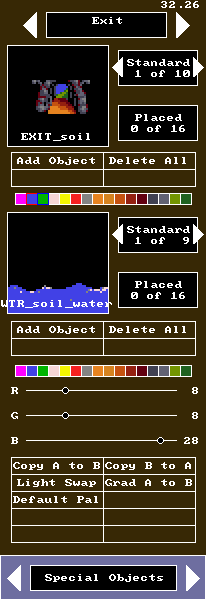
Use the arrows next to the 'Exit' caption to switch between Exits, Entrances, Traps, Hazards and Uninteractives. Use the top set of arrows to the right of the object preview to change the type for the current genus of object. (There is only one genus of exit, however.)
Notice that the palettes for all of the exits except the first appear to be incorrect. This is because you're only changing the type of the current genus of the current special object. If you want to retrieve the default palette for the special object you're using, you need to click on the palette beneath the object preview and click Default Pal.
Let's pick the correct exit for the original Lemmings Pillar theme we're using: use the arrows and pick the exit with the caption 'EXIT_pillar'. It's preview will appear in a dull orange colour. Click any one of the colours in its palette, then Default Pal.
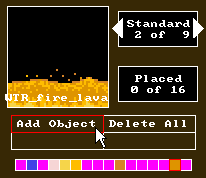
To place special objects into the level, click Add Object, and then click (and hold) the left mouse button within the level where you would like the special object to appear.
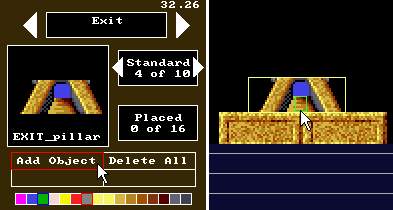
Selected special objects are surrounded by a flashing yellow rectangle. A smaller green rectangle indicates the area within which the 'hotspot' of a Lemming must be for this special object to work. (A Lemming's hot-spot is the pixel on the Lemming's feet directly beneath the rearmost pixel of his robe if he's walking, and the lowest, rearmost pixel of the Lemming's robe if he's falling.)
Repeat these steps to select 'ENT_pillar' as the entrance type, restore its default palette, and place it within the level:
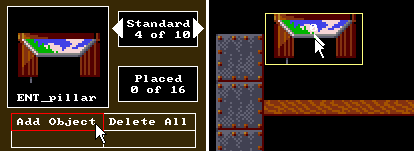
While the entrance is selected, you can flip it to the correct direction (it doesn't matter, but we should stick to the plan) using the Flip Selected tool.
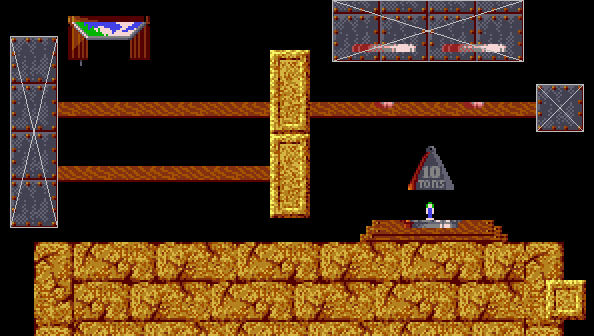
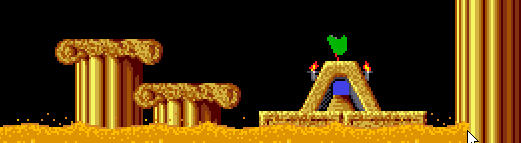
The exit doesn't look quite right... In fact, it's half missing! This is because Lemmings' default exits from Lemmings are designed to be in two pieces: a mostly static 'Exit' half which the Lemmings can use to exit the level, and an 'Uninteractive' part containing a special animation. We need to find this Uninteractive half and place it just above the Exit object we just placed.
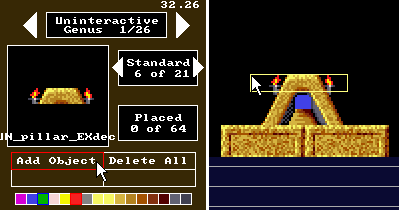
Use the arrows at the top of the Special Object tab to switch to 'Uninteractive Genus 1 / 26'. This is the first of the twenty-six available Uninteractive genera: you can define 26 distinct genera of Uninteractive, each with their own palette, and place up to a total of 64 Uninteractives of any genus on the level. We're going to define the first of these genera to be the flames that appear on top of the standard Pillar exit.
While 'Uninteractive Genus 1 / 26' is shown, use the arrows to the right of the preview to select 'UN_pillar_EXdec' (Uninteractive Pillar Exit Decoration) as the graphic to use. Use Default Pal to restore its default golden palette. Use Add Object and carefully place it on top of the exit.
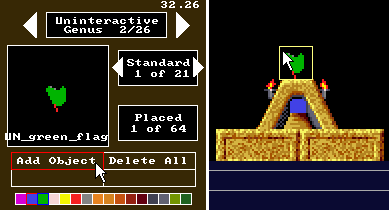
Switch to 'Uninteractive Genus 2 / 26', and you can define another Uninteractive genus to place in the level. I'm going to place a green flag ('UN_green_flag') above the exit.
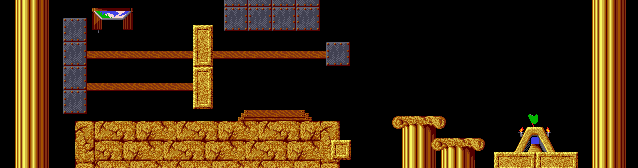
The level is now playable! You could copy this level into Lemmings DS right now and play it! You might run out of a certain tool, though... plus the steel won't be indestructable, the traps will be missing and the level targets will be all messed up. You can download the level as it stands here.
How do I set up and place traps?
You can set up and place traps just like any other special object. First, you need to a set up the genera for the traps you're going to place. From the plan, you can see there are two genera we need to set up: The 'squish traps' and the '10 ton trap'. For the 'squish trap', I'm going to use the 'T_marble_squish' 'squish trap' from the original Lemmings Marble style.
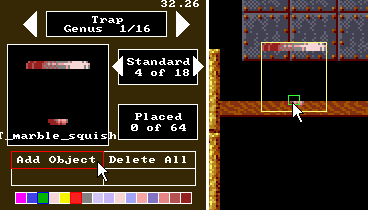
You need to be particularly mindful of the green area when placing traps. Remember, the Lemming's hot-spot must be within this area for the trap to activate. Also notice that the trap appears in front of the steel. If you want the traps to appear behind the level scenery, you will need to select them and click Push Backwards to force them back. It's a good idea to leave the traps in the foreground until you've finished editing the level, else you may forget where you placed them. (If they're hidden from the player, they'll also be hidden from you in Lemmings DS Builder!) If you do happen to lose a trap behind level scenery, right click Select Spec. Obj. to select all the special objects in a level, and showing their yellow rectangles.
Notice that the 'squish trap's' default palette is a pink colour scheme based on that of the Pillar style. If you want these traps to match the Pillar style, you'll have to manually alter the colours of this genus of trap using the palette tools. Remember that the first four colours of most traps are transparent magenta, Lemming robe blue, Lemming hair green, and Lemming body pink. If you change these colours, your Lemmings will appear funny colours if they tread on your traps.
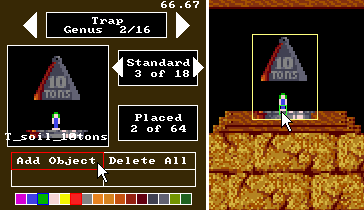
We'll need to use another Trap genus to set up the '10 ton trap' ('T_soil_10tons').
How do I set up steel and one way areas?
Setting up steel and one way areas is a snap. It's just like placing level texture objects.
First, let's switch to the Area Setup page. Click the Tex/Area button on the LOWER panel.

The tools on the LOWER panel should change into the Area Setup tools.
Areas are only visible or editable on when the LOWER panel is set to Area Setup. Areas appear as grey (for steel) or green (for oneway) rectangles with an X across their length.
To make a new steel or one way area, click on the New Steel Area or New Oneway Area buttons on the LOWER panel.
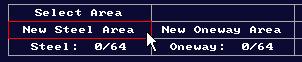
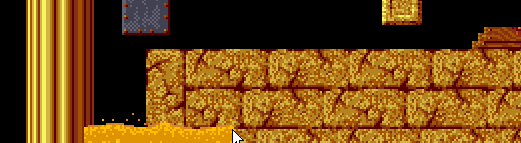
The way areas work in Lemmings DS is very simple: any piece of tangible scenery that is inside an area will be affected by that area. If you made a steel area that surrounded a single brick, that one brick would be indestructible. If you made one that surrounded the entire level, the entire level would be indestructible.
One way areas are special in that they can only be damaged by Lemmings if they're facing the correct direction. The direction that Lemmings must face to alter one way areas is shown by a green arrow in the middle of the area bounds.
Steel areas must be specified manually in the editor: Just because you've chosen a texture that looks like steel, it doesn't automatically become indestructible.
As you can see, you don't need to use a seperate steel area for each individual plate of steel. (Although you could if you so wished.)
If we had any one way areas, we could make them now using the same method.
How do I set up water?
Water acts like a mixture between setting a texture and a special object: to place water you need to use the Special Objects tab, pick what type of water you will use in the level, and then click Water Add Object button, but you also need to drag out the length of the water as you would a texture.
Notice that there is no default 'quicksand' type of water. I'm going to use the 'lava' from the Fire theme ('WTR_fire_lava') and recolour it to look like quicksand.
Water is selected as a special object, but scaled as a texture. Water, when selected, has a green rectangle showing the active zone, and can be pushed behind or in front of scenery.
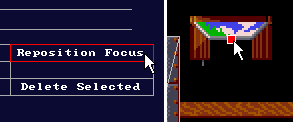
How do I reposition the camera focus?
While the LOWER panel is set to Area Setup, scroll around and look for a small red box. That's the initial camera focus for this level. When the level begins, the camera will automatically be moved so that this point is in the centre of the screen.
To move it, click Reposition Focus on the LOWER panel while in Area Setup, and click and drag as if you were placing a special object.
It's not visible ingame, let's position it over the entrance.
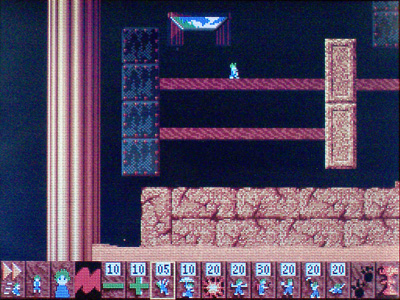
How do I allocate the number of Lemming tools?
Hold the left or right mouse button on the Lemming tool icons in the LOWER panel to increase or decrease how many of each tool the player is allowed to use.
![]()
If you increase the number of a tool to above 99, then it will change into an infinity symbol; this allows the player unlimited uses of this tool.
![]()
How do I set the level information?
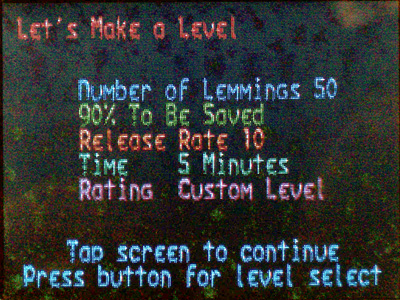
Click on the Level Info button on the UPPER panel to display the Level Information dialog. Simply type in the level name and the values that you want to use. Remember that 'To Be Saved' is the number of Lemmings, not a percentage. To give the player unlimited time in which to complete a level, type 0 as the number of minutes.
![]()
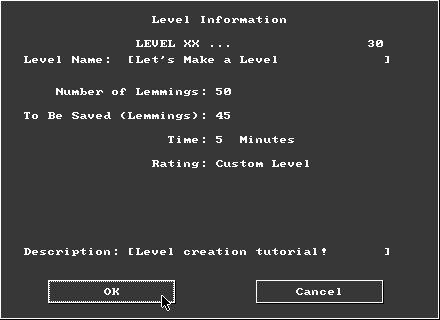
Feel free to give your level any Rating you wish. This will not affect its ordering in the level list, nor the set in which it will appear.
We're done! Now save! You can download the finished level from here.
How do I play my level in Lemmings DS?
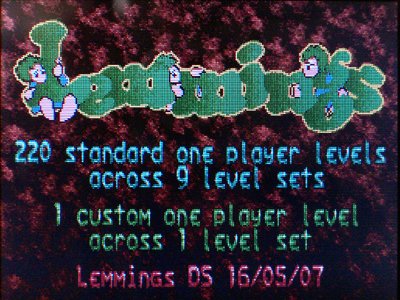
To add a level to Lemmings DS, you need to copy it to a specific location in the LemmingsDS directory on your flash media. Within /LemmingsDS/levels/1player/ there are two directories: 'standard' and 'custom' representing the Standard and Custom level categories respectively. Each directory within these two holds a single Level Set. To create a new Level Set, create a new directory within the relevant category with the name of your new Level Set. So, to create a new Custom Level Set called Tutorial, all we need to is create a directory in /LemmingsDS/levels/1player/custom/ called Tutorial. To add levels to this Level Set, copy in the .lds level files. The next time you start Lemmings DS, any new Level Sets and Levels will be detected and the totals of each will be shown on the top title screen.
What order will the levels appear in the list?
Lemmings DS sorts the Level Sets by name within each category, and the levels by filename within each Level Set. If you want to have your levels displayed in a specific order, you will need to include the level number in the filename.
For example: If I had a series of four levels in a small Level Set named 'Level Set Gold', I could give them the following filenames:
| Level Number | Level Filename | Full Level Path | Level Name |
| 1 | v07_01_MATT_-_Level_Set_Gold_-_first_times_a_charm.lds | /LemmingsDS/levels/custom/Level Set Gold/v07_01_MATT_-_Level_Set_Gold_-_first_times_a_charm.lds | First Time's a Charm |
| 2 | v07_02_MATT_-_Level_Set_Gold_-_second_chance.lds | /LemmingsDS/levels/custom/Level Set Gold/v07_02_MATT_-_Level_Set_Gold_-_second_chance.lds | Second Chance |
| 3 | v07_03_MATT_-_Level_Set_Gold_-_third_try.lds | /LemmingsDS/levels/custom/Level Set Gold/v07_03_MATT_-_Level_Set_Gold_-_third_try.lds | Third Try |
| 4 | v07_04_MATT_-_Level_Set_Gold_-_to_go_forth.lds | /LemmingsDS/levels/custom/Level Set Gold/v07_04_MATT_-_Level_Set_Gold_-_to_go_forth.lds | To Go Forth |
 |
 |
||||
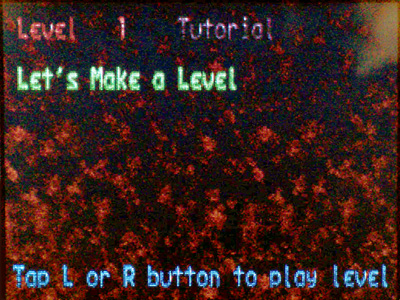
| Turn on your DS, and it should happily report that the new level has been detected. | It should appear in the custom level list, so give it a shot! | ||||
 |
 |
 |
|||
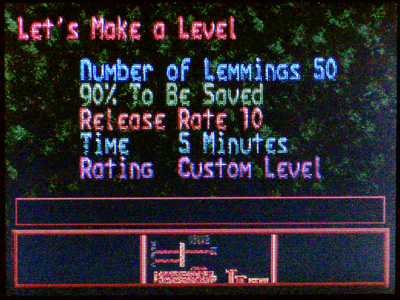
| Lemmings DS Builder automatically creates a preview version of the level and stores it in the .lds file. | You can see the information we entered shown in the level description on the bottom screen. | Let's go! | |||